
Velocity Variation for Vivid Visual Slideshows

Velocity Variation for Vivid Visual Slideshows
Increasing or decreasing the playback speed of a video is pretty simple in Microsoft PowerPoint as long as you follow the correct process. If you are using the 2016 or later version of the app, you are required to enable the Developer tab that allows you to add customized instances of Windows Media Player, and modify the speed rate of the clips from there.
When several instances of Windows Media Player are added, the speed of each instance can be configured individually to play a separate video clip. This approach could be helpful to make the entire PowerPoint presentation more dynamic and lucrative that further keeps the audience engaged throughout the session.
In this article
01 Change PowerPoint Video Playback Speed to Speed Up Video
02 Change the Speed of a PowerPoint Animation
03 FAQs About Change PPT Speed
Why Not Customize the Video Speed Before Adding it to PowerPoint? Try This!
Filmora Video Speed Changer offers video speed-changing templates to automatically reset the video speed. Of course, you can manually slow down the speed of a part of the video to emphasize the important part or speed up to get a quick view. It’s all up to you!
Change Video Speed Change Video Speed Learn More >
Part 1: How to Change PowerPoint Video Playback Speed to Speed Up Video
The process that is given below explains how you can modify (increase or decrease) the playback speed of a video in PowerPoint:
Step 1: Enable the Developer Tab
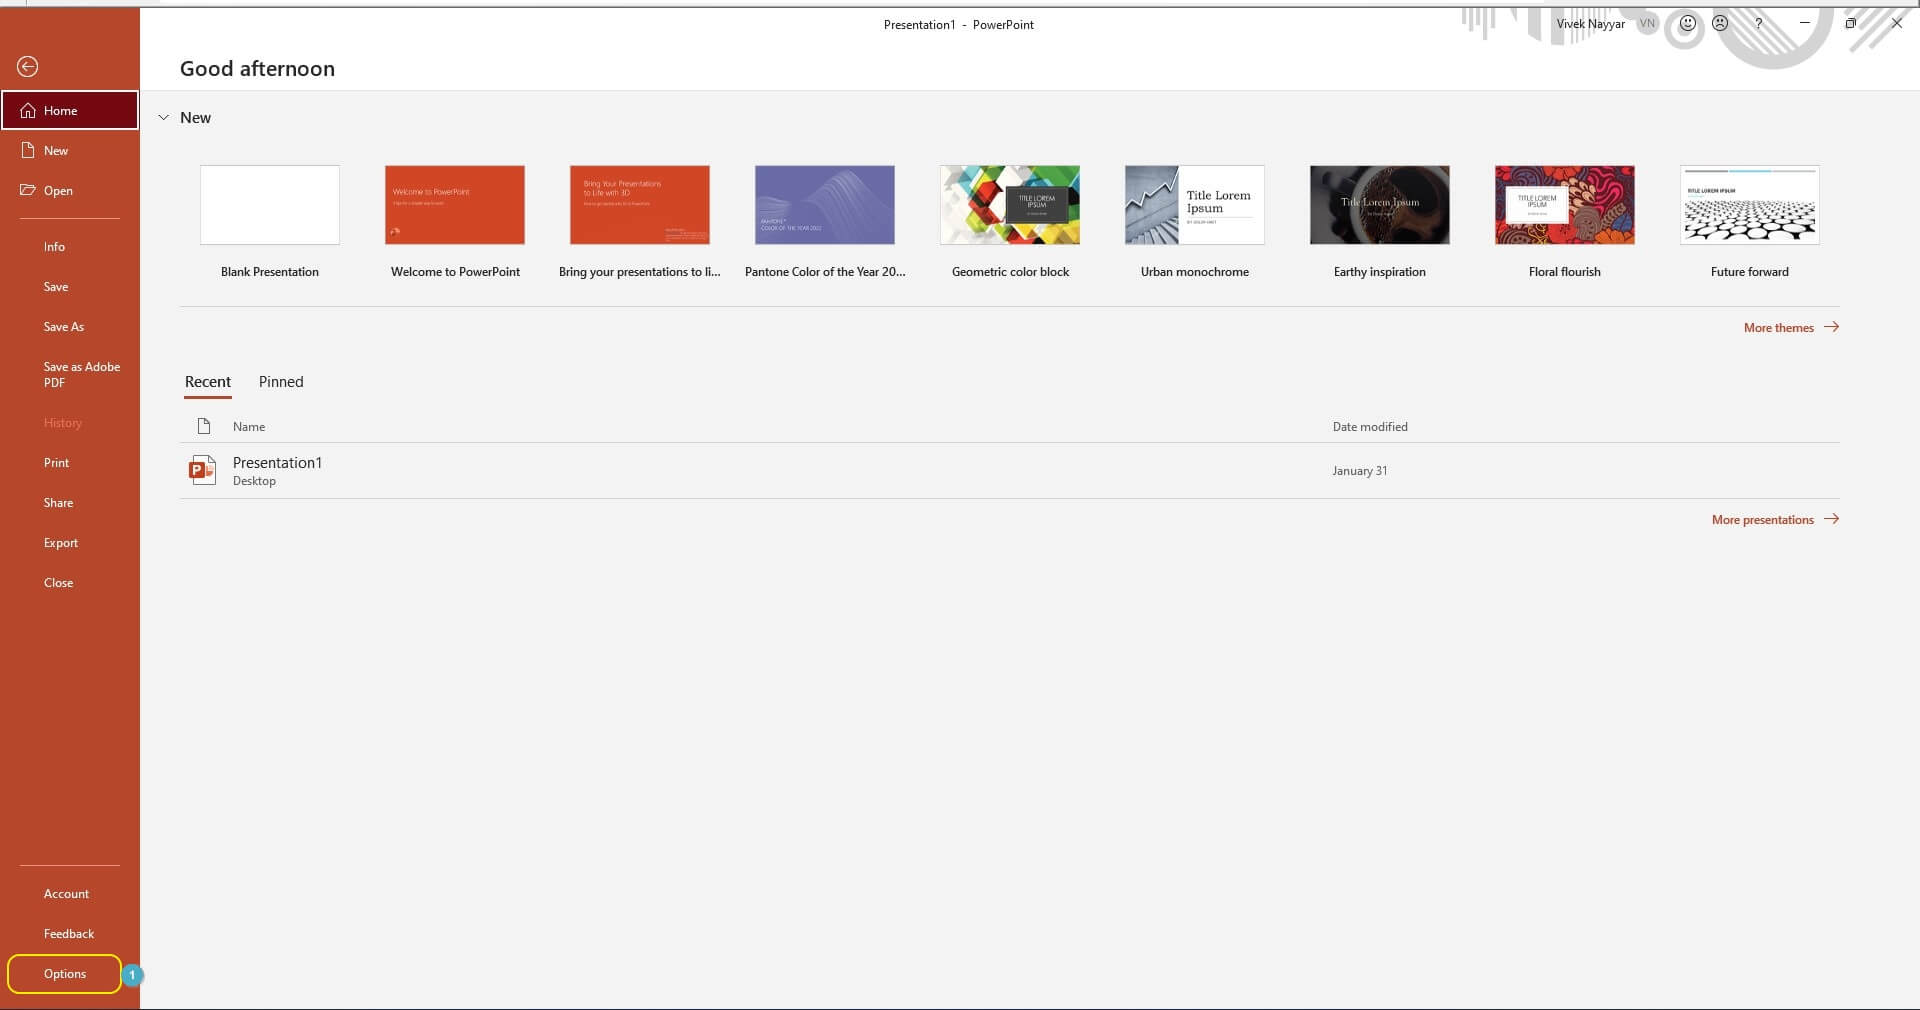
Launch Microsoft PowerPoint on your Windows computer (Microsoft PowerPoint 2019 on a PC running Windows 11 is used here for illustrations), and start with a blank presentation. Next, go to File from the menu bar at the top, and click Options from the bottom of the navigation bar on the left.
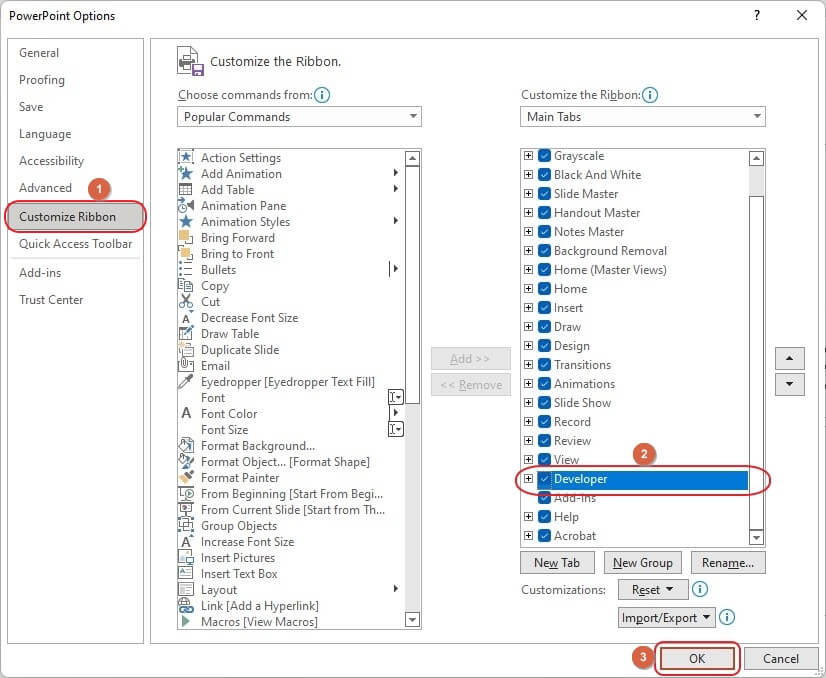
From the left pane of the PowerPoint Options box that opens up, click to select the Customize Ribbon category, and from the Main Tabs list in the right window, check the Developer box. Click OK from the bottom to save the changes.
Step 2: Add a Windows Media Player Instance
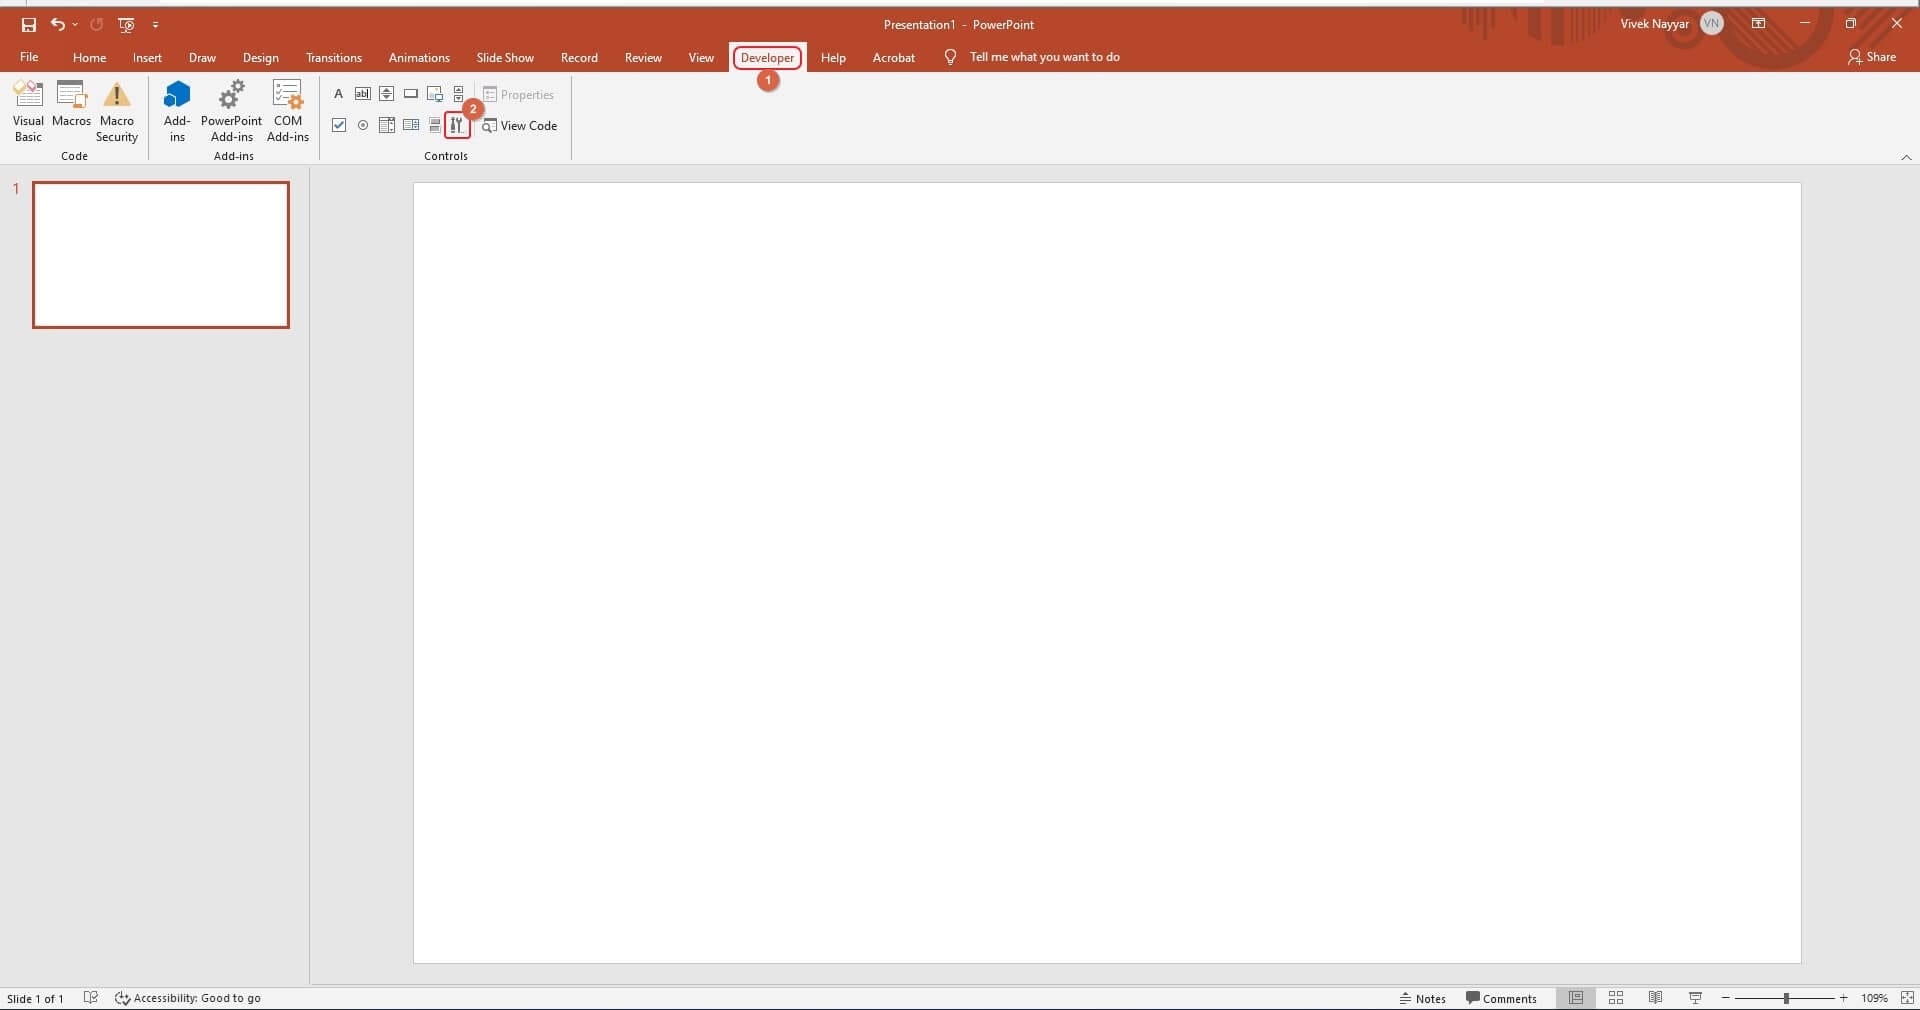
Back on the main interface, go to the Developer tab. Click More Controls from the Controls section of the ribbon.
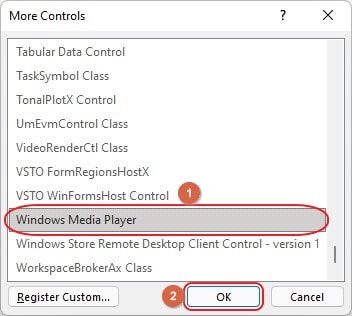
When the More Controls box appears, scroll down and click to select Windows Media Player, and click OK from the bottom.
Back on the canvas, click and drag the mouse to the scale that you want the size of Windows Media Player to be.
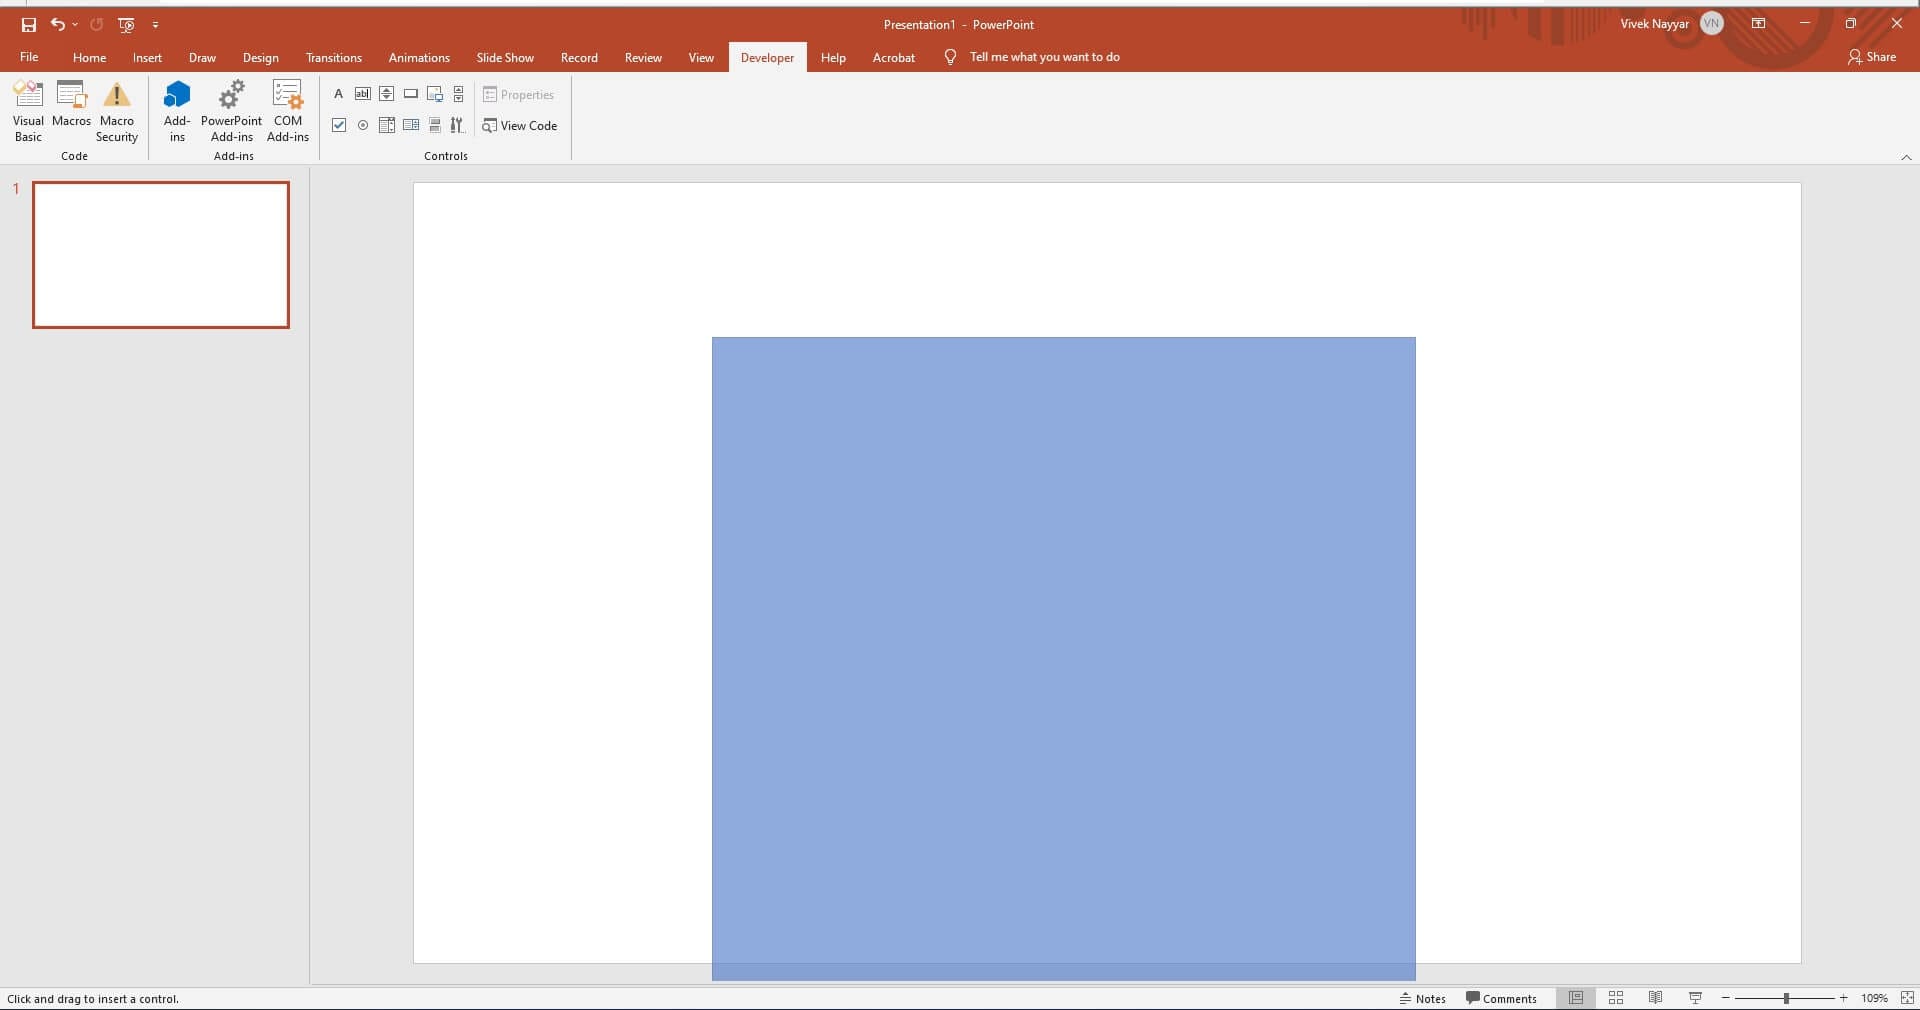
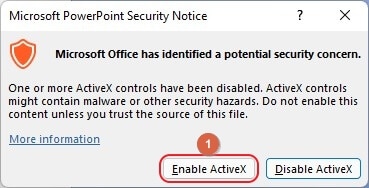
Click Enable ActiveX when PowerPoint prompts for, to add a new instance of Windows Media Player.
Video Speed Editor
A smooth tool to edit video speed on your PC and Mac, you can speed up, slow down, use key frame and more.

Step 3: Select the Source Video and Customize the Playback Speed
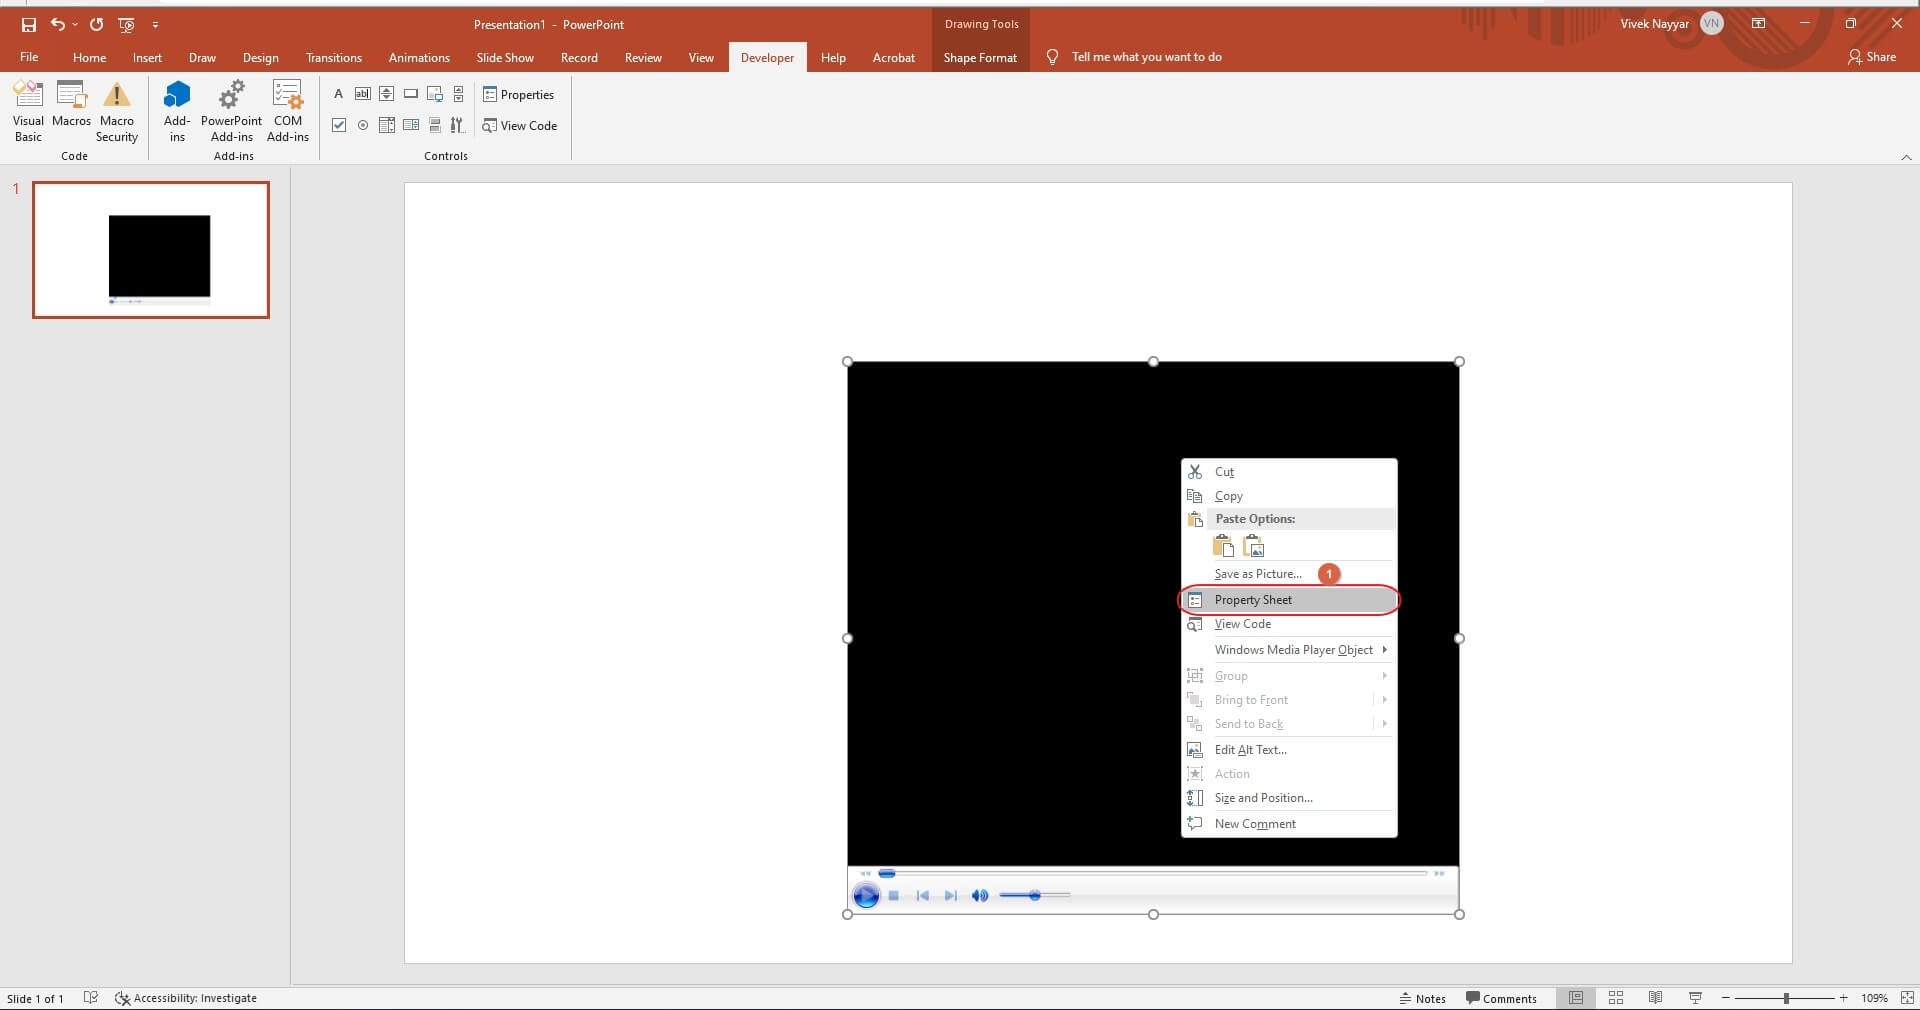
Right-click anywhere on Windows Media Player, and click Property Sheet from the context menu that comes up.
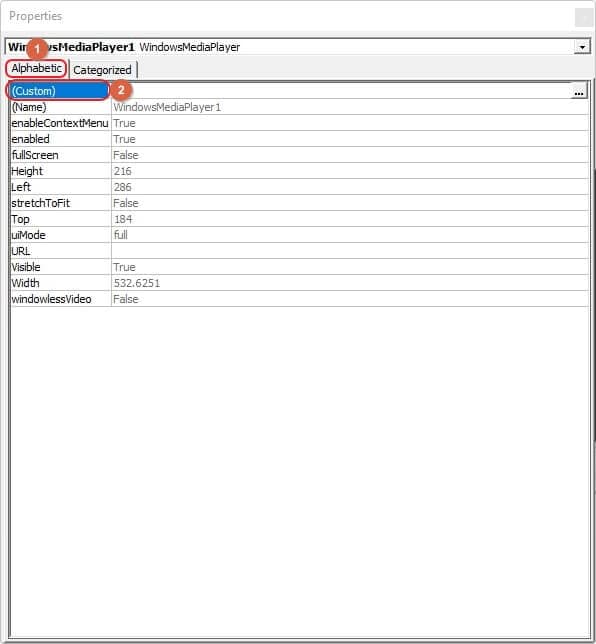
From the Properties box, double-click the Custom option from the Alphabetic tab.
 Glarysoft File Recovery Pro - Helps to recover your lost file/data, even permanently deleted data.
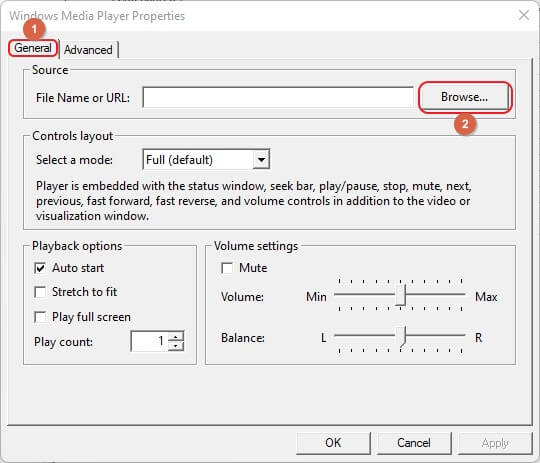
On the Windows Media Player Properties box, make sure that you are on the General tab, click Browse from the Source section, and browse for and select the source video.
Next, go to the Advanced tab, and increase the value of the Rate field that is present in the Controls settings section. Click OK when done to save the changes and close the box. Close the Properties box as well. Finally, press F5 on the keyboard to preview the presentation with the increased video speed.
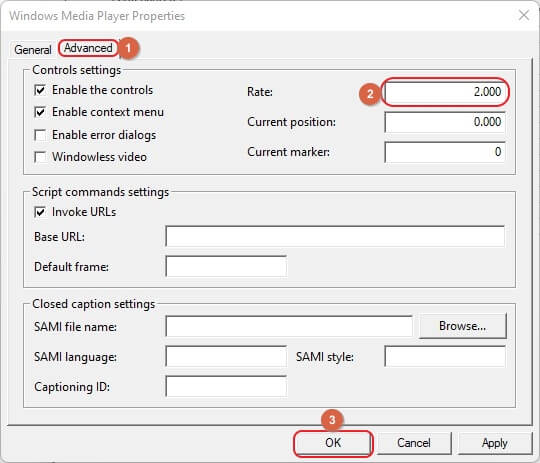
Note: Defining 2 in the ‘Rate’ field increases the playback speed of the video by 2x. Likewise, specifying the 0.5 value reduces the speed to half.
Note: Make sure to save the file as ‘PowerPoint Macro-Enabled Presentation’ to retain the customized preferences of Windows Media Player.

Filmora Video Speed Changer
Change Video Speed with Filmora
Filmora video speed changer offers speed templates to changing speed in 1-click. You can reedit or add more keyframes to speed up and slow down the video according to your needs.
Start Video Speed Changing Start Video Speed Changing Learn More >
 Glary Utilities PRO - Premium all-in-one utility to clean, speed up, maintain and protect your PC
Part 2: How to Change the Speed of a PowerPoint Animation
In addition to modifying the playback speed of the video that you have imported to PowerPoint presentation, you can even customize the overall duration of the animations that each of the slides the app has.
Although you can customize the speed for each object individually, increasing or decreasing the animation speed in a single go not only saves you a lot of time but also simplifies the entire customization process as well.
The method that is given below explains how you can change the speed of a PowerPoint animation of a slide:
Step 1: Get to the Target Slide
Launch Microsoft PowerPoint and open the presentation that has the animations that you want to speed up, and go to the target slide.
Step 2: Change the Speed of the Animations
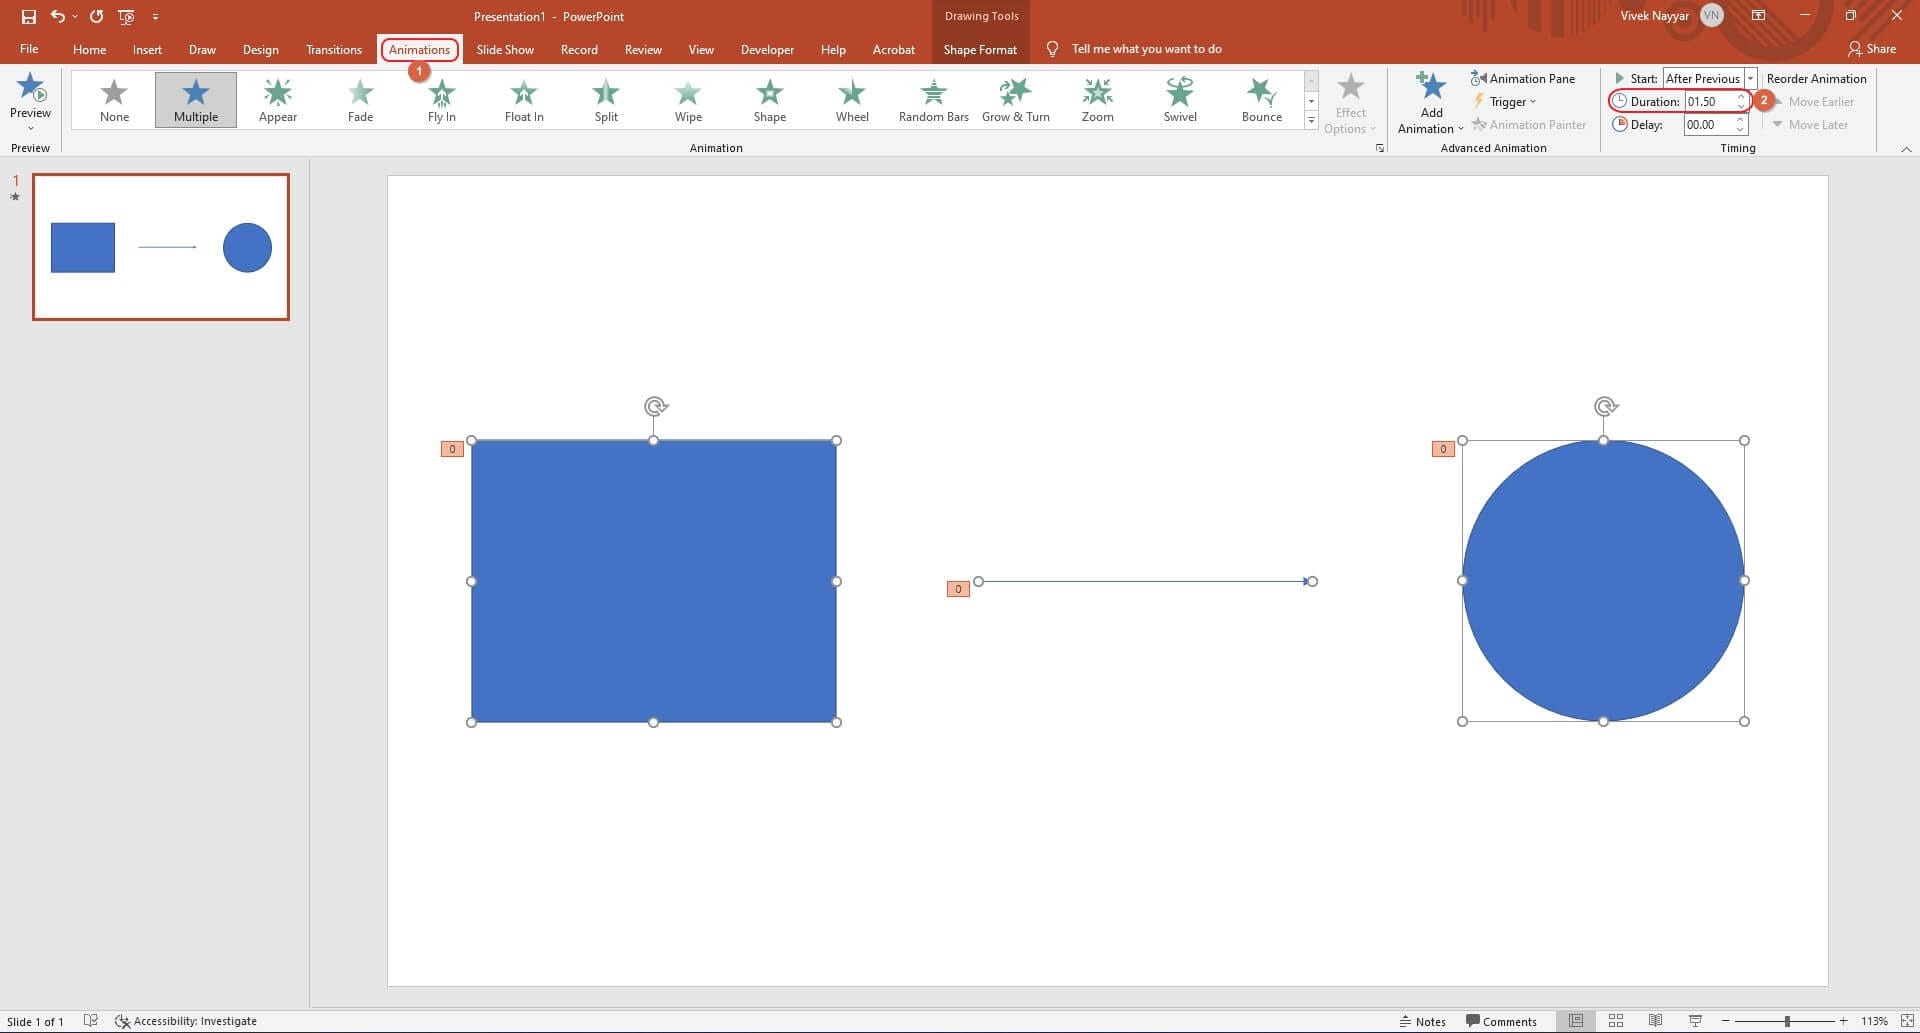
Go to the Animation tab from the top. Press Ctrl + A to select all the objects on the canvas. Now, modify the value in the Duration field that is present in the Timing section of the ribbon.
Where increasing the duration slows down the animation speed, decreasing it speeds up the animation. Simply put, the value in the duration field is inversely proportional to the speed of the animation.
Note: You can follow the same procedure to manage the animation speed for all the slides in the presentation.
Part 3: FAQs About Change PPT Speed
Q1) Why is my video lagging in PowerPoint?
There could be several reasons for this. Some of the common ones are listed below:
- You may have not configured the playback speed correctly (To fix this, go to the Windows Media Player Properties box as explained earlier, and configure various resolution and speed options accordingly)
- Your GPU is old, and doesn’t support the resolution of the video clip (To fix this, go to File > Info > Compress Media and choose a lower resolution) (Choose Presentation Quality on the Microsoft PowerPoint 2010 – PowerPoint 2016 versions)
- Hardware acceleration is turned off. (To fix this, go to File > Options > Advanced > Display and uncheck the ‘Display Slide Show hardware graphics acceleration’ box)
Q2) Why I cannot insert video in PowerPoint?
You may want to check if the video is of a compatible format. It would be good to use an MP4 video as it integrates seamlessly with most applications.
Q3) Which video format is best for PowerPoint?
Listed below are some of the formats that PowerPoint supports:
- *.asf
- *.avi
- *.mp4, *.m4v, *.mov
- *.mpg, *.mpeg
- *.wmv
However, considering the popularity and compatibility, MP4 is the format that is suggested by many professionals.
Q4) Why PowerPoint cannot play media?
Some most common reasons for this issue include:
- Incompatible Media – To fix this, go to File > Info and click ‘Optimize Compatibility’ (The tile will automatically appear if the presentation has an incompatible media file)
- Unrecognized Format – To fix this, check if the format of the video is supported by PowerPoint. If not, consider using an effective converter like Wondershare UniConverter to convert the clip to a compatible format before importing
- Missing Codecs – To fix this, install the required codecs on your PC. Nevertheless, if you’re using an MP4 file, it is unlikely that you encounter such an issue
- Overly Populated ‘Temp’ Folder – To fix this, type %TEMP% in the search box, and press Enter. Now, press Ctrl + A to select all the contents, and hit Delete to get rid of them. Next, restart the computer and try again to see if the issue is fixed
02 Change the Speed of a PowerPoint Animation
03 FAQs About Change PPT Speed
Why Not Customize the Video Speed Before Adding it to PowerPoint? Try This!
Filmora Video Speed Changer offers video speed-changing templates to automatically reset the video speed. Of course, you can manually slow down the speed of a part of the video to emphasize the important part or speed up to get a quick view. It’s all up to you!
Change Video Speed Change Video Speed Learn More >
Part 1: How to Change PowerPoint Video Playback Speed to Speed Up Video
The process that is given below explains how you can modify (increase or decrease) the playback speed of a video in PowerPoint:
Step 1: Enable the Developer Tab
Launch Microsoft PowerPoint on your Windows computer (Microsoft PowerPoint 2019 on a PC running Windows 11 is used here for illustrations), and start with a blank presentation. Next, go to File from the menu bar at the top, and click Options from the bottom of the navigation bar on the left.

From the left pane of the PowerPoint Options box that opens up, click to select the Customize Ribbon category, and from the Main Tabs list in the right window, check the Developer box. Click OK from the bottom to save the changes.
 TubeDigger - online video downloader from mostly any site

Step 2: Add a Windows Media Player Instance
Back on the main interface, go to the Developer tab. Click More Controls from the Controls section of the ribbon.

When the More Controls box appears, scroll down and click to select Windows Media Player, and click OK from the bottom.

Back on the canvas, click and drag the mouse to the scale that you want the size of Windows Media Player to be.

Click Enable ActiveX when PowerPoint prompts for, to add a new instance of Windows Media Player.

Video Speed Editor
A smooth tool to edit video speed on your PC and Mac, you can speed up, slow down, use key frame and more.

Step 3: Select the Source Video and Customize the Playback Speed
Right-click anywhere on Windows Media Player, and click Property Sheet from the context menu that comes up.

From the Properties box, double-click the Custom option from the Alphabetic tab.

On the Windows Media Player Properties box, make sure that you are on the General tab, click Browse from the Source section, and browse for and select the source video.

Next, go to the Advanced tab, and increase the value of the Rate field that is present in the Controls settings section. Click OK when done to save the changes and close the box. Close the Properties box as well. Finally, press F5 on the keyboard to preview the presentation with the increased video speed.

Note: Defining 2 in the ‘Rate’ field increases the playback speed of the video by 2x. Likewise, specifying the 0.5 value reduces the speed to half.
Note: Make sure to save the file as ‘PowerPoint Macro-Enabled Presentation’ to retain the customized preferences of Windows Media Player.

Filmora Video Speed Changer
Change Video Speed with Filmora
Filmora video speed changer offers speed templates to changing speed in 1-click. You can reedit or add more keyframes to speed up and slow down the video according to your needs.
Start Video Speed Changing Start Video Speed Changing Learn More >
Part 2: How to Change the Speed of a PowerPoint Animation
In addition to modifying the playback speed of the video that you have imported to PowerPoint presentation, you can even customize the overall duration of the animations that each of the slides the app has.
Although you can customize the speed for each object individually, increasing or decreasing the animation speed in a single go not only saves you a lot of time but also simplifies the entire customization process as well.
The method that is given below explains how you can change the speed of a PowerPoint animation of a slide:
Step 1: Get to the Target Slide
Launch Microsoft PowerPoint and open the presentation that has the animations that you want to speed up, and go to the target slide.
Step 2: Change the Speed of the Animations
Go to the Animation tab from the top. Press Ctrl + A to select all the objects on the canvas. Now, modify the value in the Duration field that is present in the Timing section of the ribbon.
Where increasing the duration slows down the animation speed, decreasing it speeds up the animation. Simply put, the value in the duration field is inversely proportional to the speed of the animation.

Note: You can follow the same procedure to manage the animation speed for all the slides in the presentation.
Part 3: FAQs About Change PPT Speed
Q1) Why is my video lagging in PowerPoint?
There could be several reasons for this. Some of the common ones are listed below:
- You may have not configured the playback speed correctly (To fix this, go to the Windows Media Player Properties box as explained earlier, and configure various resolution and speed options accordingly)
- Your GPU is old, and doesn’t support the resolution of the video clip (To fix this, go to File > Info > Compress Media and choose a lower resolution) (Choose Presentation Quality on the Microsoft PowerPoint 2010 – PowerPoint 2016 versions)
- Hardware acceleration is turned off. (To fix this, go to File > Options > Advanced > Display and uncheck the ‘Display Slide Show hardware graphics acceleration’ box)
Q2) Why I cannot insert video in PowerPoint?
You may want to check if the video is of a compatible format. It would be good to use an MP4 video as it integrates seamlessly with most applications.
Q3) Which video format is best for PowerPoint?
Listed below are some of the formats that PowerPoint supports:
- *.asf
- *.avi
- *.mp4, *.m4v, *.mov
- *.mpg, *.mpeg
- *.wmv
However, considering the popularity and compatibility, MP4 is the format that is suggested by many professionals.
Q4) Why PowerPoint cannot play media?
Some most common reasons for this issue include:
- Incompatible Media – To fix this, go to File > Info and click ‘Optimize Compatibility’ (The tile will automatically appear if the presentation has an incompatible media file)
- Unrecognized Format – To fix this, check if the format of the video is supported by PowerPoint. If not, consider using an effective converter like Wondershare UniConverter to convert the clip to a compatible format before importing
- Missing Codecs – To fix this, install the required codecs on your PC. Nevertheless, if you’re using an MP4 file, it is unlikely that you encounter such an issue
- Overly Populated ‘Temp’ Folder – To fix this, type %TEMP% in the search box, and press Enter. Now, press Ctrl + A to select all the contents, and hit Delete to get rid of them. Next, restart the computer and try again to see if the issue is fixed
02 Change the Speed of a PowerPoint Animation
03 FAQs About Change PPT Speed
Why Not Customize the Video Speed Before Adding it to PowerPoint? Try This!
Filmora Video Speed Changer offers video speed-changing templates to automatically reset the video speed. Of course, you can manually slow down the speed of a part of the video to emphasize the important part or speed up to get a quick view. It’s all up to you!
Change Video Speed Change Video Speed Learn More >
Part 1: How to Change PowerPoint Video Playback Speed to Speed Up Video
The process that is given below explains how you can modify (increase or decrease) the playback speed of a video in PowerPoint:
Step 1: Enable the Developer Tab
Launch Microsoft PowerPoint on your Windows computer (Microsoft PowerPoint 2019 on a PC running Windows 11 is used here for illustrations), and start with a blank presentation. Next, go to File from the menu bar at the top, and click Options from the bottom of the navigation bar on the left.

From the left pane of the PowerPoint Options box that opens up, click to select the Customize Ribbon category, and from the Main Tabs list in the right window, check the Developer box. Click OK from the bottom to save the changes.

Step 2: Add a Windows Media Player Instance
Back on the main interface, go to the Developer tab. Click More Controls from the Controls section of the ribbon.

When the More Controls box appears, scroll down and click to select Windows Media Player, and click OK from the bottom.
company, user or members of the same household. Action! - screen and game recorder</a>

Back on the canvas, click and drag the mouse to the scale that you want the size of Windows Media Player to be.

Click Enable ActiveX when PowerPoint prompts for, to add a new instance of Windows Media Player.

Video Speed Editor
A smooth tool to edit video speed on your PC and Mac, you can speed up, slow down, use key frame and more.

Step 3: Select the Source Video and Customize the Playback Speed
Right-click anywhere on Windows Media Player, and click Property Sheet from the context menu that comes up.

From the Properties box, double-click the Custom option from the Alphabetic tab.

On the Windows Media Player Properties box, make sure that you are on the General tab, click Browse from the Source section, and browse for and select the source video.

Next, go to the Advanced tab, and increase the value of the Rate field that is present in the Controls settings section. Click OK when done to save the changes and close the box. Close the Properties box as well. Finally, press F5 on the keyboard to preview the presentation with the increased video speed.

Note: Defining 2 in the ‘Rate’ field increases the playback speed of the video by 2x. Likewise, specifying the 0.5 value reduces the speed to half.
Note: Make sure to save the file as ‘PowerPoint Macro-Enabled Presentation’ to retain the customized preferences of Windows Media Player.

Filmora Video Speed Changer
Change Video Speed with Filmora
Filmora video speed changer offers speed templates to changing speed in 1-click. You can reedit or add more keyframes to speed up and slow down the video according to your needs.
Start Video Speed Changing Start Video Speed Changing Learn More >
Part 2: How to Change the Speed of a PowerPoint Animation
In addition to modifying the playback speed of the video that you have imported to PowerPoint presentation, you can even customize the overall duration of the animations that each of the slides the app has.
Although you can customize the speed for each object individually, increasing or decreasing the animation speed in a single go not only saves you a lot of time but also simplifies the entire customization process as well.
The method that is given below explains how you can change the speed of a PowerPoint animation of a slide:
Step 1: Get to the Target Slide
Launch Microsoft PowerPoint and open the presentation that has the animations that you want to speed up, and go to the target slide.
Step 2: Change the Speed of the Animations
Go to the Animation tab from the top. Press Ctrl + A to select all the objects on the canvas. Now, modify the value in the Duration field that is present in the Timing section of the ribbon.
Where increasing the duration slows down the animation speed, decreasing it speeds up the animation. Simply put, the value in the duration field is inversely proportional to the speed of the animation.

Note: You can follow the same procedure to manage the animation speed for all the slides in the presentation.
Part 3: FAQs About Change PPT Speed
Q1) Why is my video lagging in PowerPoint?
There could be several reasons for this. Some of the common ones are listed below:
- You may have not configured the playback speed correctly (To fix this, go to the Windows Media Player Properties box as explained earlier, and configure various resolution and speed options accordingly)
- Your GPU is old, and doesn’t support the resolution of the video clip (To fix this, go to File > Info > Compress Media and choose a lower resolution) (Choose Presentation Quality on the Microsoft PowerPoint 2010 – PowerPoint 2016 versions)
- Hardware acceleration is turned off. (To fix this, go to File > Options > Advanced > Display and uncheck the ‘Display Slide Show hardware graphics acceleration’ box)
Q2) Why I cannot insert video in PowerPoint?
You may want to check if the video is of a compatible format. It would be good to use an MP4 video as it integrates seamlessly with most applications.
Q3) Which video format is best for PowerPoint?
Listed below are some of the formats that PowerPoint supports:
- *.asf
- *.avi
- *.mp4, *.m4v, *.mov
- *.mpg, *.mpeg
- *.wmv
However, considering the popularity and compatibility, MP4 is the format that is suggested by many professionals.
Q4) Why PowerPoint cannot play media?
Some most common reasons for this issue include:
- Incompatible Media – To fix this, go to File > Info and click ‘Optimize Compatibility’ (The tile will automatically appear if the presentation has an incompatible media file)
- Unrecognized Format – To fix this, check if the format of the video is supported by PowerPoint. If not, consider using an effective converter like Wondershare UniConverter to convert the clip to a compatible format before importing
- Missing Codecs – To fix this, install the required codecs on your PC. Nevertheless, if you’re using an MP4 file, it is unlikely that you encounter such an issue
- Overly Populated ‘Temp’ Folder – To fix this, type %TEMP% in the search box, and press Enter. Now, press Ctrl + A to select all the contents, and hit Delete to get rid of them. Next, restart the computer and try again to see if the issue is fixed
02 Change the Speed of a PowerPoint Animation
03 FAQs About Change PPT Speed
Why Not Customize the Video Speed Before Adding it to PowerPoint? Try This!
Filmora Video Speed Changer offers video speed-changing templates to automatically reset the video speed. Of course, you can manually slow down the speed of a part of the video to emphasize the important part or speed up to get a quick view. It’s all up to you!
Change Video Speed Change Video Speed Learn More >
 Software Update Pro - Check and update software installed on your computer.
Part 1: How to Change PowerPoint Video Playback Speed to Speed Up Video
The process that is given below explains how you can modify (increase or decrease) the playback speed of a video in PowerPoint:
Step 1: Enable the Developer Tab
Launch Microsoft PowerPoint on your Windows computer (Microsoft PowerPoint 2019 on a PC running Windows 11 is used here for illustrations), and start with a blank presentation. Next, go to File from the menu bar at the top, and click Options from the bottom of the navigation bar on the left.

From the left pane of the PowerPoint Options box that opens up, click to select the Customize Ribbon category, and from the Main Tabs list in the right window, check the Developer box. Click OK from the bottom to save the changes.

Step 2: Add a Windows Media Player Instance
Back on the main interface, go to the Developer tab. Click More Controls from the Controls section of the ribbon.

When the More Controls box appears, scroll down and click to select Windows Media Player, and click OK from the bottom.

Back on the canvas, click and drag the mouse to the scale that you want the size of Windows Media Player to be.

Click Enable ActiveX when PowerPoint prompts for, to add a new instance of Windows Media Player.

Video Speed Editor
A smooth tool to edit video speed on your PC and Mac, you can speed up, slow down, use key frame and more.

Step 3: Select the Source Video and Customize the Playback Speed
Right-click anywhere on Windows Media Player, and click Property Sheet from the context menu that comes up.

From the Properties box, double-click the Custom option from the Alphabetic tab.

On the Windows Media Player Properties box, make sure that you are on the General tab, click Browse from the Source section, and browse for and select the source video.

Next, go to the Advanced tab, and increase the value of the Rate field that is present in the Controls settings section. Click OK when done to save the changes and close the box. Close the Properties box as well. Finally, press F5 on the keyboard to preview the presentation with the increased video speed.
 NeoDownloader - Fast and fully automatic image/video/music downloader.

Note: Defining 2 in the ‘Rate’ field increases the playback speed of the video by 2x. Likewise, specifying the 0.5 value reduces the speed to half.
Note: Make sure to save the file as ‘PowerPoint Macro-Enabled Presentation’ to retain the customized preferences of Windows Media Player.

Filmora Video Speed Changer
Change Video Speed with Filmora
Filmora video speed changer offers speed templates to changing speed in 1-click. You can reedit or add more keyframes to speed up and slow down the video according to your needs.
Start Video Speed Changing Start Video Speed Changing Learn More >
Part 2: How to Change the Speed of a PowerPoint Animation
In addition to modifying the playback speed of the video that you have imported to PowerPoint presentation, you can even customize the overall duration of the animations that each of the slides the app has.
Although you can customize the speed for each object individually, increasing or decreasing the animation speed in a single go not only saves you a lot of time but also simplifies the entire customization process as well.
The method that is given below explains how you can change the speed of a PowerPoint animation of a slide:
Step 1: Get to the Target Slide
Launch Microsoft PowerPoint and open the presentation that has the animations that you want to speed up, and go to the target slide.
Step 2: Change the Speed of the Animations
Go to the Animation tab from the top. Press Ctrl + A to select all the objects on the canvas. Now, modify the value in the Duration field that is present in the Timing section of the ribbon.
Where increasing the duration slows down the animation speed, decreasing it speeds up the animation. Simply put, the value in the duration field is inversely proportional to the speed of the animation.

Note: You can follow the same procedure to manage the animation speed for all the slides in the presentation.
Part 3: FAQs About Change PPT Speed
Q1) Why is my video lagging in PowerPoint?
There could be several reasons for this. Some of the common ones are listed below:
- You may have not configured the playback speed correctly (To fix this, go to the Windows Media Player Properties box as explained earlier, and configure various resolution and speed options accordingly)
- Your GPU is old, and doesn’t support the resolution of the video clip (To fix this, go to File > Info > Compress Media and choose a lower resolution) (Choose Presentation Quality on the Microsoft PowerPoint 2010 – PowerPoint 2016 versions)
- Hardware acceleration is turned off. (To fix this, go to File > Options > Advanced > Display and uncheck the ‘Display Slide Show hardware graphics acceleration’ box)
Q2) Why I cannot insert video in PowerPoint?
You may want to check if the video is of a compatible format. It would be good to use an MP4 video as it integrates seamlessly with most applications.
Q3) Which video format is best for PowerPoint?
Listed below are some of the formats that PowerPoint supports:
- *.asf
- *.avi
- *.mp4, *.m4v, *.mov
- *.mpg, *.mpeg
- *.wmv
However, considering the popularity and compatibility, MP4 is the format that is suggested by many professionals.
Q4) Why PowerPoint cannot play media?
Some most common reasons for this issue include:
- Incompatible Media – To fix this, go to File > Info and click ‘Optimize Compatibility’ (The tile will automatically appear if the presentation has an incompatible media file)
- Unrecognized Format – To fix this, check if the format of the video is supported by PowerPoint. If not, consider using an effective converter like Wondershare UniConverter to convert the clip to a compatible format before importing
- Missing Codecs – To fix this, install the required codecs on your PC. Nevertheless, if you’re using an MP4 file, it is unlikely that you encounter such an issue
- Overly Populated ‘Temp’ Folder – To fix this, type %TEMP% in the search box, and press Enter. Now, press Ctrl + A to select all the contents, and hit Delete to get rid of them. Next, restart the computer and try again to see if the issue is fixed
- Title: Velocity Variation for Vivid Visual Slideshows
- Author: Christopher
- Created at : 2024-07-22 11:29:09
- Updated at : 2024-07-23 11:29:09
- Link: https://extra-hints.techidaily.com/velocity-variation-for-vivid-visual-slideshows/
- License: This work is licensed under CC BY-NC-SA 4.0.


 Forex Robotron Basic Package


 WinUtilities Pro


