![[Updated] Comprehensive Strategies for Windows Media Player's Audio Operations](https://thmb.techidaily.com/805432a26a63c24a3ad7f94c306f1a1291a2364beb1c1710fc99d1f9d71ae26e.jpg)
[Updated] Comprehensive Strategies for Windows Media Player's Audio Operations
Comprehensive Strategies for Windows Media Player’s Audio Operations
How to use windows media player to rip and burn cd

Ollie Mattison
Mar 27, 2024• Proven solutions
If you want to Rip and Burn your CD with new data using Windows Media Player then prefer to follow these simple steps:

1: How to use Window Media Player to Rip CD?
Step 1: Quick Rip Vs Normal Rip:
If you are accessing CDs for the very first time then you must be searching hard about how to rip music from a CD. Don’t worry! The tutorial below can help you to understand this process. First of all you must install latest version of Windows Media Player on your device (V12); it is much improved as compared to that old V11 platform addition of preview functions and library.
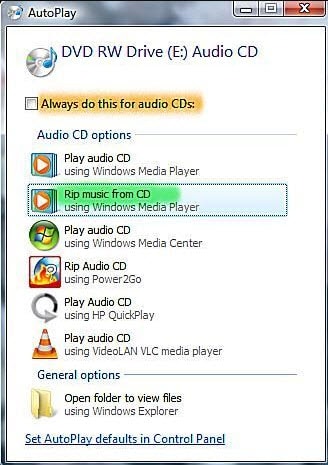
Quick Rip:
Users are advised to start ripping process from “AutoPlay” menu. It will appear right after you insert your CD/DVD drive inside computer. Below AutoPlay menu, you will find “Rip Music from CD – using Window Media Player” option. Once you click on this option, it will automatically open the WMP timeline on your system. Never forget to uncheck that “Always do this for audio CDs” option otherwise it will perform the same operation every time whenever a new CD will be detected. Now you need to hit “Start Rip Button”. The software tool performs ripping task with WMA file format and you can save it directly to Music Folder.
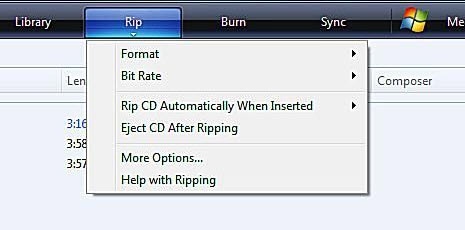
Step 2: Normal Ripping with Windows Media Player:
If you want to do ripping task with customizable settings then prefer to go for Normal Ripping technique. To complete this task: simply launch Window Media Player on your system. Now insert your CD but never use that AutoPlay option this time. As soon as you reach at Rip Menu then hit Rip Tab available on screen. From the drop down menu, you have to select “Formats”. It will assist users to pick audio files with WAV and MP3 file formats. Note that both these media file formats come under lossless format category so ripping process will not cause any quality reduction for your actual data. You can also enter your desired bit rate value to ensure right content quality. But note that, better content quality means larger file size.
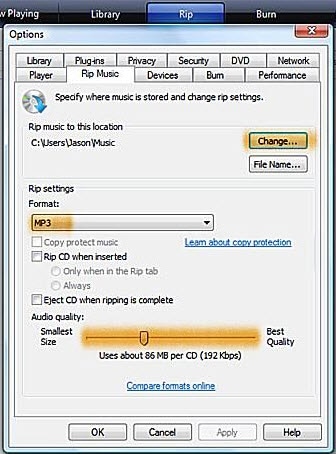
Step 3: Additional CD ripping options:
When you hit “More Options” then it will provide you many choices below. In the “Rip Options” section, you can easily enter your desired destination folder from change button that is available below “Rip Music to this Location” section. Users are also allowed to change their file format and bit rate settings. As soon as you are done with all the settings then press “OK” button.
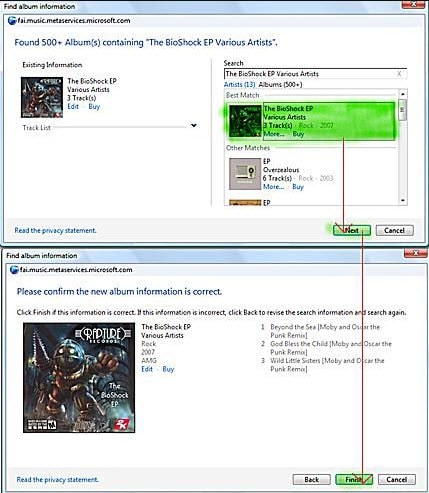
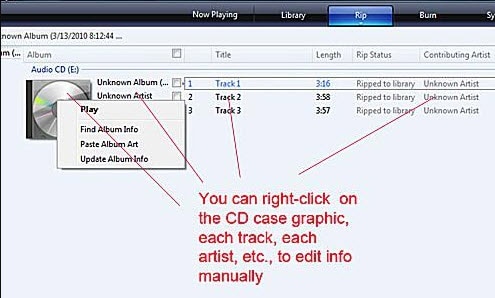
Step 4: Changing Album and Track Info in Windows Media Player:
In case if you want your software to automatically search for complete information of album online then simply right click on CD icon. Here you will find a submenu that asks for “Find Album Info”. Select your file and then press Next. On the verification screen, hit Finish.
Step 5: Let “Er Rip: Manual Album and Track Editing”:
As soon as you are done with the ripping task, your software will show a message “Ripped to Library” and it will appear with each song. Now you can use Window Media Player to move these songs to any destination media like CD or music player etc. Now your media content is ready with you and you can access it easily on other players.
2: How to Use Windows Media Player to Burn CD?
So now, you are ready to learn the CD burning process. Great! Start following these simple steps:
Step 1: Check for the music tracks that you want to burn:
Note that, if you want to burn a CD then it must be ripped in advanced using Window Media Player.
- In case if you have not yet uploaded or ripped your CD then insert it into the CD drive. As soon as your Windows Media Player recognises this new insert, hit the “Rip CD” option that is visible at upper left portion of media player. System will take few minutes to copy this CD onto computer.
- Those who want to assemble a mix or need to store songs from various CDs and need to create a playlist then go to upper left portion of media player and here press “create playlist” button. Enter name for your playlist and then drag and drop your desired songs over there.
- If you want to create list from internet then you can directly download them from YouTube. Prefer to use URL to MP3 website to get it done faster. Enter your recently downloaded songs into playlist.
Step 2: Insert your blank CD:
It is time to put your CD into Computer Disk Drive and it will soon burn your CD while copying its original content. Note that, All CDs use to have specific storage space, you can enter data accordingly.
Step 3: Locate Burn Tab on top Right corner of Media Player:
You will not find any list of songs at this place and CD will also be reflected as Empty.
Step 4: Drag your media files:
Now as you are done with all these steps now you can start burning your CD. Simply drag the playlist or album that you have recently created for burning needs and place them on Burn tab. Now you will be able to see the complete list of songs over there.
Step 5: Manipulate burn settings:
Go to burn option button for this feature can be located on extreme right corner of your screen. Use this feature to set particular length between songs. Note that you can also adjust burn speed as well as quality of songs manually. Soon you will be able to create your track list.
Step 6: Press Start Button:
Go to burn tab and then hit start button. It will soon start the burning process and a green progress window will appear on screen.
Step 7: Wait till the time process finishes:
As soon as this burning process will complete, your system will immediately eject your CD from CD space.
Ollie Mattison
Ollie Mattison is a writer and a lover of all things video.
Follow @Ollie Mattison
Ollie Mattison
Mar 27, 2024• Proven solutions
If you want to Rip and Burn your CD with new data using Windows Media Player then prefer to follow these simple steps:
1: How to use Window Media Player to Rip CD?
Step 1: Quick Rip Vs Normal Rip:
If you are accessing CDs for the very first time then you must be searching hard about how to rip music from a CD. Don’t worry! The tutorial below can help you to understand this process. First of all you must install latest version of Windows Media Player on your device (V12); it is much improved as compared to that old V11 platform addition of preview functions and library.
Quick Rip:
Users are advised to start ripping process from “AutoPlay” menu. It will appear right after you insert your CD/DVD drive inside computer. Below AutoPlay menu, you will find “Rip Music from CD – using Window Media Player” option. Once you click on this option, it will automatically open the WMP timeline on your system. Never forget to uncheck that “Always do this for audio CDs” option otherwise it will perform the same operation every time whenever a new CD will be detected. Now you need to hit “Start Rip Button”. The software tool performs ripping task with WMA file format and you can save it directly to Music Folder.
Step 2: Normal Ripping with Windows Media Player:
If you want to do ripping task with customizable settings then prefer to go for Normal Ripping technique. To complete this task: simply launch Window Media Player on your system. Now insert your CD but never use that AutoPlay option this time. As soon as you reach at Rip Menu then hit Rip Tab available on screen. From the drop down menu, you have to select “Formats”. It will assist users to pick audio files with WAV and MP3 file formats. Note that both these media file formats come under lossless format category so ripping process will not cause any quality reduction for your actual data. You can also enter your desired bit rate value to ensure right content quality. But note that, better content quality means larger file size.
Step 3: Additional CD ripping options:
When you hit “More Options” then it will provide you many choices below. In the “Rip Options” section, you can easily enter your desired destination folder from change button that is available below “Rip Music to this Location” section. Users are also allowed to change their file format and bit rate settings. As soon as you are done with all the settings then press “OK” button.
Step 4: Changing Album and Track Info in Windows Media Player:
In case if you want your software to automatically search for complete information of album online then simply right click on CD icon. Here you will find a submenu that asks for “Find Album Info”. Select your file and then press Next. On the verification screen, hit Finish.
Step 5: Let “Er Rip: Manual Album and Track Editing”:
As soon as you are done with the ripping task, your software will show a message “Ripped to Library” and it will appear with each song. Now you can use Window Media Player to move these songs to any destination media like CD or music player etc. Now your media content is ready with you and you can access it easily on other players.
2: How to Use Windows Media Player to Burn CD?
So now, you are ready to learn the CD burning process. Great! Start following these simple steps:
Step 1: Check for the music tracks that you want to burn:
Note that, if you want to burn a CD then it must be ripped in advanced using Window Media Player.
- In case if you have not yet uploaded or ripped your CD then insert it into the CD drive. As soon as your Windows Media Player recognises this new insert, hit the “Rip CD” option that is visible at upper left portion of media player. System will take few minutes to copy this CD onto computer.
- Those who want to assemble a mix or need to store songs from various CDs and need to create a playlist then go to upper left portion of media player and here press “create playlist” button. Enter name for your playlist and then drag and drop your desired songs over there.
- If you want to create list from internet then you can directly download them from YouTube. Prefer to use URL to MP3 website to get it done faster. Enter your recently downloaded songs into playlist.
Step 2: Insert your blank CD:
It is time to put your CD into Computer Disk Drive and it will soon burn your CD while copying its original content. Note that, All CDs use to have specific storage space, you can enter data accordingly.
Step 3: Locate Burn Tab on top Right corner of Media Player:
You will not find any list of songs at this place and CD will also be reflected as Empty.
Step 4: Drag your media files:
Now as you are done with all these steps now you can start burning your CD. Simply drag the playlist or album that you have recently created for burning needs and place them on Burn tab. Now you will be able to see the complete list of songs over there.
Step 5: Manipulate burn settings:
Go to burn option button for this feature can be located on extreme right corner of your screen. Use this feature to set particular length between songs. Note that you can also adjust burn speed as well as quality of songs manually. Soon you will be able to create your track list.
Step 6: Press Start Button:
Go to burn tab and then hit start button. It will soon start the burning process and a green progress window will appear on screen.
Step 7: Wait till the time process finishes:
As soon as this burning process will complete, your system will immediately eject your CD from CD space.
Ollie Mattison
Ollie Mattison is a writer and a lover of all things video.
Follow @Ollie Mattison
- Title: [Updated] Comprehensive Strategies for Windows Media Player's Audio Operations
- Author: Christopher
- Created at : 2024-07-22 10:26:09
- Updated at : 2024-07-23 10:26:09
- Link: https://extra-hints.techidaily.com/updated-comprehensive-strategies-for-windows-media-players-audio-operations/
- License: This work is licensed under CC BY-NC-SA 4.0.