![[Updated] Bridging Independent iPhone Media Journeys](https://www.lifewire.com/thmb/LwkZUw97kt_1aI6yy4WzCCTUoTM=/540x405/filters:no_upscale():max_bytes(150000):strip_icc()/iPadOS-banner-57525dc2da314a38877046ad29e0562a.jpg)
[Updated] Bridging Independent iPhone Media Journeys
Bridging Independent iPhone Media Journeys
How to Combine Videos into One on iPhone [2024 Updated]

Ollie Mattison
Mar 27, 2024• Proven solutions
We all find ourselves delighted by watching videos for different purposes. Unsurprisingly, you have a bunch of videos on your iPhone. How about combining your favorite genre videos into one video on your iPhone? For example, you can merge all the funny videos and make it a single video. This way you can enjoy the videos in one go. For those people who have lots of video clips in their iPhone and want to merge those into one, we have come up with some amazing and useful apps to combine videos on iPhone. Let’s get off the ground to learn the methods.
- Part 1: Combine Live Photos to Videos in iOS 13 for FREE
- Part 2: Combine videos with iMovie on iPhone for FREE
- Part 3: Combine videos with Videoshop
- Part 4: Combine videos with Filmora with more creative templates
Part 1: Combine Live Photos to Videos with Photos app on iPhone [iOS13]
The newly released iOS 13 added some cool features in the Photos app, and now you can combine several Live Photos together and save them as a new video or slideshow. Here is how to combine Live Photos to video in iOS13.
- Launch the Photos app and then tap the Select button at the upper-right corner of the screen.
- Select the taken Live Photos, tap the Share button in the lower-left corner of the screen and choose Save As Video.
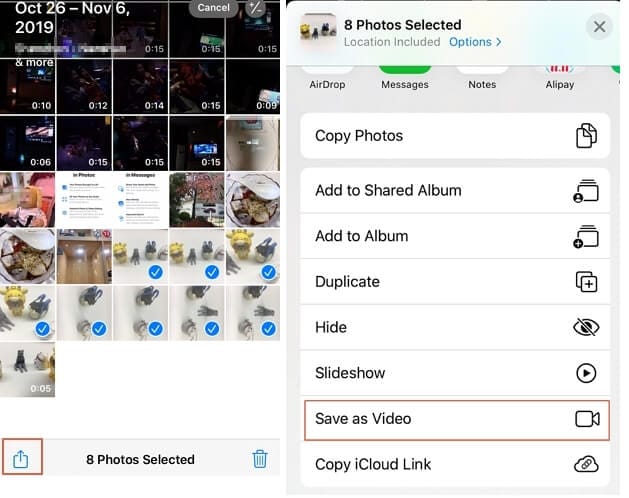
Combine Live Photos to Videos in iOS 13
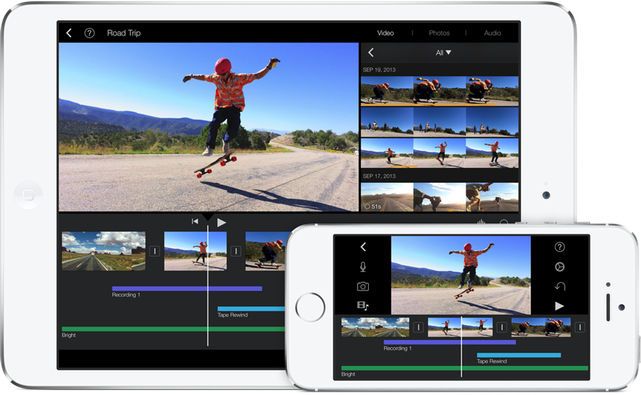
Part 2: Combine videos with iMovie
iMovie is one of the apps in the list that can assist you to merge videos on iPhone. You can yourself create beautiful movies with the assistance of iMovie. Once you combine videos on iPhone, this app will let you transfer your videos between various iOS devices via AirDrop or iCloud Drive. Here is how you can add videos together on iPhone via iMovie.
Check more details about How to Edit Videos on iMovie
Step 1 – Launch iMovie app and get under the “Project” section available on the top of the screen.
Step 2 – Now, tap on “Create Project” and then select the video type out of the two options available, i.e. “Movie” or “Trailer”, select “Movie” in this case. Next, tap on “Create” from the next screen. Or you can import video from File.
Step 3 – Your project interface has now been successfully loaded on your screen. Now, to add the source video file, tap the “Media” icon on the left top of the timeline and your video gallery will load up on your screen. Select the desired source video and tap the “Add” icon to add it on the iMovie’s timeline.
Step 4 – Once your preferred video is added on the timeline, you can scroll the timeline to left or right to let the vertical line known as “playhead’ appear on the screen. Now, place the playhead by scrolling left or right, exactly at the place where you desire to combine the video.

Step 5 – This is the time where you need to add another video which you wish to combine with the source video. Follow the same process mentioned above to get your video added on the timeline. The nearest position to the playhead, be it before the existing video clip or after the clip, will let the fresh clip added to the video.
Step 6 – Now, if you wish to preview the two added videos in a combined playback, simply hit on the “Play” icon available just above the timeline in middle of the screen.
Step 7 – You can also use the transition effects from the presets to apply the desired effect when your first video is switched to another. Or, you can use the traditional fade in or out (default transition) as well.
Step 8 – When you are satisfied with your video, simply hit the “Done” on the left top corner of your screen. And, the next interface will bring you up to a screen where you can simply save the merged video file on your local storage or can directly upload them to various cloud storage platforms. Moreover, here on this screen you can give your video a custom defined title too.
Part 3: Combine videos with Videoshop
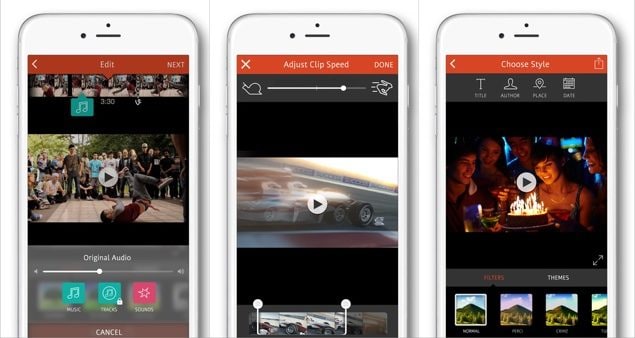
Videoshop is a great video editing app and is next app to combine video clips in the list. This app has got all; from trimming, cropping videos to adding sound effects, recording one’s own voice as well as resizing the video frame and many more features. Here is how you can add videos together on iPhone via Videoshop app.
Step 1 – First of all, download the app from App Store. Launch it post downloading.
Step 2 – Hit on the plus signed icon in order to start adding your videos.
Step 3 – You can now choose the options given above the videos. You can select different settings or editing options like adding transition, typing texts, speed changes, adding audio track and many more.

Step 4 – Once done, you can move to tap on the “Next” button.
Step 5 – Subsequently, move further by giving the title of video, author, place and date if you want. Also, you can customize videos with filters and themes.
Step 6 – Once done with the merging videos on iPhone, tap on the Sharing button and store the file. You can also upload your file to YouTube, Vimeo or send via e-mail, save to Dropbox.
Part 4: Combine videos with Filmora on Windows or Mac
You may face a little disturbance while combining videos on iPhone using iMovie. Using iMovie for merging videos may result in losing frames issue which can be unpleasant to anyone. Here, we would recommend you Filmora video editor which can be used on Windows and Mac computers. It is believed to be one of the best video merger app and would be a great option if you want to avoid losing frame thing.
Besides merging several videos into a longer one , Filmora also allows you to put two videos side by side and make a split-screen video easily . Check the video tutorial and try the free trial version below.
 Glarysoft File Recovery Pro Annually - Helps to recover your lost file/data, even permanently deleted data.

In this following part, I’ll show you how to combine iPhone videos with Filmora for Windows.
1. Launch Wondershare Filmora on Windows and click the Import button and select “Import from a Camera or a Phone”.

2. In the pop-up Import for Device window, you will see the photos and video on your iPhone on the left side, click one to preview and then select it to import. Filmora will load it directly in the Project Media library.
Step 3 – Select all photos and videos you want to combine in the Project Media library and drag and drop them to the timeline. Once you do this, you will spot that the video files you’ve dragged will be aligned in the same timeline.
Step 4 – Filmora is packed with a great deal of powerful tools with the help of which you are allowed to modify contrast, color, add effects, filters, elements or background music etc. to video. So after merging, you can edit your videos if you wish. You can check our ultimate guide about how to edit video in Filmora.
Step 5 – Once you find yourself contented with the creation, you can export it to your device. For this, choose the “EXPORT” option available in the toolbar and choose iPhone as the target device.

Final Verdict
Here ends the discussion about how to combine videos on iPhone and we hope that you got a pleasant experience reading this post. Thanks for the time for browsing through the post. We offered you some refined apps like Filmora video editor to combine your videos. So, which was the best video merger app according to you? We would like to get familiar with your choice and experience.
 Project Manager - Asset Browser for 3Ds Max
Ollie Mattison
Ollie Mattison is a writer and a lover of all things video.
Follow @Ollie Mattison
Ollie Mattison
Mar 27, 2024• Proven solutions
We all find ourselves delighted by watching videos for different purposes. Unsurprisingly, you have a bunch of videos on your iPhone. How about combining your favorite genre videos into one video on your iPhone? For example, you can merge all the funny videos and make it a single video. This way you can enjoy the videos in one go. For those people who have lots of video clips in their iPhone and want to merge those into one, we have come up with some amazing and useful apps to combine videos on iPhone. Let’s get off the ground to learn the methods.
- Part 1: Combine Live Photos to Videos in iOS 13 for FREE
- Part 2: Combine videos with iMovie on iPhone for FREE
- Part 3: Combine videos with Videoshop
- Part 4: Combine videos with Filmora with more creative templates
Part 1: Combine Live Photos to Videos with Photos app on iPhone [iOS13]
The newly released iOS 13 added some cool features in the Photos app, and now you can combine several Live Photos together and save them as a new video or slideshow. Here is how to combine Live Photos to video in iOS13.
- Launch the Photos app and then tap the Select button at the upper-right corner of the screen.
- Select the taken Live Photos, tap the Share button in the lower-left corner of the screen and choose Save As Video.
Combine Live Photos to Videos in iOS 13
Part 2: Combine videos with iMovie
iMovie is one of the apps in the list that can assist you to merge videos on iPhone. You can yourself create beautiful movies with the assistance of iMovie. Once you combine videos on iPhone, this app will let you transfer your videos between various iOS devices via AirDrop or iCloud Drive. Here is how you can add videos together on iPhone via iMovie.
Check more details about How to Edit Videos on iMovie
Step 1 – Launch iMovie app and get under the “Project” section available on the top of the screen.
Step 2 – Now, tap on “Create Project” and then select the video type out of the two options available, i.e. “Movie” or “Trailer”, select “Movie” in this case. Next, tap on “Create” from the next screen. Or you can import video from File.
Step 3 – Your project interface has now been successfully loaded on your screen. Now, to add the source video file, tap the “Media” icon on the left top of the timeline and your video gallery will load up on your screen. Select the desired source video and tap the “Add” icon to add it on the iMovie’s timeline.
Step 4 – Once your preferred video is added on the timeline, you can scroll the timeline to left or right to let the vertical line known as “playhead’ appear on the screen. Now, place the playhead by scrolling left or right, exactly at the place where you desire to combine the video.

Step 5 – This is the time where you need to add another video which you wish to combine with the source video. Follow the same process mentioned above to get your video added on the timeline. The nearest position to the playhead, be it before the existing video clip or after the clip, will let the fresh clip added to the video.
Step 6 – Now, if you wish to preview the two added videos in a combined playback, simply hit on the “Play” icon available just above the timeline in middle of the screen.
Step 7 – You can also use the transition effects from the presets to apply the desired effect when your first video is switched to another. Or, you can use the traditional fade in or out (default transition) as well.
Step 8 – When you are satisfied with your video, simply hit the “Done” on the left top corner of your screen. And, the next interface will bring you up to a screen where you can simply save the merged video file on your local storage or can directly upload them to various cloud storage platforms. Moreover, here on this screen you can give your video a custom defined title too.
Part 3: Combine videos with Videoshop
Videoshop is a great video editing app and is next app to combine video clips in the list. This app has got all; from trimming, cropping videos to adding sound effects, recording one’s own voice as well as resizing the video frame and many more features. Here is how you can add videos together on iPhone via Videoshop app.
Step 1 – First of all, download the app from App Store. Launch it post downloading.
Step 2 – Hit on the plus signed icon in order to start adding your videos.
Step 3 – You can now choose the options given above the videos. You can select different settings or editing options like adding transition, typing texts, speed changes, adding audio track and many more.

Step 4 – Once done, you can move to tap on the “Next” button.
Step 5 – Subsequently, move further by giving the title of video, author, place and date if you want. Also, you can customize videos with filters and themes.
Step 6 – Once done with the merging videos on iPhone, tap on the Sharing button and store the file. You can also upload your file to YouTube, Vimeo or send via e-mail, save to Dropbox.
Part 4: Combine videos with Filmora on Windows or Mac
You may face a little disturbance while combining videos on iPhone using iMovie. Using iMovie for merging videos may result in losing frames issue which can be unpleasant to anyone. Here, we would recommend you Filmora video editor which can be used on Windows and Mac computers. It is believed to be one of the best video merger app and would be a great option if you want to avoid losing frame thing.
Besides merging several videos into a longer one , Filmora also allows you to put two videos side by side and make a split-screen video easily . Check the video tutorial and try the free trial version below.
In this following part, I’ll show you how to combine iPhone videos with Filmora for Windows.
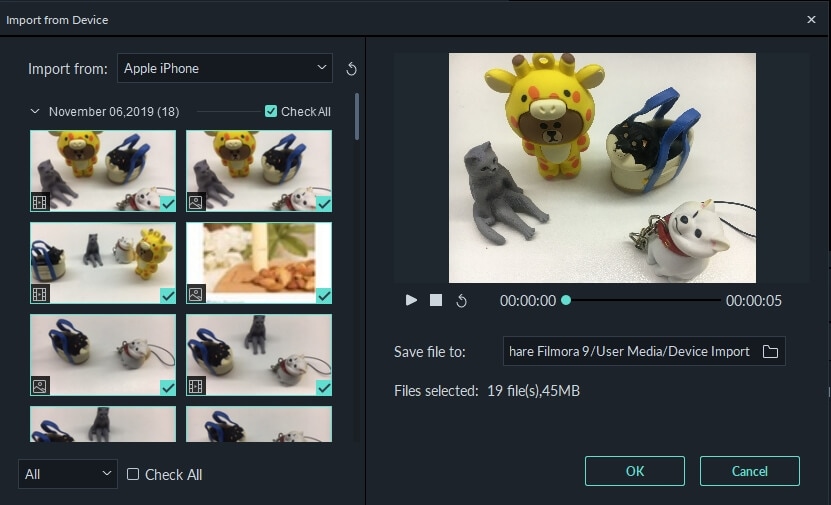
1. Launch Wondershare Filmora on Windows and click the Import button and select “Import from a Camera or a Phone”.
2. In the pop-up Import for Device window, you will see the photos and video on your iPhone on the left side, click one to preview and then select it to import. Filmora will load it directly in the Project Media library.
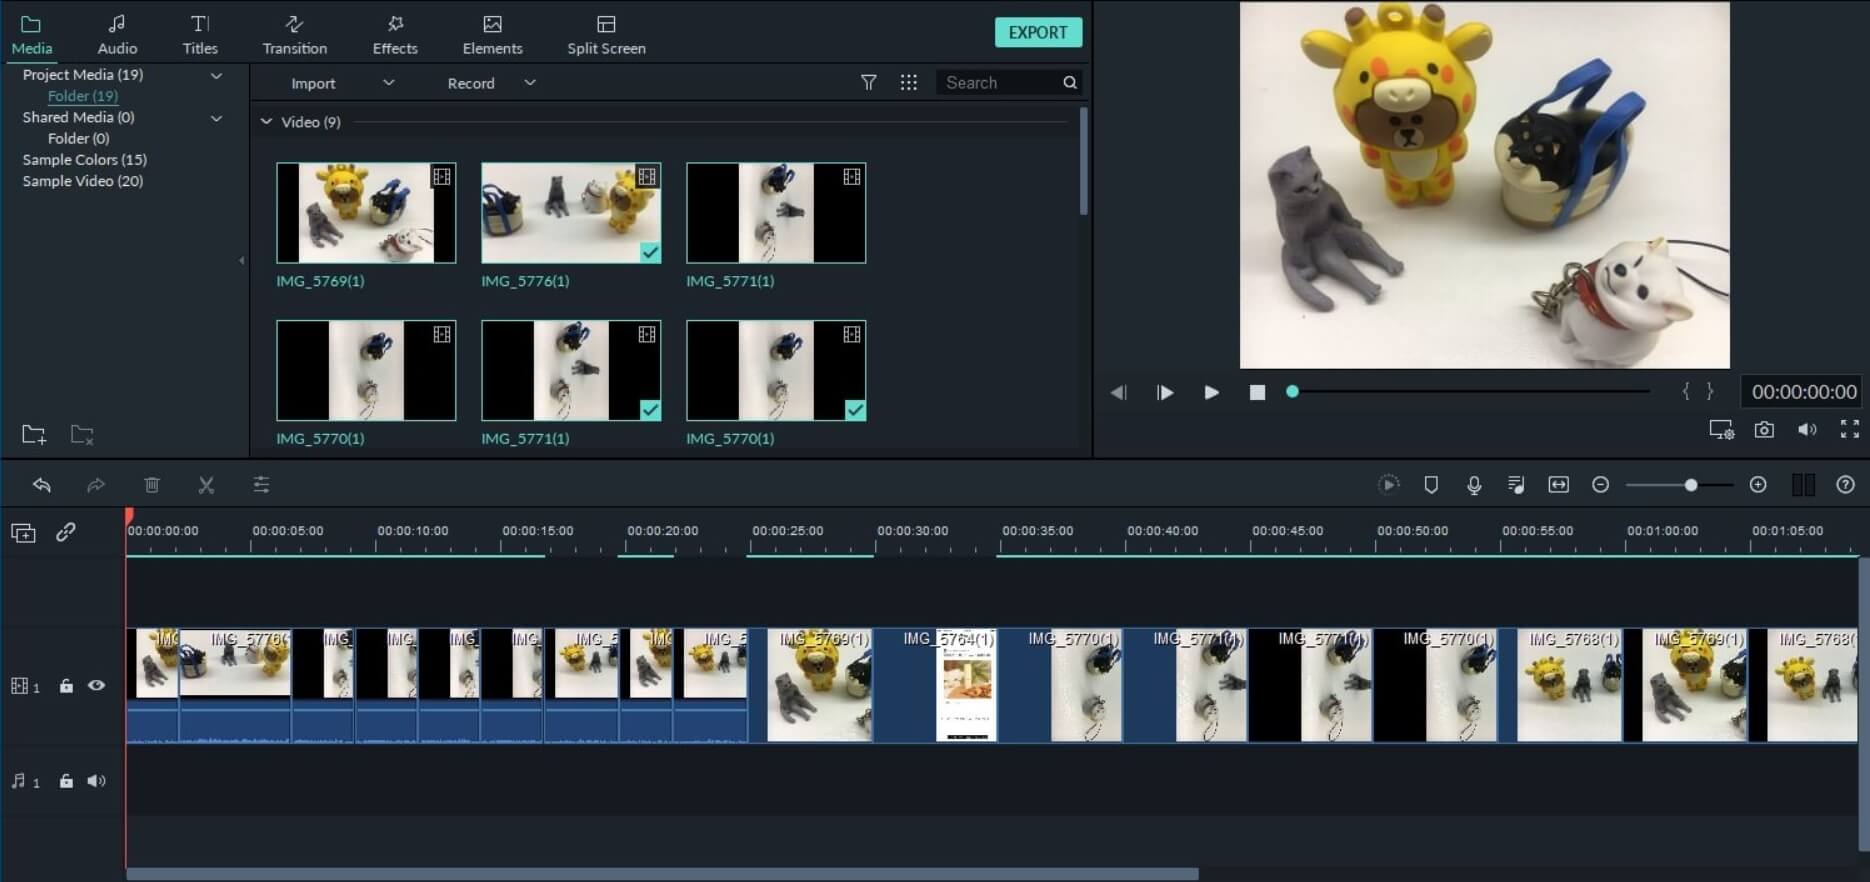
Step 3 – Select all photos and videos you want to combine in the Project Media library and drag and drop them to the timeline. Once you do this, you will spot that the video files you’ve dragged will be aligned in the same timeline.
Step 4 – Filmora is packed with a great deal of powerful tools with the help of which you are allowed to modify contrast, color, add effects, filters, elements or background music etc. to video. So after merging, you can edit your videos if you wish. You can check our ultimate guide about how to edit video in Filmora.
Step 5 – Once you find yourself contented with the creation, you can export it to your device. For this, choose the “EXPORT” option available in the toolbar and choose iPhone as the target device.
Final Verdict
Here ends the discussion about how to combine videos on iPhone and we hope that you got a pleasant experience reading this post. Thanks for the time for browsing through the post. We offered you some refined apps like Filmora video editor to combine your videos. So, which was the best video merger app according to you? We would like to get familiar with your choice and experience.
Ollie Mattison
Ollie Mattison is a writer and a lover of all things video.
Follow @Ollie Mattison
Ollie Mattison
Mar 27, 2024• Proven solutions
We all find ourselves delighted by watching videos for different purposes. Unsurprisingly, you have a bunch of videos on your iPhone. How about combining your favorite genre videos into one video on your iPhone? For example, you can merge all the funny videos and make it a single video. This way you can enjoy the videos in one go. For those people who have lots of video clips in their iPhone and want to merge those into one, we have come up with some amazing and useful apps to combine videos on iPhone. Let’s get off the ground to learn the methods.
- Part 1: Combine Live Photos to Videos in iOS 13 for FREE
- Part 2: Combine videos with iMovie on iPhone for FREE
- Part 3: Combine videos with Videoshop
- Part 4: Combine videos with Filmora with more creative templates
Part 1: Combine Live Photos to Videos with Photos app on iPhone [iOS13]
The newly released iOS 13 added some cool features in the Photos app, and now you can combine several Live Photos together and save them as a new video or slideshow. Here is how to combine Live Photos to video in iOS13.
- Launch the Photos app and then tap the Select button at the upper-right corner of the screen.
- Select the taken Live Photos, tap the Share button in the lower-left corner of the screen and choose Save As Video.
Combine Live Photos to Videos in iOS 13
Part 2: Combine videos with iMovie
iMovie is one of the apps in the list that can assist you to merge videos on iPhone. You can yourself create beautiful movies with the assistance of iMovie. Once you combine videos on iPhone, this app will let you transfer your videos between various iOS devices via AirDrop or iCloud Drive. Here is how you can add videos together on iPhone via iMovie.
Check more details about How to Edit Videos on iMovie
Step 1 – Launch iMovie app and get under the “Project” section available on the top of the screen.
Step 2 – Now, tap on “Create Project” and then select the video type out of the two options available, i.e. “Movie” or “Trailer”, select “Movie” in this case. Next, tap on “Create” from the next screen. Or you can import video from File.
Step 3 – Your project interface has now been successfully loaded on your screen. Now, to add the source video file, tap the “Media” icon on the left top of the timeline and your video gallery will load up on your screen. Select the desired source video and tap the “Add” icon to add it on the iMovie’s timeline.
Step 4 – Once your preferred video is added on the timeline, you can scroll the timeline to left or right to let the vertical line known as “playhead’ appear on the screen. Now, place the playhead by scrolling left or right, exactly at the place where you desire to combine the video.
Step 5 – This is the time where you need to add another video which you wish to combine with the source video. Follow the same process mentioned above to get your video added on the timeline. The nearest position to the playhead, be it before the existing video clip or after the clip, will let the fresh clip added to the video.
Step 6 – Now, if you wish to preview the two added videos in a combined playback, simply hit on the “Play” icon available just above the timeline in middle of the screen.
Step 7 – You can also use the transition effects from the presets to apply the desired effect when your first video is switched to another. Or, you can use the traditional fade in or out (default transition) as well.
Step 8 – When you are satisfied with your video, simply hit the “Done” on the left top corner of your screen. And, the next interface will bring you up to a screen where you can simply save the merged video file on your local storage or can directly upload them to various cloud storage platforms. Moreover, here on this screen you can give your video a custom defined title too.
Part 3: Combine videos with Videoshop
Videoshop is a great video editing app and is next app to combine video clips in the list. This app has got all; from trimming, cropping videos to adding sound effects, recording one’s own voice as well as resizing the video frame and many more features. Here is how you can add videos together on iPhone via Videoshop app.
Step 1 – First of all, download the app from App Store. Launch it post downloading.
Step 2 – Hit on the plus signed icon in order to start adding your videos.
Step 3 – You can now choose the options given above the videos. You can select different settings or editing options like adding transition, typing texts, speed changes, adding audio track and many more.
Step 4 – Once done, you can move to tap on the “Next” button.
Step 5 – Subsequently, move further by giving the title of video, author, place and date if you want. Also, you can customize videos with filters and themes.
Step 6 – Once done with the merging videos on iPhone, tap on the Sharing button and store the file. You can also upload your file to YouTube, Vimeo or send via e-mail, save to Dropbox.
Part 4: Combine videos with Filmora on Windows or Mac
You may face a little disturbance while combining videos on iPhone using iMovie. Using iMovie for merging videos may result in losing frames issue which can be unpleasant to anyone. Here, we would recommend you Filmora video editor which can be used on Windows and Mac computers. It is believed to be one of the best video merger app and would be a great option if you want to avoid losing frame thing.
Besides merging several videos into a longer one , Filmora also allows you to put two videos side by side and make a split-screen video easily . Check the video tutorial and try the free trial version below.
In this following part, I’ll show you how to combine iPhone videos with Filmora for Windows.
1. Launch Wondershare Filmora on Windows and click the Import button and select “Import from a Camera or a Phone”.
2. In the pop-up Import for Device window, you will see the photos and video on your iPhone on the left side, click one to preview and then select it to import. Filmora will load it directly in the Project Media library.
Step 3 – Select all photos and videos you want to combine in the Project Media library and drag and drop them to the timeline. Once you do this, you will spot that the video files you’ve dragged will be aligned in the same timeline.
Step 4 – Filmora is packed with a great deal of powerful tools with the help of which you are allowed to modify contrast, color, add effects, filters, elements or background music etc. to video. So after merging, you can edit your videos if you wish. You can check our ultimate guide about how to edit video in Filmora.
Step 5 – Once you find yourself contented with the creation, you can export it to your device. For this, choose the “EXPORT” option available in the toolbar and choose iPhone as the target device.
 Easy and Safe Partition Software & Hard Disk Manager
Final Verdict
Here ends the discussion about how to combine videos on iPhone and we hope that you got a pleasant experience reading this post. Thanks for the time for browsing through the post. We offered you some refined apps like Filmora video editor to combine your videos. So, which was the best video merger app according to you? We would like to get familiar with your choice and experience.

Ollie Mattison
Ollie Mattison is a writer and a lover of all things video.
Follow @Ollie Mattison
Ollie Mattison
Mar 27, 2024• Proven solutions
We all find ourselves delighted by watching videos for different purposes. Unsurprisingly, you have a bunch of videos on your iPhone. How about combining your favorite genre videos into one video on your iPhone? For example, you can merge all the funny videos and make it a single video. This way you can enjoy the videos in one go. For those people who have lots of video clips in their iPhone and want to merge those into one, we have come up with some amazing and useful apps to combine videos on iPhone. Let’s get off the ground to learn the methods.
- Part 1: Combine Live Photos to Videos in iOS 13 for FREE
- Part 2: Combine videos with iMovie on iPhone for FREE
- Part 3: Combine videos with Videoshop
- Part 4: Combine videos with Filmora with more creative templates
Part 1: Combine Live Photos to Videos with Photos app on iPhone [iOS13]
The newly released iOS 13 added some cool features in the Photos app, and now you can combine several Live Photos together and save them as a new video or slideshow. Here is how to combine Live Photos to video in iOS13.
- Launch the Photos app and then tap the Select button at the upper-right corner of the screen.
- Select the taken Live Photos, tap the Share button in the lower-left corner of the screen and choose Save As Video.
Combine Live Photos to Videos in iOS 13

Part 2: Combine videos with iMovie
iMovie is one of the apps in the list that can assist you to merge videos on iPhone. You can yourself create beautiful movies with the assistance of iMovie. Once you combine videos on iPhone, this app will let you transfer your videos between various iOS devices via AirDrop or iCloud Drive. Here is how you can add videos together on iPhone via iMovie.
Check more details about How to Edit Videos on iMovie
Step 1 – Launch iMovie app and get under the “Project” section available on the top of the screen.
Step 2 – Now, tap on “Create Project” and then select the video type out of the two options available, i.e. “Movie” or “Trailer”, select “Movie” in this case. Next, tap on “Create” from the next screen. Or you can import video from File.
Step 3 – Your project interface has now been successfully loaded on your screen. Now, to add the source video file, tap the “Media” icon on the left top of the timeline and your video gallery will load up on your screen. Select the desired source video and tap the “Add” icon to add it on the iMovie’s timeline.
Step 4 – Once your preferred video is added on the timeline, you can scroll the timeline to left or right to let the vertical line known as “playhead’ appear on the screen. Now, place the playhead by scrolling left or right, exactly at the place where you desire to combine the video.
Step 5 – This is the time where you need to add another video which you wish to combine with the source video. Follow the same process mentioned above to get your video added on the timeline. The nearest position to the playhead, be it before the existing video clip or after the clip, will let the fresh clip added to the video.
Step 6 – Now, if you wish to preview the two added videos in a combined playback, simply hit on the “Play” icon available just above the timeline in middle of the screen.
Step 7 – You can also use the transition effects from the presets to apply the desired effect when your first video is switched to another. Or, you can use the traditional fade in or out (default transition) as well.
Step 8 – When you are satisfied with your video, simply hit the “Done” on the left top corner of your screen. And, the next interface will bring you up to a screen where you can simply save the merged video file on your local storage or can directly upload them to various cloud storage platforms. Moreover, here on this screen you can give your video a custom defined title too.
Part 3: Combine videos with Videoshop
Videoshop is a great video editing app and is next app to combine video clips in the list. This app has got all; from trimming, cropping videos to adding sound effects, recording one’s own voice as well as resizing the video frame and many more features. Here is how you can add videos together on iPhone via Videoshop app.
Step 1 – First of all, download the app from App Store. Launch it post downloading.
Step 2 – Hit on the plus signed icon in order to start adding your videos.
Step 3 – You can now choose the options given above the videos. You can select different settings or editing options like adding transition, typing texts, speed changes, adding audio track and many more.
Step 4 – Once done, you can move to tap on the “Next” button.
Step 5 – Subsequently, move further by giving the title of video, author, place and date if you want. Also, you can customize videos with filters and themes.
Step 6 – Once done with the merging videos on iPhone, tap on the Sharing button and store the file. You can also upload your file to YouTube, Vimeo or send via e-mail, save to Dropbox.
Part 4: Combine videos with Filmora on Windows or Mac
You may face a little disturbance while combining videos on iPhone using iMovie. Using iMovie for merging videos may result in losing frames issue which can be unpleasant to anyone. Here, we would recommend you Filmora video editor which can be used on Windows and Mac computers. It is believed to be one of the best video merger app and would be a great option if you want to avoid losing frame thing.
Besides merging several videos into a longer one , Filmora also allows you to put two videos side by side and make a split-screen video easily . Check the video tutorial and try the free trial version below.
In this following part, I’ll show you how to combine iPhone videos with Filmora for Windows.
1. Launch Wondershare Filmora on Windows and click the Import button and select “Import from a Camera or a Phone”.
2. In the pop-up Import for Device window, you will see the photos and video on your iPhone on the left side, click one to preview and then select it to import. Filmora will load it directly in the Project Media library.
Step 3 – Select all photos and videos you want to combine in the Project Media library and drag and drop them to the timeline. Once you do this, you will spot that the video files you’ve dragged will be aligned in the same timeline.
Step 4 – Filmora is packed with a great deal of powerful tools with the help of which you are allowed to modify contrast, color, add effects, filters, elements or background music etc. to video. So after merging, you can edit your videos if you wish. You can check our ultimate guide about how to edit video in Filmora.
Step 5 – Once you find yourself contented with the creation, you can export it to your device. For this, choose the “EXPORT” option available in the toolbar and choose iPhone as the target device.

Final Verdict
Here ends the discussion about how to combine videos on iPhone and we hope that you got a pleasant experience reading this post. Thanks for the time for browsing through the post. We offered you some refined apps like Filmora video editor to combine your videos. So, which was the best video merger app according to you? We would like to get familiar with your choice and experience.
 DLNow Video Downloader
Ollie Mattison
Ollie Mattison is a writer and a lover of all things video.
Follow @Ollie Mattison
- Title: [Updated] Bridging Independent iPhone Media Journeys
- Author: Christopher
- Created at : 2024-07-22 13:22:54
- Updated at : 2024-07-23 13:22:54
- Link: https://extra-hints.techidaily.com/updated-bridging-independent-iphone-media-journeys/
- License: This work is licensed under CC BY-NC-SA 4.0.