
Unlocking PIP Techniques for Professional Apple Users
Unlocking PIP Techniques for Professional Apple Users
How to Make Picture in Picture Video on macOS sierra


Richard Bennett
Mar 27, 2024• Proven solutions
Creating picture-in-picture videos can be one of the best ways that you can make reaction videos or play-by-play videos showcasing yourself on camera as well as action happening in the main video.
This type of video has become extremely popular on YouTube and other video sharing websites. If you are interested in breaking into this medium, it becomes much easier with the help of the macOS Sierra update. Through the improvements with this new operating system and extremely high demand for picture-in-picture videos, users are finding it much simpler to create this style of video.
In order to create professional picture-in-picture videos, you’re going to need access to an editing suite. Having a professional PIP video editor can be one of the best ways to edit together a picture-in-picture video and add in some of your own effects in the process.
 Glary Utilities PRO - Premium all-in-one utility to clean, speed up, maintain and protect your PC
How to make a picture-in-picture video on Mac OS Sierra
One of the best picture-in-picture video editors available on mac OS sierra right now is Wondershare Filmora .
Why choose Wondershare Filmora
- Supports almost all kinds of video formats, including MKV, WMV, MOV, AVCHD, and more.
- Complete all classic video editing like crop, trim, cut, split, and combine in a few clicks.
- Provides more than 300 styles and audio/visual effects to ignite your video.
- Advanced video editing tools like PIP, Faceoff, Mosaic, Jump Cut, etc for you to explore.
- Convert you’re edited to any popular video format or fit the video to mobile devices.
- Burn your own DVD collection or upload it to YouTube and Facebook, Vimeo instantly.
 vMix Basic HD - Software based live production. vMix Basic HD includes 4 inputs, 3 cameras, streaming, recording, playlist.
 Download Mac Version ](https://tools.techidaily.com/wondershare/filmora/download/ )
Here are the detailed steps for creating a PIP(picture-in-picture) video with Filmora:
 ZoneAlarm Extreme Security NextGen
Step 1 Download and Install Wondershare Filmora
To get started, locate an area that you can download the Wondershare Filmora program. The free editing software is available from the Wondershare website, as well as throughout several other spots online.
Getting your hands on the software is the easiest part, and installing the software takes just a few moments. You can use the free version of Filmora or unlock all of the features of the program by paying for the full licensed version of the software.

Step 2 Import video files
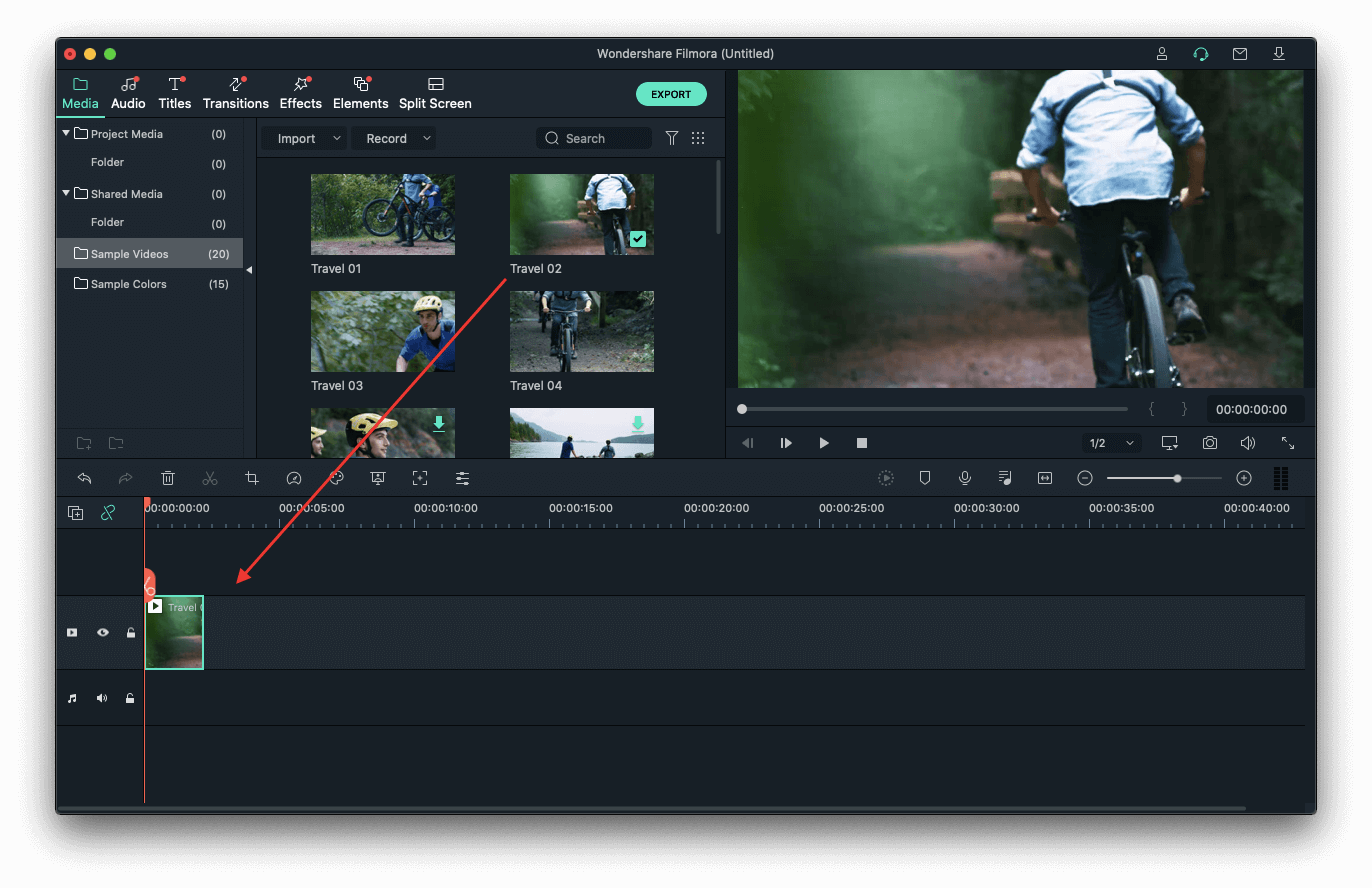
After you have installed the full version or trial version of the program, you just need to import the video files that you would like to use.
Think of two videos that you would like to play at the same time in a picture-in-picture format and then import both video files to the editor.
Once the two files have been added to the software, you can manipulate them however you see fit.
Step 3 Modify PIP track
To get a PIP video, double click on the added video or image on the PIP track. The Motion panel will open. Click the “Advanced” button for extra Mask and Effect options.
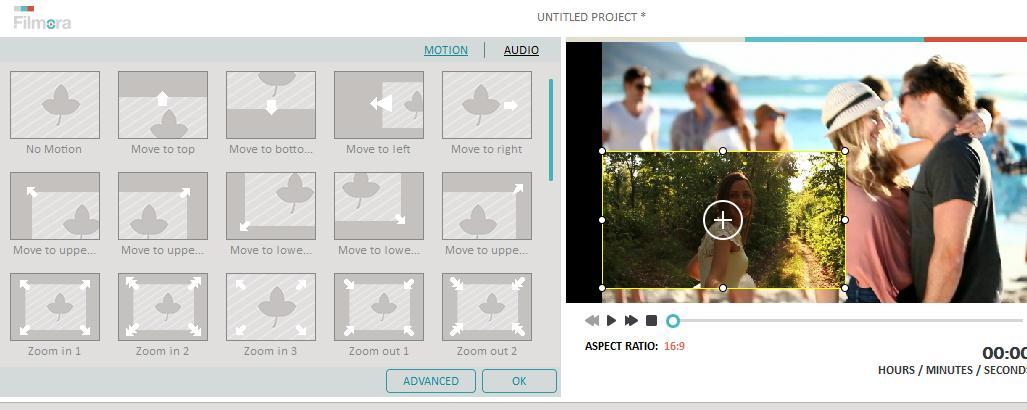
Choose a motion effect you like to make Picture-in-Picture video/images. There will be a sign when motion is added to a PIP. You can put the Picture-in-Picture video/images in any position you want.
Once you are comfortable with the viewing area that you would like to playback, put the videos on top of each other in a picture-in-picture style, and have them play at the same time.
This picture-in-picture format is like a video overlay, and you can take out the area where the second video will play and sync it up with the main video too.
Once you are comfortable with how the videos play in relation to each other, where the video tracks are located and more, you can work at saving the film.
Step 4 Saving and sharing
Wondershare Filmora makes the process of saving much easier because there are so many files available for output. With a massive amount of video output tools and track options, you can pick options like the optimal resolution for your video, the best sound options, and more.
You can also find upload tools or DVD burning tools available all within the Filmora editor, making the process of sharing your video much easier as well.
If you are looking for the easiest way to create picture-in-picture video experiences on the new Mac OS sierra, you have got to try Wondershare Filmora.
Download Mac Version ](https://tools.techidaily.com/wondershare/filmora/download/ )
 The Tube Sites Submitter is a fast and efficient tool for anyone who needs to upload videos quickly, easily and automatically to hundreds of tube sites in mere minutes .
Richard Bennett
Richard Bennett is a writer and a lover of all things video.
Follow @Richard Bennett
Richard Bennett
Mar 27, 2024• Proven solutions
Creating picture-in-picture videos can be one of the best ways that you can make reaction videos or play-by-play videos showcasing yourself on camera as well as action happening in the main video.
This type of video has become extremely popular on YouTube and other video sharing websites. If you are interested in breaking into this medium, it becomes much easier with the help of the macOS Sierra update. Through the improvements with this new operating system and extremely high demand for picture-in-picture videos, users are finding it much simpler to create this style of video.
In order to create professional picture-in-picture videos, you’re going to need access to an editing suite. Having a professional PIP video editor can be one of the best ways to edit together a picture-in-picture video and add in some of your own effects in the process.
How to make a picture-in-picture video on Mac OS Sierra
One of the best picture-in-picture video editors available on mac OS sierra right now is Wondershare Filmora .
Why choose Wondershare Filmora
- Supports almost all kinds of video formats, including MKV, WMV, MOV, AVCHD, and more.
- Complete all classic video editing like crop, trim, cut, split, and combine in a few clicks.
- Provides more than 300 styles and audio/visual effects to ignite your video.
- Advanced video editing tools like PIP, Faceoff, Mosaic, Jump Cut, etc for you to explore.
- Convert you’re edited to any popular video format or fit the video to mobile devices.
- Burn your own DVD collection or upload it to YouTube and Facebook, Vimeo instantly.
Download Mac Version ](https://tools.techidaily.com/wondershare/filmora/download/ )
Here are the detailed steps for creating a PIP(picture-in-picture) video with Filmora:
Step 1 Download and Install Wondershare Filmora
To get started, locate an area that you can download the Wondershare Filmora program. The free editing software is available from the Wondershare website, as well as throughout several other spots online.
Getting your hands on the software is the easiest part, and installing the software takes just a few moments. You can use the free version of Filmora or unlock all of the features of the program by paying for the full licensed version of the software.
Step 2 Import video files
After you have installed the full version or trial version of the program, you just need to import the video files that you would like to use.
Think of two videos that you would like to play at the same time in a picture-in-picture format and then import both video files to the editor.
Once the two files have been added to the software, you can manipulate them however you see fit.
Step 3 Modify PIP track
To get a PIP video, double click on the added video or image on the PIP track. The Motion panel will open. Click the “Advanced” button for extra Mask and Effect options.
 Nero Burning ROM:
The ultimate burning program for all your needs!
Choose a motion effect you like to make Picture-in-Picture video/images. There will be a sign when motion is added to a PIP. You can put the Picture-in-Picture video/images in any position you want.
Once you are comfortable with the viewing area that you would like to playback, put the videos on top of each other in a picture-in-picture style, and have them play at the same time.
This picture-in-picture format is like a video overlay, and you can take out the area where the second video will play and sync it up with the main video too.
Once you are comfortable with how the videos play in relation to each other, where the video tracks are located and more, you can work at saving the film.
Step 4 Saving and sharing
Wondershare Filmora makes the process of saving much easier because there are so many files available for output. With a massive amount of video output tools and track options, you can pick options like the optimal resolution for your video, the best sound options, and more.
You can also find upload tools or DVD burning tools available all within the Filmora editor, making the process of sharing your video much easier as well.
If you are looking for the easiest way to create picture-in-picture video experiences on the new Mac OS sierra, you have got to try Wondershare Filmora.
[](https://tools.techidaily.com/wondershare/filmora/download/)[Download Mac Version](https://images.wondershare.com/filmora/guide/download-btn-mac.jpg)](https://tools.techidaily.com/wondershare/filmora/download/) Power Tools add-on for Google Sheets, Lifetime subscription
Richard Bennett
Richard Bennett is a writer and a lover of all things video.
Follow @Richard Bennett
Richard Bennett
Mar 27, 2024• Proven solutions
Creating picture-in-picture videos can be one of the best ways that you can make reaction videos or play-by-play videos showcasing yourself on camera as well as action happening in the main video.
This type of video has become extremely popular on YouTube and other video sharing websites. If you are interested in breaking into this medium, it becomes much easier with the help of the macOS Sierra update. Through the improvements with this new operating system and extremely high demand for picture-in-picture videos, users are finding it much simpler to create this style of video.
In order to create professional picture-in-picture videos, you’re going to need access to an editing suite. Having a professional PIP video editor can be one of the best ways to edit together a picture-in-picture video and add in some of your own effects in the process.
How to make a picture-in-picture video on Mac OS Sierra
One of the best picture-in-picture video editors available on mac OS sierra right now is Wondershare Filmora .
Why choose Wondershare Filmora
- Supports almost all kinds of video formats, including MKV, WMV, MOV, AVCHD, and more.
- Complete all classic video editing like crop, trim, cut, split, and combine in a few clicks.
- Provides more than 300 styles and audio/visual effects to ignite your video.
- Advanced video editing tools like PIP, Faceoff, Mosaic, Jump Cut, etc for you to explore.
- Convert you’re edited to any popular video format or fit the video to mobile devices.
- Burn your own DVD collection or upload it to YouTube and Facebook, Vimeo instantly.
Download Mac Version ](https://tools.techidaily.com/wondershare/filmora/download/ )
Here are the detailed steps for creating a PIP(picture-in-picture) video with Filmora:
 Jet Profiler for MySQL, Enterprise Version: Jet Profiler for MySQL is real-time query performance and diagnostics tool for the MySQL database server. Its detailed query information, graphical interface and ease of use makes this a great tool for finding performance bottlenecks in your MySQL databases.
 Step 1 Download and Install Wondershare Filmora
To get started, locate an area that you can download the Wondershare Filmora program. The free editing software is available from the Wondershare website, as well as throughout several other spots online.
Getting your hands on the software is the easiest part, and installing the software takes just a few moments. You can use the free version of Filmora or unlock all of the features of the program by paying for the full licensed version of the software.
Step 2 Import video files
After you have installed the full version or trial version of the program, you just need to import the video files that you would like to use.
Think of two videos that you would like to play at the same time in a picture-in-picture format and then import both video files to the editor.
Once the two files have been added to the software, you can manipulate them however you see fit.
Step 3 Modify PIP track
To get a PIP video, double click on the added video or image on the PIP track. The Motion panel will open. Click the “Advanced” button for extra Mask and Effect options.
Choose a motion effect you like to make Picture-in-Picture video/images. There will be a sign when motion is added to a PIP. You can put the Picture-in-Picture video/images in any position you want.
Once you are comfortable with the viewing area that you would like to playback, put the videos on top of each other in a picture-in-picture style, and have them play at the same time.
This picture-in-picture format is like a video overlay, and you can take out the area where the second video will play and sync it up with the main video too.
Once you are comfortable with how the videos play in relation to each other, where the video tracks are located and more, you can work at saving the film.
Step 4 Saving and sharing
Wondershare Filmora makes the process of saving much easier because there are so many files available for output. With a massive amount of video output tools and track options, you can pick options like the optimal resolution for your video, the best sound options, and more.
You can also find upload tools or DVD burning tools available all within the Filmora editor, making the process of sharing your video much easier as well.
If you are looking for the easiest way to create picture-in-picture video experiences on the new Mac OS sierra, you have got to try Wondershare Filmora.
Download Mac Version ](https://tools.techidaily.com/wondershare/filmora/download/ )
Richard Bennett
Richard Bennett is a writer and a lover of all things video.
Follow @Richard Bennett
Richard Bennett
Mar 27, 2024• Proven solutions
Creating picture-in-picture videos can be one of the best ways that you can make reaction videos or play-by-play videos showcasing yourself on camera as well as action happening in the main video.
This type of video has become extremely popular on YouTube and other video sharing websites. If you are interested in breaking into this medium, it becomes much easier with the help of the macOS Sierra update. Through the improvements with this new operating system and extremely high demand for picture-in-picture videos, users are finding it much simpler to create this style of video.
In order to create professional picture-in-picture videos, you’re going to need access to an editing suite. Having a professional PIP video editor can be one of the best ways to edit together a picture-in-picture video and add in some of your own effects in the process.
How to make a picture-in-picture video on Mac OS Sierra
One of the best picture-in-picture video editors available on mac OS sierra right now is Wondershare Filmora .
Why choose Wondershare Filmora
- Supports almost all kinds of video formats, including MKV, WMV, MOV, AVCHD, and more.
- Complete all classic video editing like crop, trim, cut, split, and combine in a few clicks.
- Provides more than 300 styles and audio/visual effects to ignite your video.
- Advanced video editing tools like PIP, Faceoff, Mosaic, Jump Cut, etc for you to explore.
- Convert you’re edited to any popular video format or fit the video to mobile devices.
- Burn your own DVD collection or upload it to YouTube and Facebook, Vimeo instantly.
Download Mac Version ](https://tools.techidaily.com/wondershare/filmora/download/ )
Here are the detailed steps for creating a PIP(picture-in-picture) video with Filmora:
Step 1 Download and Install Wondershare Filmora
To get started, locate an area that you can download the Wondershare Filmora program. The free editing software is available from the Wondershare website, as well as throughout several other spots online.
Getting your hands on the software is the easiest part, and installing the software takes just a few moments. You can use the free version of Filmora or unlock all of the features of the program by paying for the full licensed version of the software.
Step 2 Import video files
After you have installed the full version or trial version of the program, you just need to import the video files that you would like to use.
Think of two videos that you would like to play at the same time in a picture-in-picture format and then import both video files to the editor.
Once the two files have been added to the software, you can manipulate them however you see fit.
Step 3 Modify PIP track
To get a PIP video, double click on the added video or image on the PIP track. The Motion panel will open. Click the “Advanced” button for extra Mask and Effect options.

Choose a motion effect you like to make Picture-in-Picture video/images. There will be a sign when motion is added to a PIP. You can put the Picture-in-Picture video/images in any position you want.
Once you are comfortable with the viewing area that you would like to playback, put the videos on top of each other in a picture-in-picture style, and have them play at the same time.
This picture-in-picture format is like a video overlay, and you can take out the area where the second video will play and sync it up with the main video too.
Once you are comfortable with how the videos play in relation to each other, where the video tracks are located and more, you can work at saving the film.
Step 4 Saving and sharing
Wondershare Filmora makes the process of saving much easier because there are so many files available for output. With a massive amount of video output tools and track options, you can pick options like the optimal resolution for your video, the best sound options, and more.
You can also find upload tools or DVD burning tools available all within the Filmora editor, making the process of sharing your video much easier as well.
If you are looking for the easiest way to create picture-in-picture video experiences on the new Mac OS sierra, you have got to try Wondershare Filmora.
Download Mac Version ](https://tools.techidaily.com/wondershare/filmora/download/ )
Richard Bennett
Richard Bennett is a writer and a lover of all things video.
Follow @Richard Bennett
- Title: Unlocking PIP Techniques for Professional Apple Users
- Author: Christopher
- Created at : 2024-07-22 10:50:22
- Updated at : 2024-07-23 10:50:22
- Link: https://extra-hints.techidaily.com/unlocking-pip-techniques-for-professional-apple-users/
- License: This work is licensed under CC BY-NC-SA 4.0.