:max_bytes(150000):strip_icc()/ipad-pro-pencil-56a533763df78cf77286e0e0.png)
Strategies for Seamless iPhone Photos Sorting & iCloud Backup Management
Strategies for Seamless iPhone Photos Sorting & iCloud Backup Management
How To Organize Photo Album On iPhone And iCloud

Ollie Mattison
Mar 27, 2024• Proven solutions
Are you frustrated of searching a photo from your last summer collection through the heap of images on your iPhone? If you are struggling to search any particular image from your collection of photos on your iPhone, here is a guide to managing and organising your iPhone images to a photo album. Yes, the iPhone photo albums are a great way to manage thousands of images, piled up on your phone. The photo album gives you an easy and instant access to all the videos and iPhone photos. You may clearly add and organize the photo albums in your own way.
Part1: Organize Photo Album on iPhone
Introducing Default Albums
The introduction of the iCloud drive that is usually supported by the devices iOS 5 and iPhone 3Gs and the later models, has made the iPhone photo album organization quite easy and hassle free. Apart from the ‘all photo album’, there are few default albums as well. What are the default albums? The images or the photos are often categorized as the selfies or screenshots favorites, etc. The iPhone automatically create and name the albums to a particular category of videos or photos, which are usually known as the default albums. Whether you are looking for a selfie clicked last month or a family group selfie, you just need to search a particular photo album as per your requirement. The various default album categories usually created are-
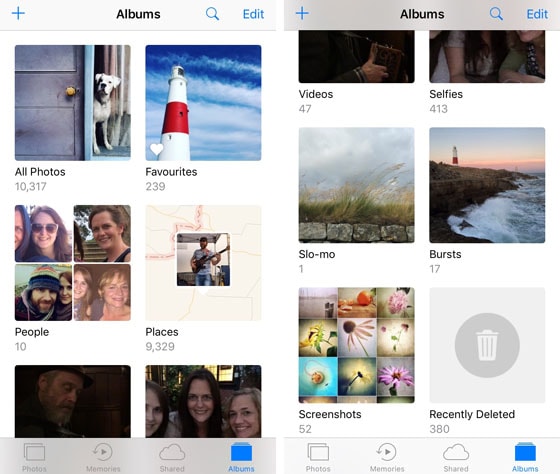
Videos album- You can find all the videos at one folder in video album.
Selfies- The images that require a front facing camera captures, are automatically stored in the Selfie album.
Favorites- If you are in love with any of the image clicked and wish to see it frequently, you may make photo directly on the favorites album, instead of searching it all over again and again.
Screenshots- When you press the home and power button together, the screenshots of your iPhone are created and saved in the Screenshots photo album.
Places- Have you enabled location services on your iPhone? If so, then this is an ultimate way to recollect when and where you went and clicked any particular or all Apple iPhone photos at one place.
People- If any person is detected in your photo, it is stored in iPhone photos album.
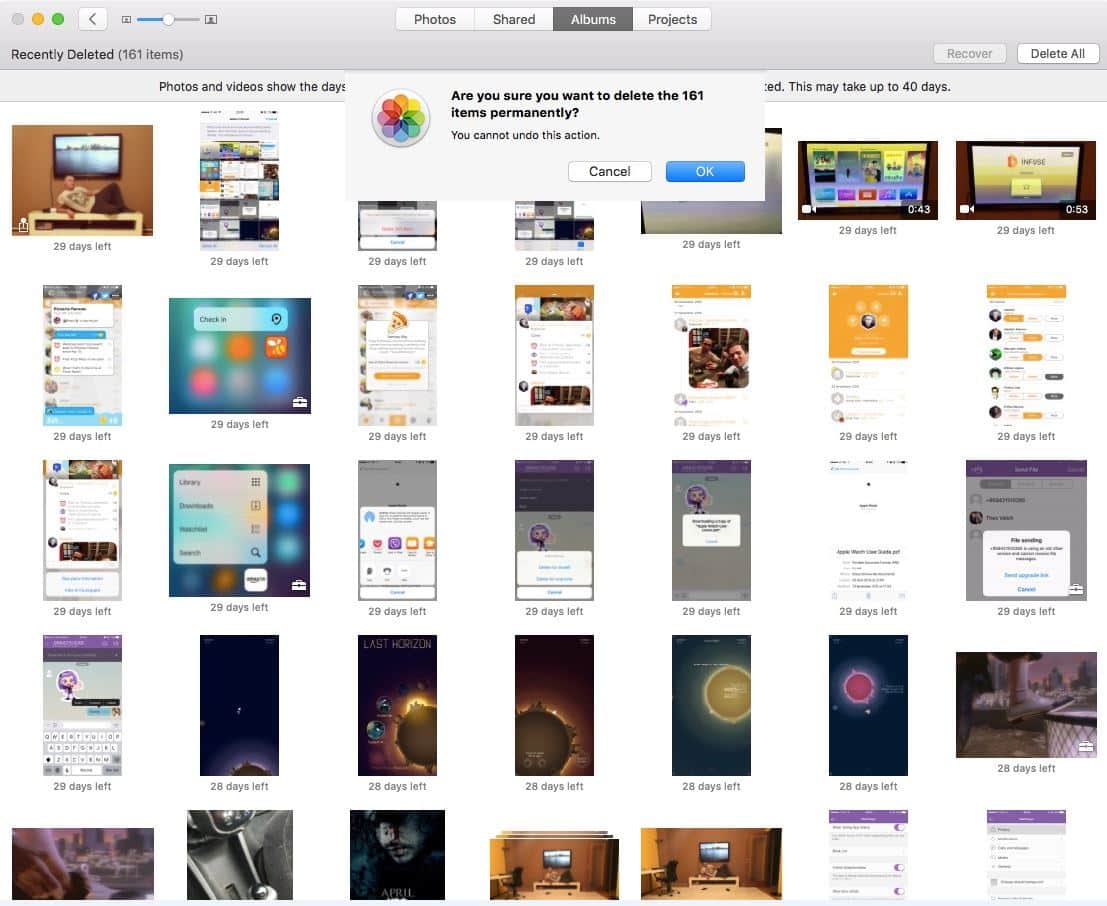
Recently Deleted- Did you delete any favorite iPhone photos and regretting the same? Don’t worry, now you may retrieve the apple iPhone photos within 29 days of deleting the same. Go to ‘recently deleted’ iPhone photo album to retrieve the deleted iPhone photos.
Other than the default iPhone photo albums, you may create your own customized photo albums too.
The First Way to Add Photo into a New Album
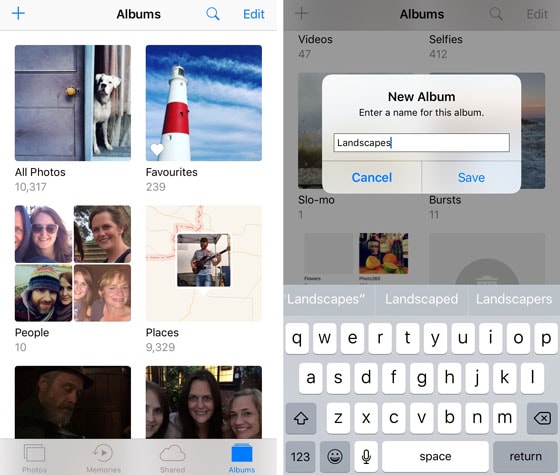
To organize your photos in a varied collection of new albums, seems a great option. The first way of adding photos is to create a photo album and then add iPhone photos to it. To create an album, tap the plus sign on the top left corner of the Album screen. Then, name the album to save it, clicking on the Save button.
Once your album is created, you may save the photos to the album at any time, clicking on the thumbnails from the “All Photos” list. Tap the Select option on the top right and then select the thumbnail images you wish to save. Next, click on the the Add to option, you can see at the bottom of the screen. Scroll to find the desired album and tap on the name of the photo album to save the iPhone photos into it.
The Second Way to Add Photos Into A Photo Album
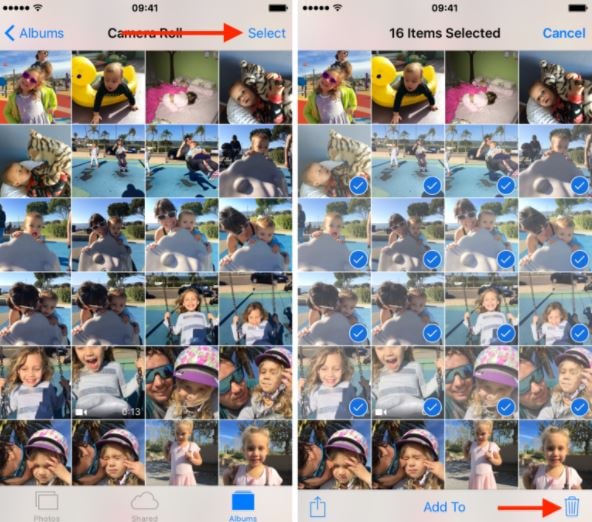
In this method, you select the apple iPhone photos first, and then add them into new or existing album. Tap on the select option at the top of the image thumbnail screen to select the thumbnail images, you wish to add to any album.

Then, tap the add option below the screen. If you wish the add the images to any of the existing album then scroll and search the album name and tap on it. To create a new album, tap the new album alternative, name it, and then tap Save.
How to Remove Photos from iPhone
Removing the photos from iPhone is quite easy and simple. If you wish to delete a photo or a video, select it by opening the Photo app and tap the trash icon on the right down corner of the page. Similarly, for deleting multiple photos, open the photo app and select the multiple videos and photos and hit the trash icon to delete the photos.
Part2: Organize Photo Album on iCloud
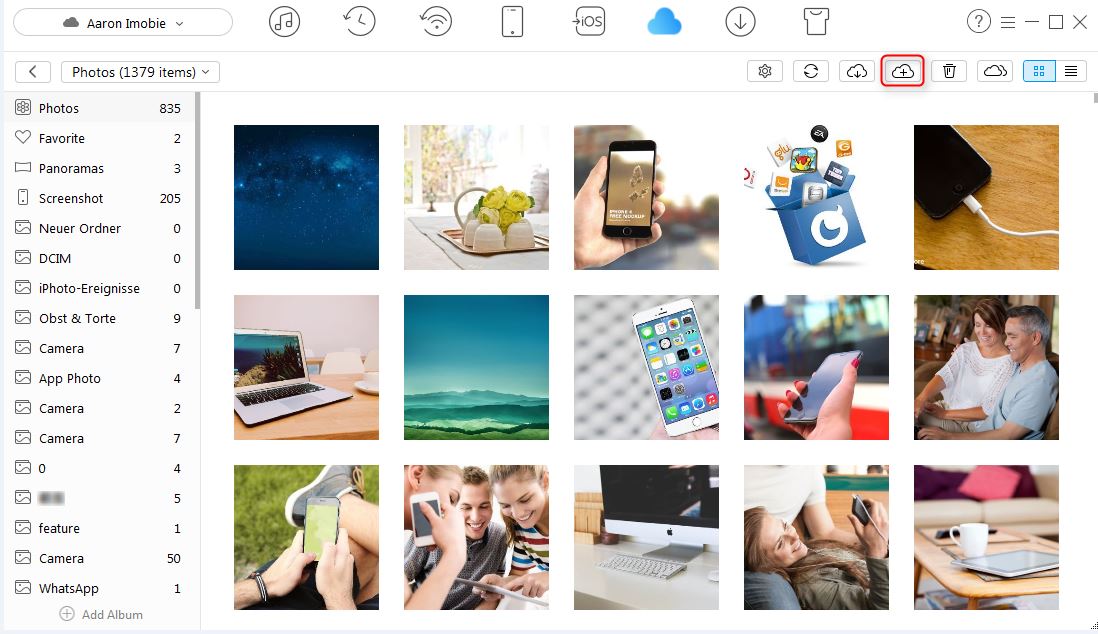
How to Add an Album
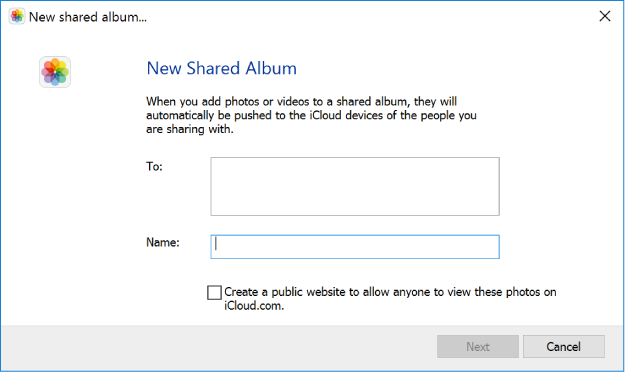
If you wish to organize your photos on the icloud photo album or add a new album, on the sidebar click the album, to see the videos and photos categorised according to the album. Then, click the plus sign add button to add the new album, name it, and click the ok option. Finally, select the images or videos you wish to add to the new album and click on Add.
How to Add Photos to an Album
The videos and photos are categorised by location and time, click on the sidebar photo option to see it. Next, you must select the videos or photos you wish to add to the album and click on the plus sign Add button.
Select the album you wish to add the iCloud photos and videos, from the pop up menu and then, select a new album, name it and click ok.
How to Remove Photo from Album
On the side bar, click an icloud photo album to view the content, tap the videos or photos you wish to delete, and click the trash icon (delete button) to delete the iCloud photos from the album.
Conclusion
Knowing the steps to add or delete the iPhone photo albums or the icloud photos, makes the process far simpler and hassle free. Locating a photo album or apple iPhone photos has become an instant procedure after organizing the photo album on iPhone and iCloud.
Images come from the Internet
Ollie Mattison
Ollie Mattison is a writer and a lover of all things video.
Follow @Ollie Mattison
Ollie Mattison
Mar 27, 2024• Proven solutions
Are you frustrated of searching a photo from your last summer collection through the heap of images on your iPhone? If you are struggling to search any particular image from your collection of photos on your iPhone, here is a guide to managing and organising your iPhone images to a photo album. Yes, the iPhone photo albums are a great way to manage thousands of images, piled up on your phone. The photo album gives you an easy and instant access to all the videos and iPhone photos. You may clearly add and organize the photo albums in your own way.
Part1: Organize Photo Album on iPhone
Introducing Default Albums
The introduction of the iCloud drive that is usually supported by the devices iOS 5 and iPhone 3Gs and the later models, has made the iPhone photo album organization quite easy and hassle free. Apart from the ‘all photo album’, there are few default albums as well. What are the default albums? The images or the photos are often categorized as the selfies or screenshots favorites, etc. The iPhone automatically create and name the albums to a particular category of videos or photos, which are usually known as the default albums. Whether you are looking for a selfie clicked last month or a family group selfie, you just need to search a particular photo album as per your requirement. The various default album categories usually created are-
Videos album- You can find all the videos at one folder in video album.
Selfies- The images that require a front facing camera captures, are automatically stored in the Selfie album.
Favorites- If you are in love with any of the image clicked and wish to see it frequently, you may make photo directly on the favorites album, instead of searching it all over again and again.
Screenshots- When you press the home and power button together, the screenshots of your iPhone are created and saved in the Screenshots photo album.
Places- Have you enabled location services on your iPhone? If so, then this is an ultimate way to recollect when and where you went and clicked any particular or all Apple iPhone photos at one place.
People- If any person is detected in your photo, it is stored in iPhone photos album.
Recently Deleted- Did you delete any favorite iPhone photos and regretting the same? Don’t worry, now you may retrieve the apple iPhone photos within 29 days of deleting the same. Go to ‘recently deleted’ iPhone photo album to retrieve the deleted iPhone photos.
Other than the default iPhone photo albums, you may create your own customized photo albums too.
The First Way to Add Photo into a New Album
To organize your photos in a varied collection of new albums, seems a great option. The first way of adding photos is to create a photo album and then add iPhone photos to it. To create an album, tap the plus sign on the top left corner of the Album screen. Then, name the album to save it, clicking on the Save button.
Once your album is created, you may save the photos to the album at any time, clicking on the thumbnails from the “All Photos” list. Tap the Select option on the top right and then select the thumbnail images you wish to save. Next, click on the the Add to option, you can see at the bottom of the screen. Scroll to find the desired album and tap on the name of the photo album to save the iPhone photos into it.
The Second Way to Add Photos Into A Photo Album
In this method, you select the apple iPhone photos first, and then add them into new or existing album. Tap on the select option at the top of the image thumbnail screen to select the thumbnail images, you wish to add to any album.
Then, tap the add option below the screen. If you wish the add the images to any of the existing album then scroll and search the album name and tap on it. To create a new album, tap the new album alternative, name it, and then tap Save.
How to Remove Photos from iPhone
Removing the photos from iPhone is quite easy and simple. If you wish to delete a photo or a video, select it by opening the Photo app and tap the trash icon on the right down corner of the page. Similarly, for deleting multiple photos, open the photo app and select the multiple videos and photos and hit the trash icon to delete the photos.
Part2: Organize Photo Album on iCloud
How to Add an Album
If you wish to organize your photos on the icloud photo album or add a new album, on the sidebar click the album, to see the videos and photos categorised according to the album. Then, click the plus sign add button to add the new album, name it, and click the ok option. Finally, select the images or videos you wish to add to the new album and click on Add.
How to Add Photos to an Album
The videos and photos are categorised by location and time, click on the sidebar photo option to see it. Next, you must select the videos or photos you wish to add to the album and click on the plus sign Add button.
Select the album you wish to add the iCloud photos and videos, from the pop up menu and then, select a new album, name it and click ok.
How to Remove Photo from Album
On the side bar, click an icloud photo album to view the content, tap the videos or photos you wish to delete, and click the trash icon (delete button) to delete the iCloud photos from the album.
Conclusion
Knowing the steps to add or delete the iPhone photo albums or the icloud photos, makes the process far simpler and hassle free. Locating a photo album or apple iPhone photos has become an instant procedure after organizing the photo album on iPhone and iCloud.
Images come from the Internet
Ollie Mattison
Ollie Mattison is a writer and a lover of all things video.
Follow @Ollie Mattison
Also read:
- [Updated] 2023'S Premier Alternatives to Samsung's Gear 360 Cam
- [Updated] 2024 Approved Disrupted Beats Best Mobile Music Distortors
- [Updated] How to Get Your YouTube Video Seen - 6 Easy Steps
- [Updated] Top Non-Udemy Online Learning Platforms for Self-Improvement
- 2024 Approved Comprehensive Guide to Top AE Extensions
- Ensure Clarity Leading Downloader Software for YouTubers
- In 2024, Begin Your Editing Journey Adopting Movie Maker for W11
- In 2024, How Can You Transfer Files From Honor Magic 5 Pro To iPhone 15/14/13? | Dr.fone
- Pinnacle Vision Studio Review Yearly Update
- Pivoting From ChatGPT: A Guide to Superior Options
- The Magnificent Art of Pokemon Go Streaming On Tecno Camon 20? | Dr.fone
- To Socialize All Your Accounts: Assessing the Benefits and Potential Vulnerabilities of Facebook Login
- Updated Best Video Translator App for PC Cannot Miss for 2024
- Title: Strategies for Seamless iPhone Photos Sorting & iCloud Backup Management
- Author: Christopher
- Created at : 2025-01-02 16:39:33
- Updated at : 2025-01-04 20:38:10
- Link: https://extra-hints.techidaily.com/strategies-for-seamless-iphone-photos-sorting-and-icloud-backup-management/
- License: This work is licensed under CC BY-NC-SA 4.0.