![[New] Audio Callback Collector - iPhone 2024 Model](https://thmb.techidaily.com/5d7817aad095517ef8a3802d67c136a4ed2562ac9acdb56f193b79911b70ed6c.png)
"[New] Audio Callback Collector - iPhone 2024 Model"
Audio Callback Collector - iPhone 2024 Model
As all of us know, voicemails are one of the most advanced ways of communication over internet, so there are also trends nowadays. Many big messaging platforms like WhatsApp, Telegram, Facebook Messenger, Viber, etc., have successfully added this feature to their software. You can mail or send your voice message to another user over a network and may get a reply in the same voicemail form. So, let’s start discussing the voicemail recorder on iPhone briefly in the following to help you understand more!

Part 1. What is voicemail?
A voicemail is usually an audio form of a message sent by a user digitally over a network to another user on the same network. It is one of the most used types of messaging nowadays. Many people on the internet prefer to send a voicemail instead of a text mail because it seems to be more personal than it. In simple words, a voicemail is a digital audio message sent by or recorded by a user for another user. Also, another definition of it is that voicemail is a computerized system that allows users to easily exchange audio messages among themselves.

Part 2. Why should people use it?
Voicemail is a more convenient way to communicate with someone than text messaging. Moreover, the others can leave a voice message for you when you are offline. Once messages have been placed in the voice mailbox, the owner can be informed through phone or pager. They can also call their own voice mailbox, extract the message, and re-listen before saving, deleting, or other operations at any time. Additionally, voicemail offers the advantages of strong anonymity and is not location- or time-based, so an increasing number of people are using it.

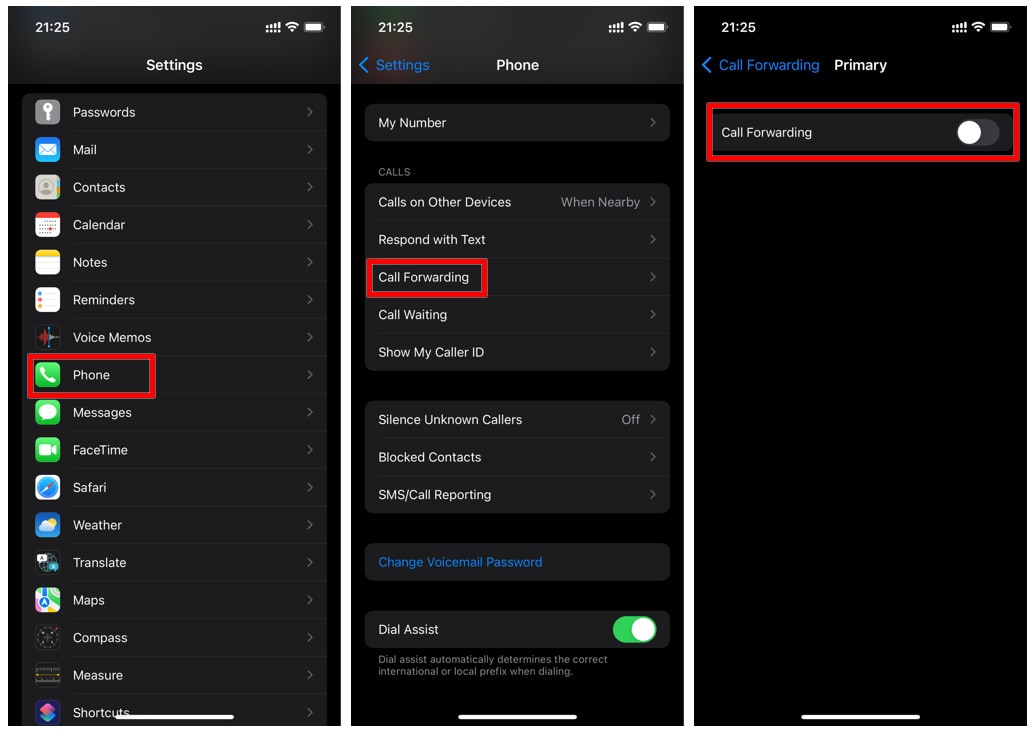
Part 3. How to activate or deactivate voicemail on iPhone?
If you want to activate or deactivate your voicemail on your iPhone due to its extra charges or any other reason, you can follow the following steps:
Activate voicemail on iPhone:
Step1Determine the password of your voice mailbox
You can go to your phone application on iPhone , dial the number *#62# there, and then make a call on it. In the ring, you will get your voice mailbox password number. Please remember it in your mind.
Step2Turn on the Call Forwarding
After determining your voice mailbox number, click on the Settings > Phone > Call Forwarding. Here you will be asked to enter the voicemail password you determined earlier.
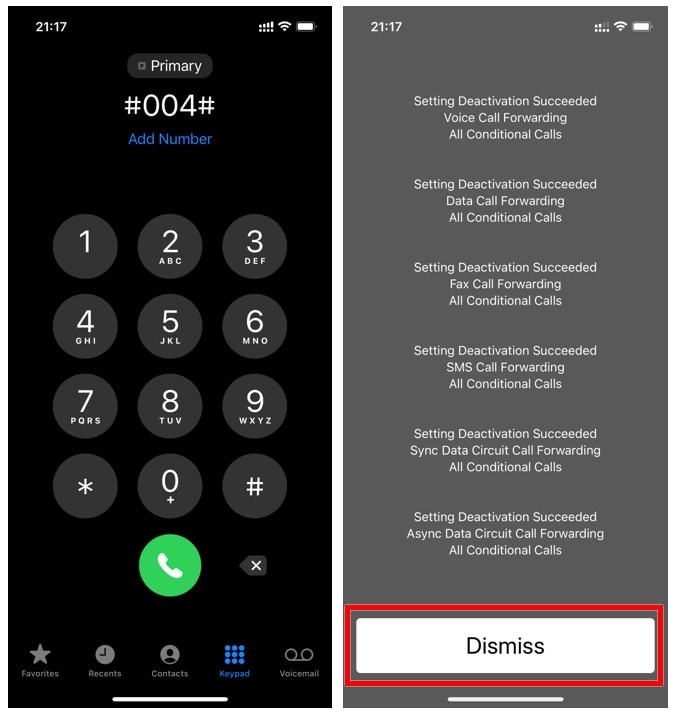
Deactivate voicemail on iPhone:
Step1Call the #004#
Go back to your phone application and call #004# to deactivate your voicemail. Now your voicemail has been deactivated. Please confirm whether your voicemail was halted or not.
![]()
Note: If you want to activate your voicemail on your iPhone again, dial this number 004# and make a call.
 ZoneAlarm Extreme Security NextGen
Part 4. How to change voicemail greeting on iPhone?
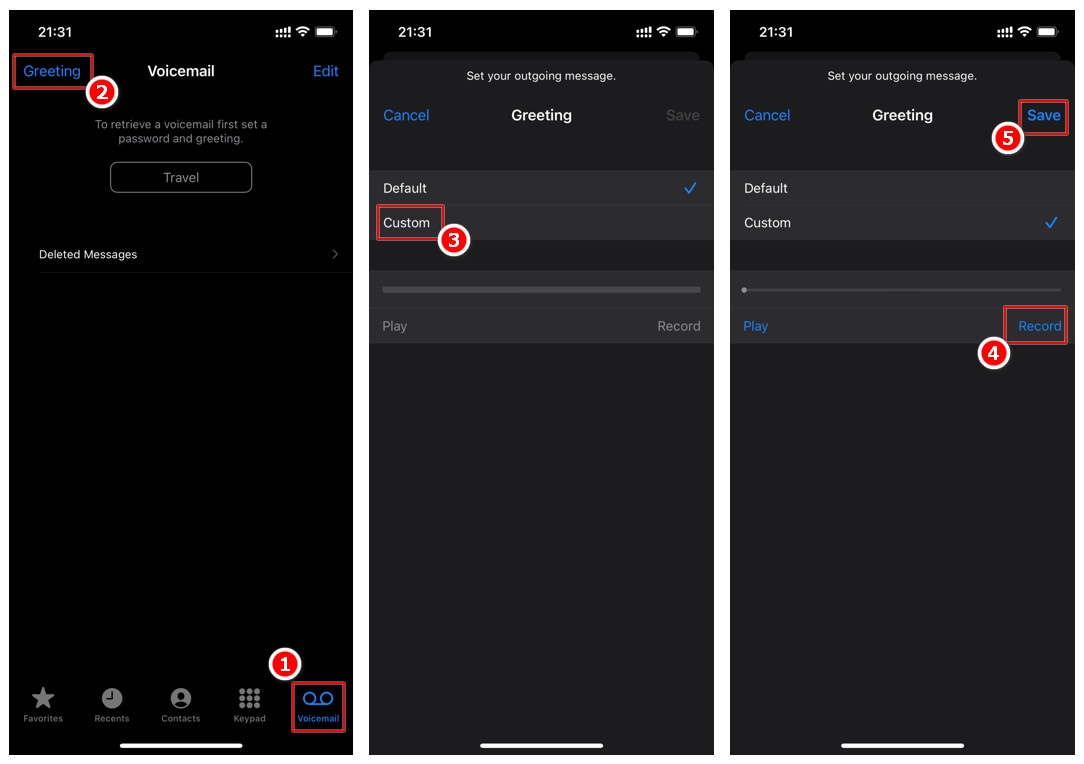
### Way 1\. Custom on iPhoneTo change the default voicemail greeting to custom on iPhone, follow the following steps:
- At first, pen the phone application on your iPhone and click on the voicemail button.
- Then click on the greeting option there.
- You will get two options: the default voicemail greeting, which is running currently, and the custom voicemail greeting.
- Click on the custom one and then begin to record a custom voicemail greeting.
- When you finish recording it, tap on the save button.
Way 2. Use other apps
Now are going to discuss how we can change the voicemail greeting on iPhone using other apps:
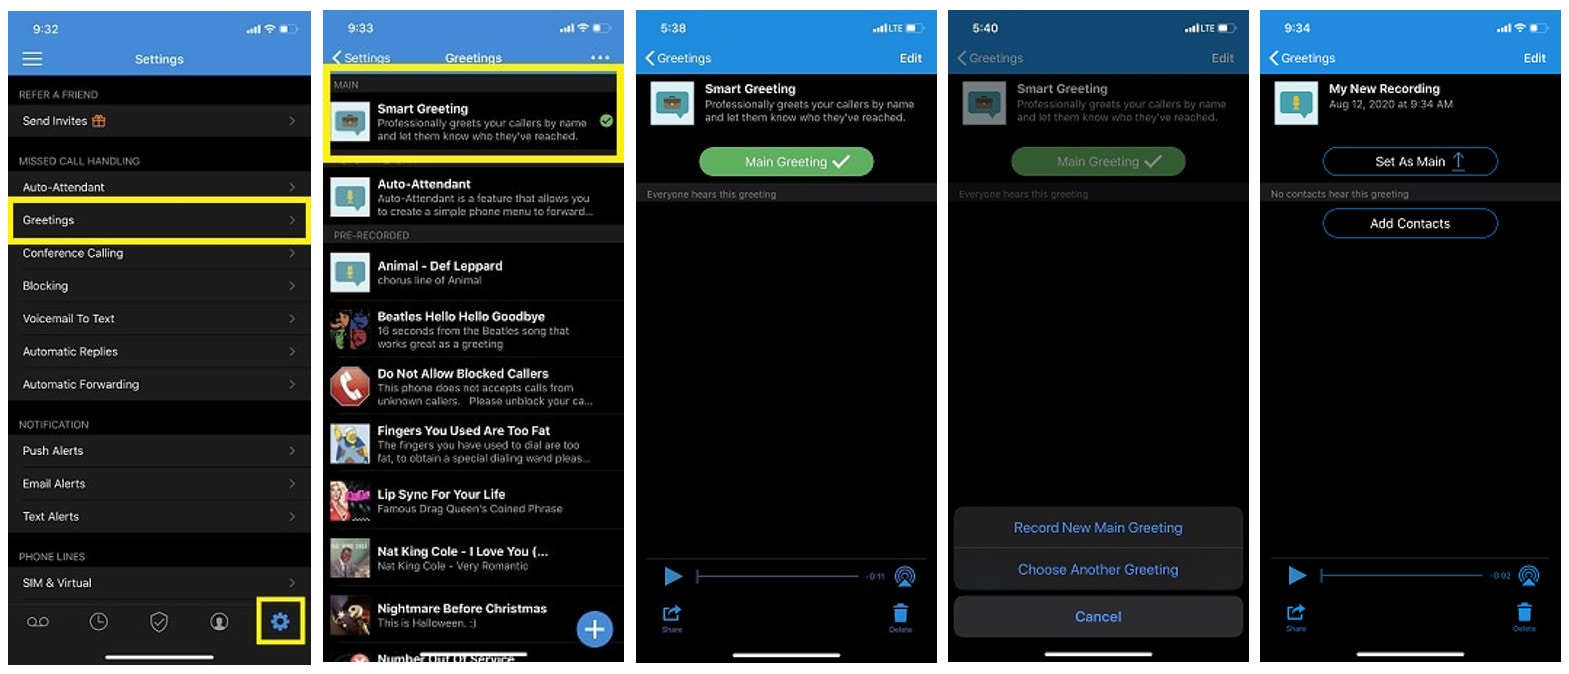
1. YouMail :
YouMail is one of the most popular call blocker apps, you can follow the steps below to change your voicemail greeting on your iPhone.
- First, click on the Settings button (gear icon) and then the Greetings from the menu.
- You can see what voicemail greeting is currently running under the Main section.
- After clicking on the green button of the Main Greeting there, a pop-up menu will appear at the bottom of your screen, through which you can change your voicemail greeting. Or you can also record a new one.
- When you have finished recording or selecting your new voicemail greeting, please remember to click the Set As Main button to set it as your new voicemail greeting.
2. Google Voice :
Google Voice is also the best way to change your voicemail greeting on iOS. You can change your voicemail greeting through it by following the procedure described below:
- Open the Google Voice application on iOS and click on the settings button in the tap menu.
- Then click on the voicemail button and then the voicemail greeting option.
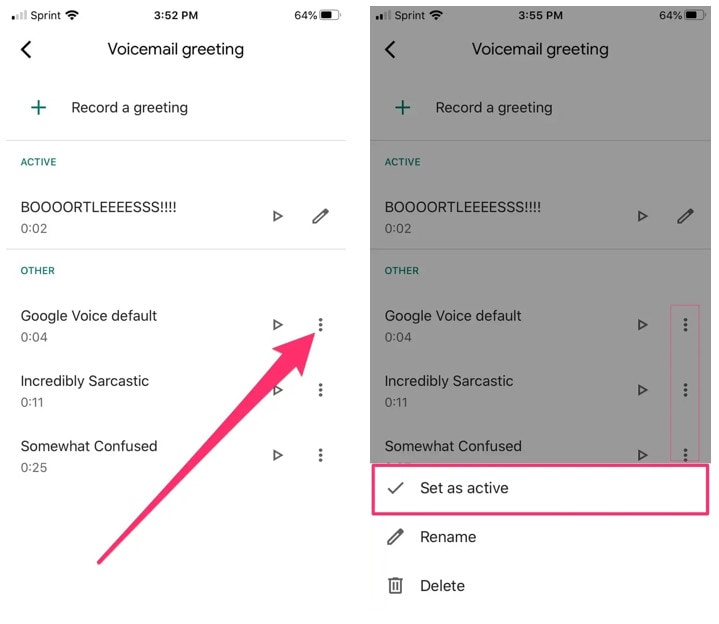
- Now it’s upon you that you must record an entirely new one or select an existing voicemail greeting.
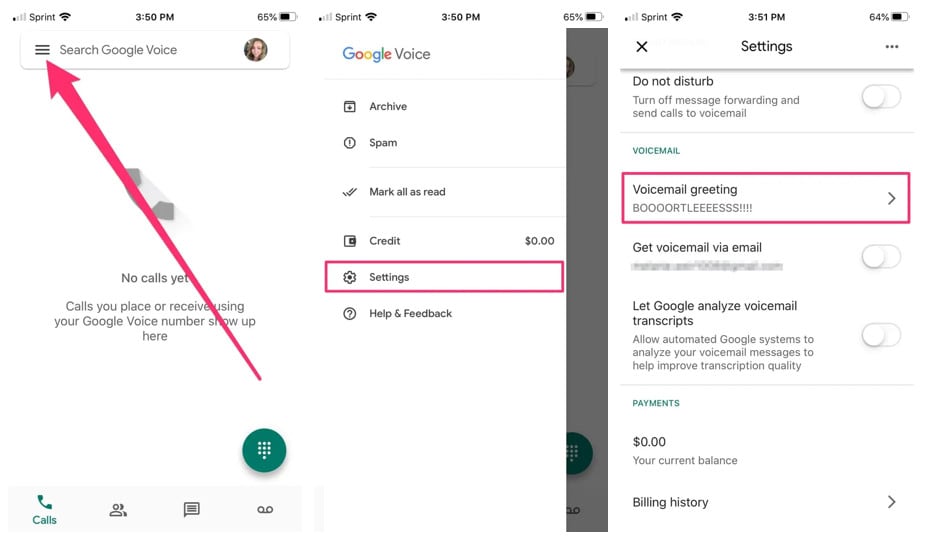
- To record one, you can click on the record button and then the save button, then set it as an active one by clicking on the Set as active
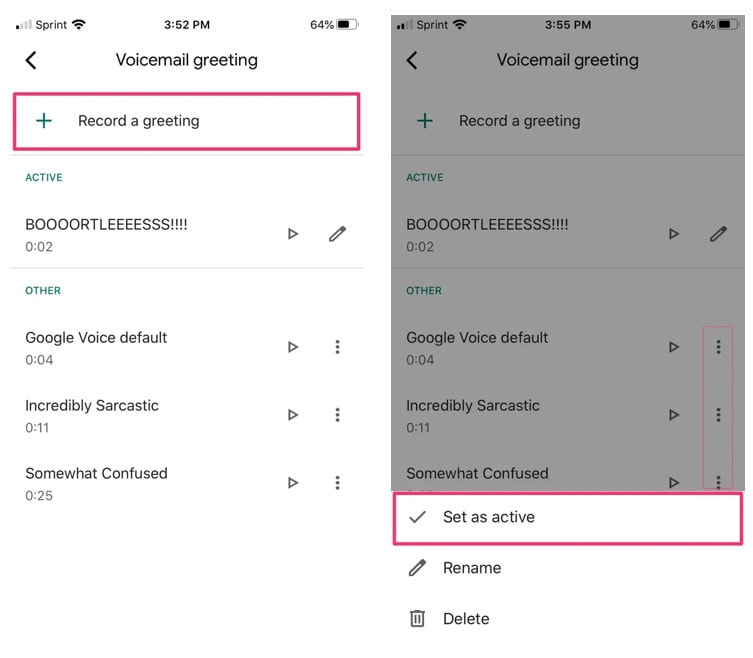
- To select from the existing one, you can click on the more button, which looks like three vertical dots and is next to it, and then click on the Set as active button to save your changes.
 vMix Pro - Software based live production. vMix Pro includes everything in vMix 4K plus 8 channels of Replay and 8 vMix Call
Part 5. How to check your voicemail on iPhone?
You can check your voicemail by following the steps below:
- To check your voicemail on your iPhone, open your phone application and click on the voicemail button, and you will see a list of all the voicemails you have received.
- You can play and listen to the voicemails of your choice. Also, there is now an advanced feature in the new versions of the iPhone from which you can read the written version of the voicemails you have received instead of hearing it. Still, it is currently available in a few regions only.
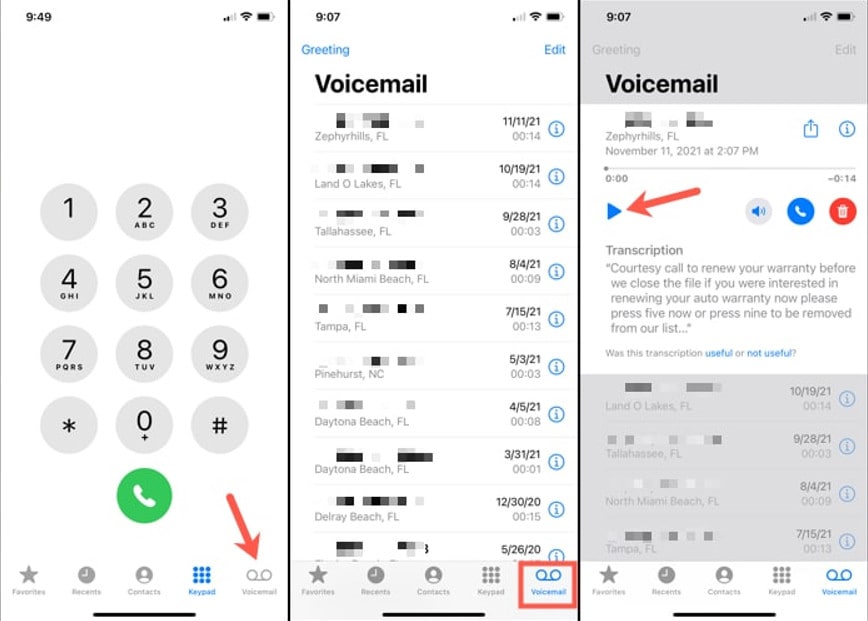
- You can also call someone after hearing his voicemail from the call option there and delete the voicemails you already have listened to from the delete option.
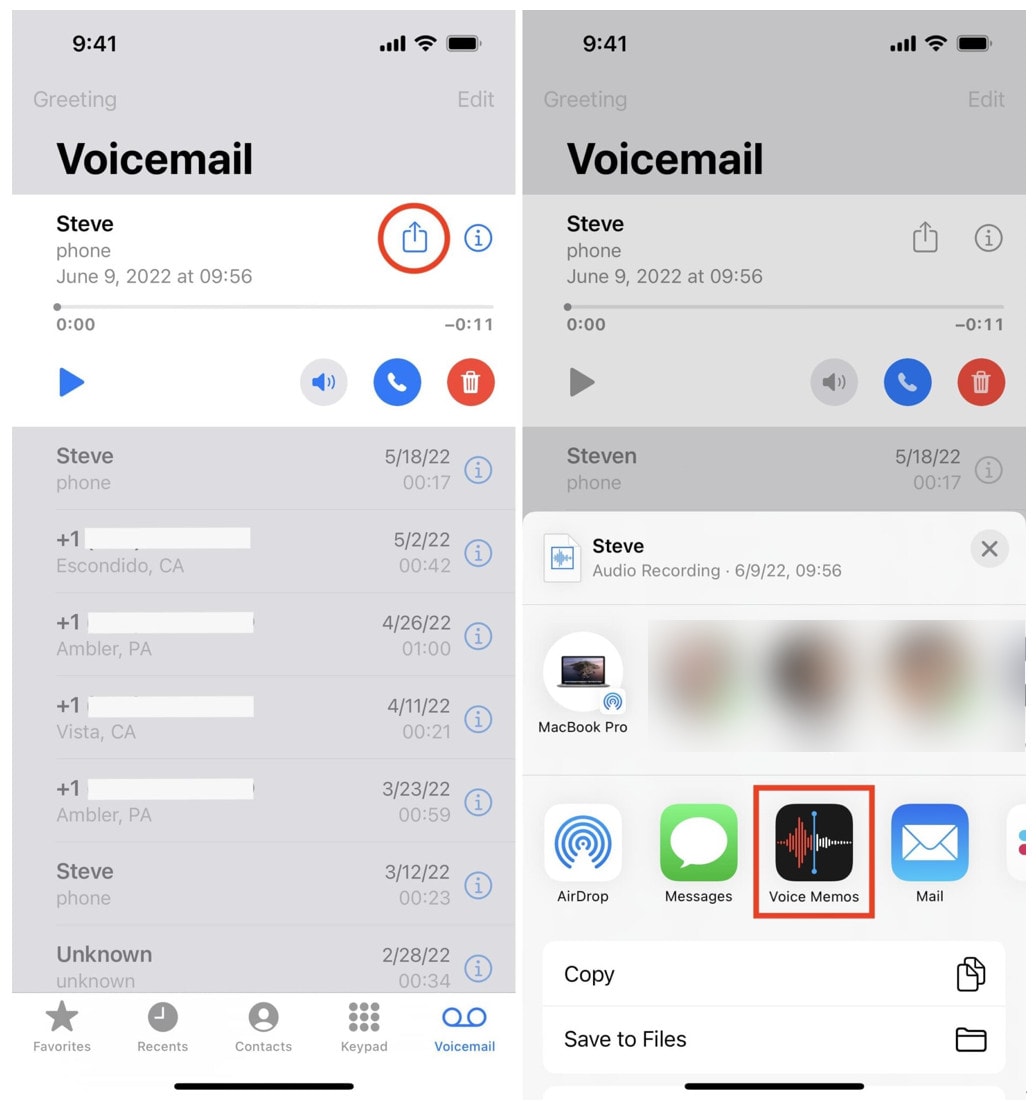
Part 6. How to save your voicemail on iPhone?
If you want to record a voicemail that has vital information or should be remembered, please save it as follows:
- Open your voicemail on Phone, simply click on one voicemail in the list you want to save.
- Then click on the share option and select the Voice Memos, which will save it to your phone successfully.
Part 7. How to record your voicemail on iPhone?
If you want to keep other visual information, you can choose to record voicemail on your iPhone by recording the screen. Let’s begin discussing it below:
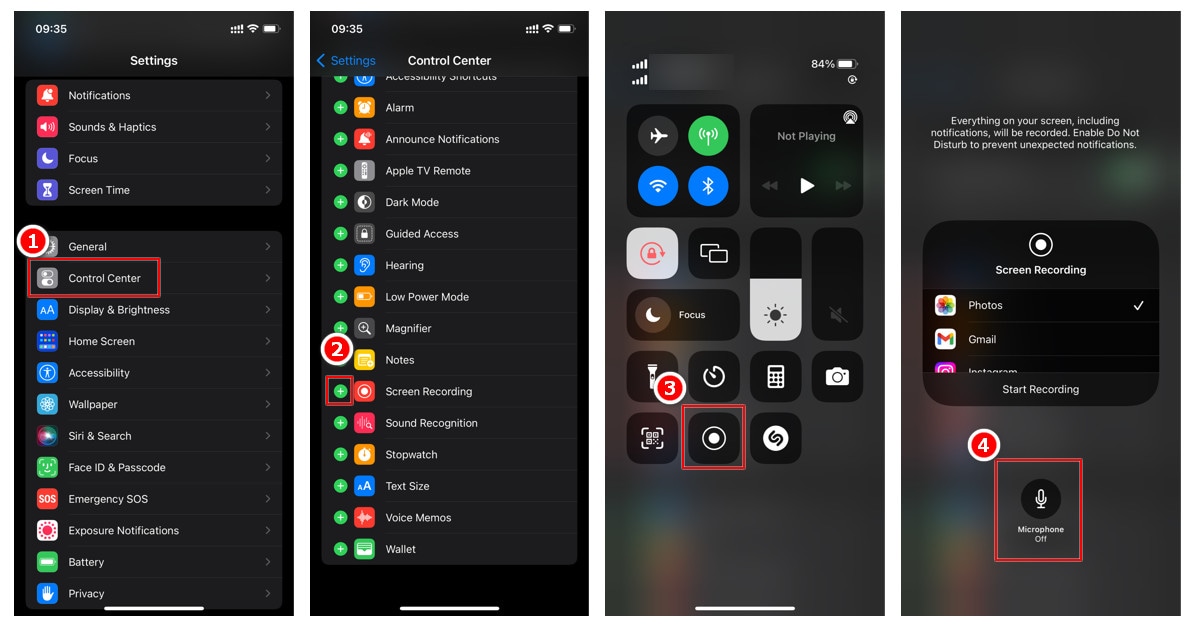
Way 1. Use built-in function
First, we discuss how we can do it using the built-in functions of your iPhone.
- First, open your “Settings > Control Center”, and click the + icon next to “Screen Recording”. You can find the screen recording button in the drop-down menu. When recording phone audio, you can long press the record button to make sure the microphone is off.
- Now open your voicemail and play the voice message you want to record. Click the recording button and wait 3 seconds for the beginning.

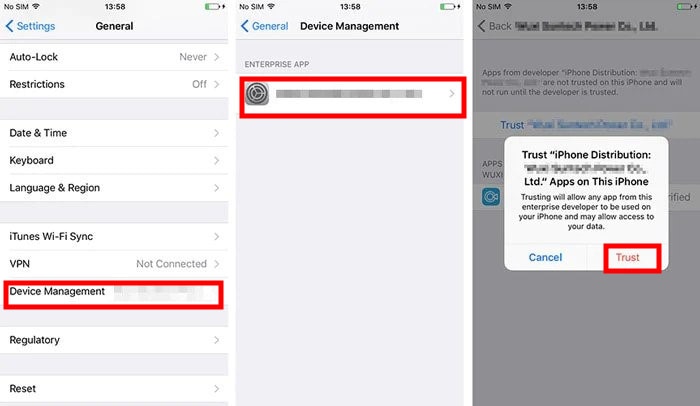
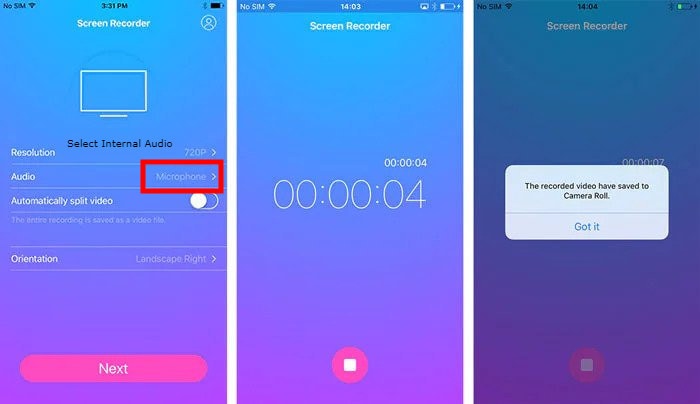
Way 2. Use a third-party phone recorder
Most third-party screen recording programs work similarly to the built-in screen recording feature, although they can satisfy more specific recording requirements. Try the following methods if all you want to do is record audio:
- Download iOS Screen Recorder . And turn on the trust option to grant access.
- Open the iOS Screen Recorder App and select the internal audio before you play any audio clip and record.
FAQs about voicemails on iPhone

1. How to recover deleted voicemails?
You can recover the deleted voicemails in the last 30 days. If there are any voicemails that you have deleted in the last 30 days and are available for recovery, it will show you a button named Deleted Messages. Just find the voicemail message you want to recover and click the Undelete button.

Conclusion
Voicemails are essential for all of us nowadays as they make our communication much more accessible than before, and everyone can try to use them instead of typing long messages. Also, it makes it easier to reach someone on another call or offline by leaving a voicemail for him. It’s helpful in call centers that manage thousands of calls in a day. If you have some queries about voicemails on iPhone, we hope you all can successfully resolve them now by reading this article. Thanks for reading!
Free Download For Win 7 or later(64-bit)
Free Download For macOS 10.14 or later
Part 4. How to change voicemail greeting on iPhone?
Way 1. Custom on iPhone
To change the default voicemail greeting to custom on iPhone, follow the following steps:
- At first, pen the phone application on your iPhone and click on the voicemail button.
- Then click on the greeting option there.
- You will get two options: the default voicemail greeting, which is running currently, and the custom voicemail greeting.
- Click on the custom one and then begin to record a custom voicemail greeting.
- When you finish recording it, tap on the save button.
 Glary Utilities PRO - Premium all-in-one utility to clean, speed up, maintain and protect your PC
Way 2. Use other apps
Now are going to discuss how we can change the voicemail greeting on iPhone using other apps:
1. YouMail :
YouMail is one of the most popular call blocker apps, you can follow the steps below to change your voicemail greeting on your iPhone.
- First, click on the Settings button (gear icon) and then the Greetings from the menu.
- You can see what voicemail greeting is currently running under the Main section.
- After clicking on the green button of the Main Greeting there, a pop-up menu will appear at the bottom of your screen, through which you can change your voicemail greeting. Or you can also record a new one.
- When you have finished recording or selecting your new voicemail greeting, please remember to click the Set As Main button to set it as your new voicemail greeting.
2. Google Voice :
Google Voice is also the best way to change your voicemail greeting on iOS. You can change your voicemail greeting through it by following the procedure described below:
- Open the Google Voice application on iOS and click on the settings button in the tap menu.
- Then click on the voicemail button and then the voicemail greeting option.
- Now it’s upon you that you must record an entirely new one or select an existing voicemail greeting.
 DEX 3 RE is Easy-To-Use DJ Mixing Software for MAC and Windows Designed for Today’s Versatile DJ.
Mix from your own library of music, iTunes or use the Pulselocker subsciprtion service for in-app access to over 44 million songs. Use with over 85 supported DJ controllers or mix with a keyboard and mouse.
DEX 3 RE is everything you need without the clutter - the perfect 2-deck mixing software solution for mobile DJs or hard-core hobbiests.
PCDJ DEX 3 RE (DJ Software for Win & MAC - Product Activation For 3 Machines)
- To record one, you can click on the record button and then the save button, then set it as an active one by clicking on the Set as active
- To select from the existing one, you can click on the more button, which looks like three vertical dots and is next to it, and then click on the Set as active button to save your changes.
Part 5. How to check your voicemail on iPhone?
You can check your voicemail by following the steps below:
- To check your voicemail on your iPhone, open your phone application and click on the voicemail button, and you will see a list of all the voicemails you have received.
- You can play and listen to the voicemails of your choice. Also, there is now an advanced feature in the new versions of the iPhone from which you can read the written version of the voicemails you have received instead of hearing it. Still, it is currently available in a few regions only.
- You can also call someone after hearing his voicemail from the call option there and delete the voicemails you already have listened to from the delete option.

Part 6. How to save your voicemail on iPhone?
If you want to record a voicemail that has vital information or should be remembered, please save it as follows:
- Open your voicemail on Phone, simply click on one voicemail in the list you want to save.
- Then click on the share option and select the Voice Memos, which will save it to your phone successfully.
Part 7. How to record your voicemail on iPhone?
If you want to keep other visual information, you can choose to record voicemail on your iPhone by recording the screen. Let’s begin discussing it below:
Way 1. Use built-in function
First, we discuss how we can do it using the built-in functions of your iPhone.
- First, open your “Settings > Control Center”, and click the + icon next to “Screen Recording”. You can find the screen recording button in the drop-down menu. When recording phone audio, you can long press the record button to make sure the microphone is off.
- Now open your voicemail and play the voice message you want to record. Click the recording button and wait 3 seconds for the beginning.
Way 2. Use a third-party phone recorder
Most third-party screen recording programs work similarly to the built-in screen recording feature, although they can satisfy more specific recording requirements. Try the following methods if all you want to do is record audio:
- Download iOS Screen Recorder . And turn on the trust option to grant access.
- Open the iOS Screen Recorder App and select the internal audio before you play any audio clip and record.
 Software Update Pro - Check and update software installed on your computer.
FAQs about voicemails on iPhone
1. How to recover deleted voicemails?
You can recover the deleted voicemails in the last 30 days. If there are any voicemails that you have deleted in the last 30 days and are available for recovery, it will show you a button named Deleted Messages. Just find the voicemail message you want to recover and click the Undelete button.


Conclusion
Voicemails are essential for all of us nowadays as they make our communication much more accessible than before, and everyone can try to use them instead of typing long messages. Also, it makes it easier to reach someone on another call or offline by leaving a voicemail for him. It’s helpful in call centers that manage thousands of calls in a day. If you have some queries about voicemails on iPhone, we hope you all can successfully resolve them now by reading this article. Thanks for reading!
Free Download For Win 7 or later(64-bit)
Free Download For macOS 10.14 or later
- Title: [New] Audio Callback Collector - iPhone 2024 Model
- Author: Christopher
- Created at : 2024-07-22 12:51:01
- Updated at : 2024-07-23 12:51:01
- Link: https://extra-hints.techidaily.com/new-audio-callback-collector-iphone-2024-model/
- License: This work is licensed under CC BY-NC-SA 4.0.