
"Mastering iPhone Macro Photography Detailed Images at Your Fingertips"
Mastering iPhone Macro Photography: Detailed Images at Your Fingertips
iPhone Macro and Close-up Photography Tips


Ollie Mattison
Mar 27, 2024• Proven solutions
With busy lives and hectic schedules, it can be easy to miss the small but important details. Sometimes, the smallest of things can be just as inspiring as the biggest, but when did you last stop and really look at what’s around? From the tiniest insect to the patterns on a leaf, starting to see things through different eyes can put a whole new spin on the world around us.
 vMix 4K - Software based live production. vMix 4K includes everything in vMix HD plus 4K support, PTZ control, External/Fullscreen output, 4 Virtual Outputs, 1 Replay, 4 vMix Call, and 2 Recorders.
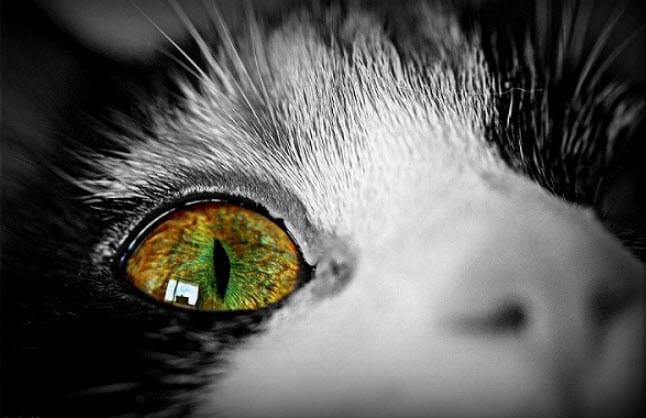
Image source: Impressive Magazine
Macro and close-up photography is a great way to start appreciating the little things in life, and you don’t need a fancy camera to get involved either. Armed with nothing more than your standard iPhone, you can start enjoying the fun of macro photography today. Here’s what you need to know.
You May Also Like: How to Take Underwater Photos with your iPhone 7
You May Also Like: Resizing a Photo without Losing Quality
Section 1. What is close-up and macro photography?
Close-up photography and macro photography are all about photographing things in a way that makes them appear larger than they are in real life. It lets us look in detail at the things around us and can be an exciting and dramatic way to shoot images. But is there a difference between close up and macro in photography terms?
There is, so if you’re looking to get to grips with this type of photography, you need to understand that:
- Close up photography is about putting your iPhone camera physically close to the object you are photographing, but without using any peripherals or special apps.
- **Macro photography uses technology to actually increase the size of the image to allow a close-up photo without needing to be so physically close.
With your iPhone macro photography and close-up shooting are both possible and can bring great results if you know what you’re doing. However, for the really professional touch, an investment in a macro lens or specialist app will certainly kick your photography skills into high gear.
Section 2. iPhone Macro Photography Tips
Taking great photos in macro mode isn’t always as easy as it looks. Novice users can become frustrated when images come out dark, blurry or out of focus. Here are some top tips to get your iPhone macro photography just right, and to start building a collection of gorgeous close up images.
Tip1. Find your light
Shooting in the macro range requires decent lighting, so consider when and how you are positioning your images. Early morning and midafternoon are great times of day to plan a shoot, as the soft, natural light is ideal for macro photography. Taking photos in the blazing midday sun can cause overexposure, and your iPhone may struggle to focus too.
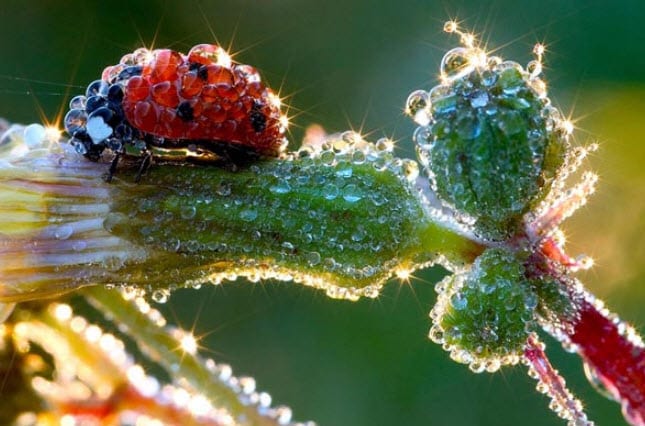
Image source: Urdu-Mag.com
If you do want to snap some macro images in bright sunlight, try positioning your shadow to create a more indirect lighting of the subject. You can also move your own orientation so that the sun is shining into your shot, rather than behind it.
Tip2. Focus is the key
With any photo, focus is crucial to an awesome result. But when you’re creating macro images, this becomes even more critical to the success of your photography. Try using the manual focus setting to give yourself more control over your focus point, and work on fine-tuning your skills to create the perfect image.

Image source: PicMonkey
If you’re not ready to go fully manual, you could try using the iPhone’s locking feature to lock the focus into place and avoid the photo being ruined by a little wobble on your part. To use this, simply tap and hold the screen at the part of the image you want to be in focus, and you’ll see AE/EF Lock appear at the bottom. This means both focus and lighting are fixed until you tap elsewhere on the screen to release it.
Tip3. Keep steady
Keeping still when taking a macro shot is absolutely vital. With your image already enlarged, any wobbles or shakes will cause blur or a loss of focus and spoil your image. In the longer term, you may want to invest in a tripod to steady the phone, but if you’re just starting out, you might not be keen just yet.
If you don’t own a tripod, you could use a stationary object nearby, such as a wall, rock or gate. You could also bring a beanbag with you, as these allow you to get up close and personal with your subject comfortably, whilst also supporting and steadying your phone for the shot.
Tip4. Don’t get too close
Hold your finger close to your face, and you’ll find that at a certain distance you can no longer focus on it. The same principle is true for iPhone macro photography; if you get too close your image will start to blur. But how close is too close?
Different iPhone iterations have slightly different lenses, so there will be a bit of trial and error involved to find the perfect distance for your model. Somewhere in the range of two to four inches tends to be about the limit and is more than close enough to allow you to take some stunning close-up photographs.
Tip5. Be simple
When you’re shooting macro images with your iPhone, the intention is to make the background somewhat blurry, with only the objects at the front of the image in focus. You might think that this means it doesn’t matter what’s actually in the background, but in reality, a busy background with mixed colors can still serve to spoil your image.

Image source: GCFLearnFree
Make the subject center stage by positioning your composition to give the least cluttered background possible. Use the sky if you can, or experiment with textured backgrounds such as a wall or fence. Think about how far your subject is from the background, as the further away the background is, the more blurry it will become and the greater the contrast of focus on your subject will appear.
Tip6. Composition
If you’ve researched photography in general, you’ll already have heard of the ‘rule of thirds’. This rule is super simple to apply when using an iPhone and is just as relevant in macro photography as it is when shooting landscapes or any other composition.
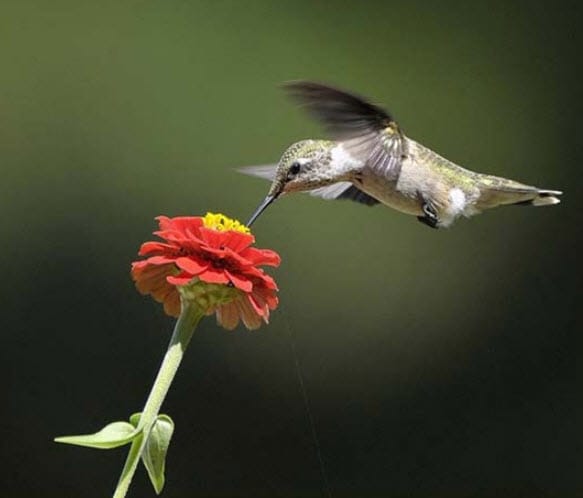
Image source: SmashingHub
The rule states that if the image were divided into thirds horizontally and vertically, the most important objects in the image should be placed at the points where the lines intersect. This is easy on iPhone, as you can switch on the gridlines and instantly see where to place the subject in the photos. When shooting macro images, place your focal point at one of the intersections to give your photo the professional touch.
Tip7. Try different angles
iPhone macro photography is all about looking at the world in a different way. To really accentuate this quality in your work, why not try shooting from a different perspective? Get very low down and shoot your subject from below, with the sky as a background, or snap from directly above to add drama to your images.

Image source: Flickr
Look for interesting colors and play with the light. Let the sunshine through the leaves of the plant or find a puddle and play with reflections. Line yourself up with a cityscape or countryside landscape, then place the subject dangling in the foreground. Have fun with angles and discover new ways of looking at your surroundings.
Tip8. Waterdrop trick
If you’re yet to invest in a macro lens for your iPhone, water can be your friend, adding a new level of magnification to your image. A small drop of water is a powerful magnifier and applying it carefully to your iPhone lens can make close-up photography even better.
A larger drop that is almost ready to plop off will give magnificent magnification, but you’ll have to have a steady hand and fast shutter finger to enjoy the result. Applying a huge droplet will give a dramatic result, softly blurred at the edges and sharply in focus at the center.
Do be careful not to soak your iPhone while you’re playing with this trick!
Tip9. Use a macro lens
If you’re serious about achieving incredible iPhone macro photography, the very best shots are only possible with a purpose-built macro lens. Simple, clip-on lenses will elevate the results to new heights, letting you take immaculately detailed, super close up shots that look like they were done on an expensive professional camera.
There are a number of iPhone macro lenses out there that will do a great job and won’t necessarily cost the earth. The Olloclip and Photojojo are both under $100, and let you add the pro touch to every photograph you set up. These are lightweight, easy to fit, and well worth the investment for the keen close up photographer.
Conclusion
If you’re fed up with the same old shots and want to try something different, delving into the world of macro photography with your iPhone could give you a new lease of life. Whether you dive right in with a purchase of a clip-on lens or simply start looking at the little details in everything around you, close up photography is fun and easy to get into for every iPhone user.
Explore, experiment, and practice, and you’ll soon find your own style and be the envy of all your followers.


 Software Update Pro - Check and update software installed on your computer.
Ollie Mattison
Ollie Mattison is a writer and a lover of all things video.
Follow @Ollie Mattison
Ollie Mattison
Mar 27, 2024• Proven solutions
With busy lives and hectic schedules, it can be easy to miss the small but important details. Sometimes, the smallest of things can be just as inspiring as the biggest, but when did you last stop and really look at what’s around? From the tiniest insect to the patterns on a leaf, starting to see things through different eyes can put a whole new spin on the world around us.

Image source: Impressive Magazine
Macro and close-up photography is a great way to start appreciating the little things in life, and you don’t need a fancy camera to get involved either. Armed with nothing more than your standard iPhone, you can start enjoying the fun of macro photography today. Here’s what you need to know.
You May Also Like: How to Take Underwater Photos with your iPhone 7
You May Also Like: Resizing a Photo without Losing Quality
Section 1. What is close-up and macro photography?
Close-up photography and macro photography are all about photographing things in a way that makes them appear larger than they are in real life. It lets us look in detail at the things around us and can be an exciting and dramatic way to shoot images. But is there a difference between close up and macro in photography terms?
There is, so if you’re looking to get to grips with this type of photography, you need to understand that:
- Close up photography is about putting your iPhone camera physically close to the object you are photographing, but without using any peripherals or special apps.
- **Macro photography uses technology to actually increase the size of the image to allow a close-up photo without needing to be so physically close.
With your iPhone macro photography and close-up shooting are both possible and can bring great results if you know what you’re doing. However, for the really professional touch, an investment in a macro lens or specialist app will certainly kick your photography skills into high gear.
Section 2. iPhone Macro Photography Tips
Taking great photos in macro mode isn’t always as easy as it looks. Novice users can become frustrated when images come out dark, blurry or out of focus. Here are some top tips to get your iPhone macro photography just right, and to start building a collection of gorgeous close up images.
Tip1. Find your light
Shooting in the macro range requires decent lighting, so consider when and how you are positioning your images. Early morning and midafternoon are great times of day to plan a shoot, as the soft, natural light is ideal for macro photography. Taking photos in the blazing midday sun can cause overexposure, and your iPhone may struggle to focus too.
Image source: Urdu-Mag.com
If you do want to snap some macro images in bright sunlight, try positioning your shadow to create a more indirect lighting of the subject. You can also move your own orientation so that the sun is shining into your shot, rather than behind it.
Tip2. Focus is the key
With any photo, focus is crucial to an awesome result. But when you’re creating macro images, this becomes even more critical to the success of your photography. Try using the manual focus setting to give yourself more control over your focus point, and work on fine-tuning your skills to create the perfect image.

Image source: PicMonkey
If you’re not ready to go fully manual, you could try using the iPhone’s locking feature to lock the focus into place and avoid the photo being ruined by a little wobble on your part. To use this, simply tap and hold the screen at the part of the image you want to be in focus, and you’ll see AE/EF Lock appear at the bottom. This means both focus and lighting are fixed until you tap elsewhere on the screen to release it.
Tip3. Keep steady
Keeping still when taking a macro shot is absolutely vital. With your image already enlarged, any wobbles or shakes will cause blur or a loss of focus and spoil your image. In the longer term, you may want to invest in a tripod to steady the phone, but if you’re just starting out, you might not be keen just yet.
If you don’t own a tripod, you could use a stationary object nearby, such as a wall, rock or gate. You could also bring a beanbag with you, as these allow you to get up close and personal with your subject comfortably, whilst also supporting and steadying your phone for the shot.
Tip4. Don’t get too close
Hold your finger close to your face, and you’ll find that at a certain distance you can no longer focus on it. The same principle is true for iPhone macro photography; if you get too close your image will start to blur. But how close is too close?
Different iPhone iterations have slightly different lenses, so there will be a bit of trial and error involved to find the perfect distance for your model. Somewhere in the range of two to four inches tends to be about the limit and is more than close enough to allow you to take some stunning close-up photographs.
Tip5. Be simple
When you’re shooting macro images with your iPhone, the intention is to make the background somewhat blurry, with only the objects at the front of the image in focus. You might think that this means it doesn’t matter what’s actually in the background, but in reality, a busy background with mixed colors can still serve to spoil your image.

Image source: GCFLearnFree
Make the subject center stage by positioning your composition to give the least cluttered background possible. Use the sky if you can, or experiment with textured backgrounds such as a wall or fence. Think about how far your subject is from the background, as the further away the background is, the more blurry it will become and the greater the contrast of focus on your subject will appear.
Tip6. Composition
If you’ve researched photography in general, you’ll already have heard of the ‘rule of thirds’. This rule is super simple to apply when using an iPhone and is just as relevant in macro photography as it is when shooting landscapes or any other composition.
Image source: SmashingHub
The rule states that if the image were divided into thirds horizontally and vertically, the most important objects in the image should be placed at the points where the lines intersect. This is easy on iPhone, as you can switch on the gridlines and instantly see where to place the subject in the photos. When shooting macro images, place your focal point at one of the intersections to give your photo the professional touch.
Tip7. Try different angles
iPhone macro photography is all about looking at the world in a different way. To really accentuate this quality in your work, why not try shooting from a different perspective? Get very low down and shoot your subject from below, with the sky as a background, or snap from directly above to add drama to your images.
Image source: Flickr
Look for interesting colors and play with the light. Let the sunshine through the leaves of the plant or find a puddle and play with reflections. Line yourself up with a cityscape or countryside landscape, then place the subject dangling in the foreground. Have fun with angles and discover new ways of looking at your surroundings.
Tip8. Waterdrop trick
If you’re yet to invest in a macro lens for your iPhone, water can be your friend, adding a new level of magnification to your image. A small drop of water is a powerful magnifier and applying it carefully to your iPhone lens can make close-up photography even better.
A larger drop that is almost ready to plop off will give magnificent magnification, but you’ll have to have a steady hand and fast shutter finger to enjoy the result. Applying a huge droplet will give a dramatic result, softly blurred at the edges and sharply in focus at the center.
Do be careful not to soak your iPhone while you’re playing with this trick!
Tip9. Use a macro lens
If you’re serious about achieving incredible iPhone macro photography, the very best shots are only possible with a purpose-built macro lens. Simple, clip-on lenses will elevate the results to new heights, letting you take immaculately detailed, super close up shots that look like they were done on an expensive professional camera.
There are a number of iPhone macro lenses out there that will do a great job and won’t necessarily cost the earth. The Olloclip and Photojojo are both under $100, and let you add the pro touch to every photograph you set up. These are lightweight, easy to fit, and well worth the investment for the keen close up photographer.
Conclusion
If you’re fed up with the same old shots and want to try something different, delving into the world of macro photography with your iPhone could give you a new lease of life. Whether you dive right in with a purchase of a clip-on lens or simply start looking at the little details in everything around you, close up photography is fun and easy to get into for every iPhone user.
Explore, experiment, and practice, and you’ll soon find your own style and be the envy of all your followers.
Ollie Mattison
Ollie Mattison is a writer and a lover of all things video.
Follow @Ollie Mattison
Ollie Mattison
Mar 27, 2024• Proven solutions
With busy lives and hectic schedules, it can be easy to miss the small but important details. Sometimes, the smallest of things can be just as inspiring as the biggest, but when did you last stop and really look at what’s around? From the tiniest insect to the patterns on a leaf, starting to see things through different eyes can put a whole new spin on the world around us.
Image source: Impressive Magazine
Macro and close-up photography is a great way to start appreciating the little things in life, and you don’t need a fancy camera to get involved either. Armed with nothing more than your standard iPhone, you can start enjoying the fun of macro photography today. Here’s what you need to know.
You May Also Like: How to Take Underwater Photos with your iPhone 7
You May Also Like: Resizing a Photo without Losing Quality
Section 1. What is close-up and macro photography?
Close-up photography and macro photography are all about photographing things in a way that makes them appear larger than they are in real life. It lets us look in detail at the things around us and can be an exciting and dramatic way to shoot images. But is there a difference between close up and macro in photography terms?
There is, so if you’re looking to get to grips with this type of photography, you need to understand that:
- Close up photography is about putting your iPhone camera physically close to the object you are photographing, but without using any peripherals or special apps.
- **Macro photography uses technology to actually increase the size of the image to allow a close-up photo without needing to be so physically close.
With your iPhone macro photography and close-up shooting are both possible and can bring great results if you know what you’re doing. However, for the really professional touch, an investment in a macro lens or specialist app will certainly kick your photography skills into high gear.

Section 2. iPhone Macro Photography Tips
Taking great photos in macro mode isn’t always as easy as it looks. Novice users can become frustrated when images come out dark, blurry or out of focus. Here are some top tips to get your iPhone macro photography just right, and to start building a collection of gorgeous close up images.
Tip1. Find your light
Shooting in the macro range requires decent lighting, so consider when and how you are positioning your images. Early morning and midafternoon are great times of day to plan a shoot, as the soft, natural light is ideal for macro photography. Taking photos in the blazing midday sun can cause overexposure, and your iPhone may struggle to focus too.
 Video Converter Factory Pro
Image source: Urdu-Mag.com
If you do want to snap some macro images in bright sunlight, try positioning your shadow to create a more indirect lighting of the subject. You can also move your own orientation so that the sun is shining into your shot, rather than behind it.
Tip2. Focus is the key
With any photo, focus is crucial to an awesome result. But when you’re creating macro images, this becomes even more critical to the success of your photography. Try using the manual focus setting to give yourself more control over your focus point, and work on fine-tuning your skills to create the perfect image.
Image source: PicMonkey
If you’re not ready to go fully manual, you could try using the iPhone’s locking feature to lock the focus into place and avoid the photo being ruined by a little wobble on your part. To use this, simply tap and hold the screen at the part of the image you want to be in focus, and you’ll see AE/EF Lock appear at the bottom. This means both focus and lighting are fixed until you tap elsewhere on the screen to release it.
Tip3. Keep steady
Keeping still when taking a macro shot is absolutely vital. With your image already enlarged, any wobbles or shakes will cause blur or a loss of focus and spoil your image. In the longer term, you may want to invest in a tripod to steady the phone, but if you’re just starting out, you might not be keen just yet.
If you don’t own a tripod, you could use a stationary object nearby, such as a wall, rock or gate. You could also bring a beanbag with you, as these allow you to get up close and personal with your subject comfortably, whilst also supporting and steadying your phone for the shot.
Tip4. Don’t get too close
Hold your finger close to your face, and you’ll find that at a certain distance you can no longer focus on it. The same principle is true for iPhone macro photography; if you get too close your image will start to blur. But how close is too close?
Different iPhone iterations have slightly different lenses, so there will be a bit of trial and error involved to find the perfect distance for your model. Somewhere in the range of two to four inches tends to be about the limit and is more than close enough to allow you to take some stunning close-up photographs.
Tip5. Be simple
When you’re shooting macro images with your iPhone, the intention is to make the background somewhat blurry, with only the objects at the front of the image in focus. You might think that this means it doesn’t matter what’s actually in the background, but in reality, a busy background with mixed colors can still serve to spoil your image.
Image source: GCFLearnFree
Make the subject center stage by positioning your composition to give the least cluttered background possible. Use the sky if you can, or experiment with textured backgrounds such as a wall or fence. Think about how far your subject is from the background, as the further away the background is, the more blurry it will become and the greater the contrast of focus on your subject will appear.
Tip6. Composition
If you’ve researched photography in general, you’ll already have heard of the ‘rule of thirds’. This rule is super simple to apply when using an iPhone and is just as relevant in macro photography as it is when shooting landscapes or any other composition.
Image source: SmashingHub
The rule states that if the image were divided into thirds horizontally and vertically, the most important objects in the image should be placed at the points where the lines intersect. This is easy on iPhone, as you can switch on the gridlines and instantly see where to place the subject in the photos. When shooting macro images, place your focal point at one of the intersections to give your photo the professional touch.
Tip7. Try different angles
iPhone macro photography is all about looking at the world in a different way. To really accentuate this quality in your work, why not try shooting from a different perspective? Get very low down and shoot your subject from below, with the sky as a background, or snap from directly above to add drama to your images.
Image source: Flickr
Look for interesting colors and play with the light. Let the sunshine through the leaves of the plant or find a puddle and play with reflections. Line yourself up with a cityscape or countryside landscape, then place the subject dangling in the foreground. Have fun with angles and discover new ways of looking at your surroundings.
Tip8. Waterdrop trick
If you’re yet to invest in a macro lens for your iPhone, water can be your friend, adding a new level of magnification to your image. A small drop of water is a powerful magnifier and applying it carefully to your iPhone lens can make close-up photography even better.
A larger drop that is almost ready to plop off will give magnificent magnification, but you’ll have to have a steady hand and fast shutter finger to enjoy the result. Applying a huge droplet will give a dramatic result, softly blurred at the edges and sharply in focus at the center.
Do be careful not to soak your iPhone while you’re playing with this trick!
Tip9. Use a macro lens
If you’re serious about achieving incredible iPhone macro photography, the very best shots are only possible with a purpose-built macro lens. Simple, clip-on lenses will elevate the results to new heights, letting you take immaculately detailed, super close up shots that look like they were done on an expensive professional camera.
There are a number of iPhone macro lenses out there that will do a great job and won’t necessarily cost the earth. The Olloclip and Photojojo are both under $100, and let you add the pro touch to every photograph you set up. These are lightweight, easy to fit, and well worth the investment for the keen close up photographer.
Conclusion
If you’re fed up with the same old shots and want to try something different, delving into the world of macro photography with your iPhone could give you a new lease of life. Whether you dive right in with a purchase of a clip-on lens or simply start looking at the little details in everything around you, close up photography is fun and easy to get into for every iPhone user.
Explore, experiment, and practice, and you’ll soon find your own style and be the envy of all your followers.
Ollie Mattison
Ollie Mattison is a writer and a lover of all things video.
Follow @Ollie Mattison
Ollie Mattison
Mar 27, 2024• Proven solutions
With busy lives and hectic schedules, it can be easy to miss the small but important details. Sometimes, the smallest of things can be just as inspiring as the biggest, but when did you last stop and really look at what’s around? From the tiniest insect to the patterns on a leaf, starting to see things through different eyes can put a whole new spin on the world around us.
Image source: Impressive Magazine
Macro and close-up photography is a great way to start appreciating the little things in life, and you don’t need a fancy camera to get involved either. Armed with nothing more than your standard iPhone, you can start enjoying the fun of macro photography today. Here’s what you need to know.
You May Also Like: How to Take Underwater Photos with your iPhone 7
You May Also Like: Resizing a Photo without Losing Quality
Section 1. What is close-up and macro photography?
Close-up photography and macro photography are all about photographing things in a way that makes them appear larger than they are in real life. It lets us look in detail at the things around us and can be an exciting and dramatic way to shoot images. But is there a difference between close up and macro in photography terms?
There is, so if you’re looking to get to grips with this type of photography, you need to understand that:
- Close up photography is about putting your iPhone camera physically close to the object you are photographing, but without using any peripherals or special apps.
- **Macro photography uses technology to actually increase the size of the image to allow a close-up photo without needing to be so physically close.
With your iPhone macro photography and close-up shooting are both possible and can bring great results if you know what you’re doing. However, for the really professional touch, an investment in a macro lens or specialist app will certainly kick your photography skills into high gear.
Section 2. iPhone Macro Photography Tips
Taking great photos in macro mode isn’t always as easy as it looks. Novice users can become frustrated when images come out dark, blurry or out of focus. Here are some top tips to get your iPhone macro photography just right, and to start building a collection of gorgeous close up images.
Tip1. Find your light
Shooting in the macro range requires decent lighting, so consider when and how you are positioning your images. Early morning and midafternoon are great times of day to plan a shoot, as the soft, natural light is ideal for macro photography. Taking photos in the blazing midday sun can cause overexposure, and your iPhone may struggle to focus too.
Image source: Urdu-Mag.com
If you do want to snap some macro images in bright sunlight, try positioning your shadow to create a more indirect lighting of the subject. You can also move your own orientation so that the sun is shining into your shot, rather than behind it.
Tip2. Focus is the key
With any photo, focus is crucial to an awesome result. But when you’re creating macro images, this becomes even more critical to the success of your photography. Try using the manual focus setting to give yourself more control over your focus point, and work on fine-tuning your skills to create the perfect image.
Image source: PicMonkey
If you’re not ready to go fully manual, you could try using the iPhone’s locking feature to lock the focus into place and avoid the photo being ruined by a little wobble on your part. To use this, simply tap and hold the screen at the part of the image you want to be in focus, and you’ll see AE/EF Lock appear at the bottom. This means both focus and lighting are fixed until you tap elsewhere on the screen to release it.
Tip3. Keep steady
Keeping still when taking a macro shot is absolutely vital. With your image already enlarged, any wobbles or shakes will cause blur or a loss of focus and spoil your image. In the longer term, you may want to invest in a tripod to steady the phone, but if you’re just starting out, you might not be keen just yet.
If you don’t own a tripod, you could use a stationary object nearby, such as a wall, rock or gate. You could also bring a beanbag with you, as these allow you to get up close and personal with your subject comfortably, whilst also supporting and steadying your phone for the shot.
Tip4. Don’t get too close
Hold your finger close to your face, and you’ll find that at a certain distance you can no longer focus on it. The same principle is true for iPhone macro photography; if you get too close your image will start to blur. But how close is too close?
Different iPhone iterations have slightly different lenses, so there will be a bit of trial and error involved to find the perfect distance for your model. Somewhere in the range of two to four inches tends to be about the limit and is more than close enough to allow you to take some stunning close-up photographs.
Tip5. Be simple
When you’re shooting macro images with your iPhone, the intention is to make the background somewhat blurry, with only the objects at the front of the image in focus. You might think that this means it doesn’t matter what’s actually in the background, but in reality, a busy background with mixed colors can still serve to spoil your image.
Image source: GCFLearnFree
Make the subject center stage by positioning your composition to give the least cluttered background possible. Use the sky if you can, or experiment with textured backgrounds such as a wall or fence. Think about how far your subject is from the background, as the further away the background is, the more blurry it will become and the greater the contrast of focus on your subject will appear.
Tip6. Composition
If you’ve researched photography in general, you’ll already have heard of the ‘rule of thirds’. This rule is super simple to apply when using an iPhone and is just as relevant in macro photography as it is when shooting landscapes or any other composition.
 vMix Pro - Software based live production. vMix Pro includes everything in vMix 4K plus 8 channels of Replay and 8 vMix Call
Image source: SmashingHub
The rule states that if the image were divided into thirds horizontally and vertically, the most important objects in the image should be placed at the points where the lines intersect. This is easy on iPhone, as you can switch on the gridlines and instantly see where to place the subject in the photos. When shooting macro images, place your focal point at one of the intersections to give your photo the professional touch.
Tip7. Try different angles
iPhone macro photography is all about looking at the world in a different way. To really accentuate this quality in your work, why not try shooting from a different perspective? Get very low down and shoot your subject from below, with the sky as a background, or snap from directly above to add drama to your images.
 PaperScan Professional: PaperScan Scanner Software is a powerful TWAIN & WIA scanning application centered on one idea: making document acquisition an unparalleled easy task for anyone.
Image source: Flickr
Look for interesting colors and play with the light. Let the sunshine through the leaves of the plant or find a puddle and play with reflections. Line yourself up with a cityscape or countryside landscape, then place the subject dangling in the foreground. Have fun with angles and discover new ways of looking at your surroundings.
Tip8. Waterdrop trick
If you’re yet to invest in a macro lens for your iPhone, water can be your friend, adding a new level of magnification to your image. A small drop of water is a powerful magnifier and applying it carefully to your iPhone lens can make close-up photography even better.
A larger drop that is almost ready to plop off will give magnificent magnification, but you’ll have to have a steady hand and fast shutter finger to enjoy the result. Applying a huge droplet will give a dramatic result, softly blurred at the edges and sharply in focus at the center.
Do be careful not to soak your iPhone while you’re playing with this trick!
Tip9. Use a macro lens
If you’re serious about achieving incredible iPhone macro photography, the very best shots are only possible with a purpose-built macro lens. Simple, clip-on lenses will elevate the results to new heights, letting you take immaculately detailed, super close up shots that look like they were done on an expensive professional camera.
There are a number of iPhone macro lenses out there that will do a great job and won’t necessarily cost the earth. The Olloclip and Photojojo are both under $100, and let you add the pro touch to every photograph you set up. These are lightweight, easy to fit, and well worth the investment for the keen close up photographer.
Conclusion
If you’re fed up with the same old shots and want to try something different, delving into the world of macro photography with your iPhone could give you a new lease of life. Whether you dive right in with a purchase of a clip-on lens or simply start looking at the little details in everything around you, close up photography is fun and easy to get into for every iPhone user.
Explore, experiment, and practice, and you’ll soon find your own style and be the envy of all your followers.
Ollie Mattison
Ollie Mattison is a writer and a lover of all things video.
Follow @Ollie Mattison
- Title: Mastering iPhone Macro Photography Detailed Images at Your Fingertips
- Author: Christopher
- Created at : 2024-07-22 10:21:04
- Updated at : 2024-07-23 10:21:04
- Link: https://extra-hints.techidaily.com/mastering-iphone-macro-photography-detailed-images-at-your-fingertips/
- License: This work is licensed under CC BY-NC-SA 4.0.