
Leading Edge of Color Grading with LUTs
Leading Edge of Color Grading with LUTs
Create High-Quality Video - Wondershare Filmora
An easy and powerful YouTube video editor
Numerous video and audio effects to choose from
Detailed tutorials are provided by the official channel
You need to be creative to compose a lookup table (LUT) for color grading. And working with LUT Creator is what you need for a successful outcome. Even though it suits advanced users, it comes with various tools to perform several things that concern color grading.
After a successful 3D LUT app download, you are good to work with it on your computer. Easily display its working and reference images side by side, toggle them back and forth, or top and bottom as you show your creativity. You can bring your source photo into the 3D LUT Creator in several ways. Interacting with other programs, pasting from the clipboard, or simply swapping work as you reference your images lets you come up with perfect color grading.

In this article
01 What Is a 3D LUT Creator, Exactly?
02 The 3D LUT Creator’s Features
03 Does 3D LUT have a mobile app?
 Power Tools add-on for Google Sheets, Lifetime subscription
What Is a 3D LUT Creator, Exactly?
A 3D LUT Creator is a program that harbors unique colors meant for grading your video or images. It creates 3DLUTS imported to other programs such as Adobe Premiere Pro, Final Cut Pro, and others. Creators opt for this top-notch program for several reasons. The speed is pretty fast, it harbors unique tools, and it easily integrates with other programs such as Adobe Photoshop. More so, 3D LUT Creator gives you a polished end product that upscales your creativity level.
The Cost of a 3D LUT Creator
The 3D LUT Creator comes on both Windows and Mac OS devices for desktop versions. These operating systems use different licenses but can combine for a price of $299. The Grading Edition is $99, the Standard Version is $199, and the PRO version is $249.
The 3D LUT Creator’s Features
This app is rich in features, enabling you to handle several color mixes and grading easily. The features supported by the 3D LUT Creator include:
1. Color match and correction with the reference image
With a color match, you’ll be able to copy the color scheme from one image to another. The color correction is made from the grid-tied to the color plan with saturation and hue. You can then easily change the color scheme and work with any desired color range of your choice.
 Project Manager - Asset Browser for 3Ds Max
2. Find the built-in LUT collection
You can find a collection of LUTs up to 48 in number. These are both cinematic-look LUTs and technical LUTs for grayscale conversion. To achieve this, turn on the adjustment. You will then see a pop-up menu and an “Intensify” slider. Next, choose from the 48 collections of LUTs the color that suits you.
3. Control color settings
You can save the color settings in files with the extensions “.3dl,” “.csv,” and “.cube” as these are cross-platform formats. Likewise, you can open them in other video editors like Adobe Premiere Pro, Adobe After Effects, and Final Cut Pro apps. To use it, take a frame of the video, then process it within the program and save the settings before finally applying a color profile to your video.
To correct your colors, first, the camera receives light and color. Then light passes through the lens and gets into the filter. Once the filter cuts off the infrared light, the rest of the light incident on the Bayer filter
4. Adjust the image
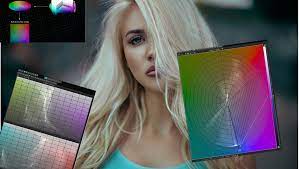
You can adjust the image in the 3D LUT Creator using the A/B Grid. You first need to ensure that your settings are well set as per your mission. These include contrast, temperature, pivot, saturation, and dynamic range. Use the “Compare” button to compare the changes with the original file. The “before” and the “after” image should give you a deeper insight into what your video is like after adjustment.
5. Find the custom LUT adjustment
You can also find a custom LUT adjustment with this creator. To do so, go to the Color Adjustment tool and turn on the Custom LUT adjustment. Furthermore, this applies to both individual and group layers.
6. Adjust the colors
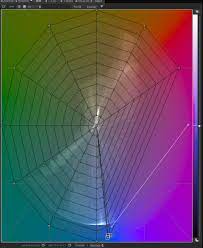
For this feature, use the spider’s web in the A/B Grid and use the “color wheel.” Several points on the web represent the colors in your image. To adjust color, click and drag a point in any direction of choice. You will have changed the original color within the image to another color.

7. Generate a LUT File
You can choose to save the adjustments as a LUT file. To create such a file, go to the “File” menu and select the “File” tab, then click on the “Export” option. Next, name your file and choose the LUT format that you want to use. The most popular LUT format is “cube”. More so, it is quite compatible with several photo editors. Likewise, you can export your content to other platforms.
Does 3D LUT have a mobile app?
Yes. 3D LUT has a mobile app version. You can use it to adjust your videos and photos from the comfort of your palms. It comprises these features.
Basic color adjustment: This feature allows you to change your video or image color to your satisfaction. You can make it brighter or dull by moving the brightness bar to either the left or the right. Other adjustments are the contrast, saturation, and white balance.
Choose your photos from the gallery: you don’t have to search for your data from other platforms. Simply choose photos or videos to use from the gallery. This applies to the earlier saved photos. However, you can also use your camera to shoot instant photos.
Color correction: your image color could be too bright or dull. This feature enables you to correct the color to a perfect tone. Besides, you get to choose from a wide range of colors, or better still, do a quick mix even as you correct the needed sections.
You don’t intend to compose your video and miss an open platform to share your content. Use the export tab to instantly share your video or images once ed to perfection. You can use it for marketing or tutorials.
The 3D LUT desktop version
The desktop version is the most widely used. It is powerful, with enough tools to carry out a couple of color grading effects.
How it works
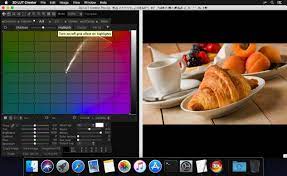
The 3D LUT Creator has a working image and a reference image. These are displayed side by side or top and bottom to show the “Before” and “After” effects. The best part is that you can comfortably interact with other programs such as After Effect and many more. The simplest way to add your content is to drag a photo from the Finder into the PS. Additionally, pasting your image from the clipboard also works well. This favors you when watching a video on a separate social media site like YouTube or Vimeo as long as you like the grading pattern. Use your desktop screenshot as a clipboard shortcut, then go to the 3D LUT Creator and hit “Command+V” to paste it.
Note that after you paste your content into the program, you should begin to work with your color. Here are some useful tools for the desktop version.
The A/B Grid: This tool enables you to change the hue and saturation of your image without affecting other colors. It is either square or circular, both with layered colors. You will notice the color wheel shows the control points with more saturation in the outer area, while less saturation is geared towards the center region. Nonetheless, it is quite easy to limit the colors on your screen, as you can choose to work with only a few at a time.
C/L Grid: This tool is for controlling the contrast of a specific color. Make use of it by rotating the axis angle to influence specific hues to work with.
Use this tool to control the saturation or luminance. This should be according to the existing state of your image, such as the current saturation. Likewise, you can use color swatches to perform color adjustments based on different color modes. Such color modes include SXY, YUV, CMYK, and RGBW, among others.
Masking: This is another powerful tool capable of pulling an interesting color mixture. You can create masks based on various aspects of the settings, like hue and warmth.
To download the app, visit the official website of 3D LUT Creator at:
Concluding Remarks
● Working with the 3D LUT Creator is quite interesting. It gives a different approach to several common photo editors on the market. You get the 3D LUT mobile app version and the desktop version. It also brings you tons of tools to pull through any piece of colorwork on your images and videos. However, working with this program is complex and may suit only professional photographers and editors.
You need to be creative to compose a lookup table (LUT) for color grading. And working with LUT Creator is what you need for a successful outcome. Even though it suits advanced users, it comes with various tools to perform several things that concern color grading.
After a successful 3D LUT app download, you are good to work with it on your computer. Easily display its working and reference images side by side, toggle them back and forth, or top and bottom as you show your creativity. You can bring your source photo into the 3D LUT Creator in several ways. Interacting with other programs, pasting from the clipboard, or simply swapping work as you reference your images lets you come up with perfect color grading.

company, user or members of the same household. Action! - screen and game recorder</a>
In this article
01 What Is a 3D LUT Creator, Exactly?
02 The 3D LUT Creator’s Features
03 Does 3D LUT have a mobile app?
What Is a 3D LUT Creator, Exactly?
A 3D LUT Creator is a program that harbors unique colors meant for grading your video or images. It creates 3DLUTS imported to other programs such as Adobe Premiere Pro, Final Cut Pro, and others. Creators opt for this top-notch program for several reasons. The speed is pretty fast, it harbors unique tools, and it easily integrates with other programs such as Adobe Photoshop. More so, 3D LUT Creator gives you a polished end product that upscales your creativity level.
The Cost of a 3D LUT Creator
The 3D LUT Creator comes on both Windows and Mac OS devices for desktop versions. These operating systems use different licenses but can combine for a price of $299. The Grading Edition is $99, the Standard Version is $199, and the PRO version is $249.
The 3D LUT Creator’s Features
This app is rich in features, enabling you to handle several color mixes and grading easily. The features supported by the 3D LUT Creator include:
### 1\. Color match and correction with the reference imageWith a color match, you’ll be able to copy the color scheme from one image to another. The color correction is made from the grid-tied to the color plan with saturation and hue. You can then easily change the color scheme and work with any desired color range of your choice.

2. Find the built-in LUT collection
You can find a collection of LUTs up to 48 in number. These are both cinematic-look LUTs and technical LUTs for grayscale conversion. To achieve this, turn on the adjustment. You will then see a pop-up menu and an “Intensify” slider. Next, choose from the 48 collections of LUTs the color that suits you.
3. Control color settings
You can save the color settings in files with the extensions “.3dl,” “.csv,” and “.cube” as these are cross-platform formats. Likewise, you can open them in other video editors like Adobe Premiere Pro, Adobe After Effects, and Final Cut Pro apps. To use it, take a frame of the video, then process it within the program and save the settings before finally applying a color profile to your video.
To correct your colors, first, the camera receives light and color. Then light passes through the lens and gets into the filter. Once the filter cuts off the infrared light, the rest of the light incident on the Bayer filter

4. Adjust the image
You can adjust the image in the 3D LUT Creator using the A/B Grid. You first need to ensure that your settings are well set as per your mission. These include contrast, temperature, pivot, saturation, and dynamic range. Use the “Compare” button to compare the changes with the original file. The “before” and the “after” image should give you a deeper insight into what your video is like after adjustment.
5. Find the custom LUT adjustment
You can also find a custom LUT adjustment with this creator. To do so, go to the Color Adjustment tool and turn on the Custom LUT adjustment. Furthermore, this applies to both individual and group layers.
6. Adjust the colors
For this feature, use the spider’s web in the A/B Grid and use the “color wheel.” Several points on the web represent the colors in your image. To adjust color, click and drag a point in any direction of choice. You will have changed the original color within the image to another color.
 Software Update Pro - Check and update software installed on your computer.
7. Generate a LUT File
You can choose to save the adjustments as a LUT file. To create such a file, go to the “File” menu and select the “File” tab, then click on the “Export” option. Next, name your file and choose the LUT format that you want to use. The most popular LUT format is “cube”. More so, it is quite compatible with several photo editors. Likewise, you can export your content to other platforms.
Does 3D LUT have a mobile app?
Yes. 3D LUT has a mobile app version. You can use it to adjust your videos and photos from the comfort of your palms. It comprises these features.
Basic color adjustment: This feature allows you to change your video or image color to your satisfaction. You can make it brighter or dull by moving the brightness bar to either the left or the right. Other adjustments are the contrast, saturation, and white balance.
Choose your photos from the gallery: you don’t have to search for your data from other platforms. Simply choose photos or videos to use from the gallery. This applies to the earlier saved photos. However, you can also use your camera to shoot instant photos.
Color correction: your image color could be too bright or dull. This feature enables you to correct the color to a perfect tone. Besides, you get to choose from a wide range of colors, or better still, do a quick mix even as you correct the needed sections.
You don’t intend to compose your video and miss an open platform to share your content. Use the export tab to instantly share your video or images once ed to perfection. You can use it for marketing or tutorials.
 Simple and intuitive video editing
The 3D LUT desktop version
The desktop version is the most widely used. It is powerful, with enough tools to carry out a couple of color grading effects.
How it works
The 3D LUT Creator has a working image and a reference image. These are displayed side by side or top and bottom to show the “Before” and “After” effects. The best part is that you can comfortably interact with other programs such as After Effect and many more. The simplest way to add your content is to drag a photo from the Finder into the PS. Additionally, pasting your image from the clipboard also works well. This favors you when watching a video on a separate social media site like YouTube or Vimeo as long as you like the grading pattern. Use your desktop screenshot as a clipboard shortcut, then go to the 3D LUT Creator and hit “Command+V” to paste it.
Note that after you paste your content into the program, you should begin to work with your color. Here are some useful tools for the desktop version.
The A/B Grid: This tool enables you to change the hue and saturation of your image without affecting other colors. It is either square or circular, both with layered colors. You will notice the color wheel shows the control points with more saturation in the outer area, while less saturation is geared towards the center region. Nonetheless, it is quite easy to limit the colors on your screen, as you can choose to work with only a few at a time.
C/L Grid: This tool is for controlling the contrast of a specific color. Make use of it by rotating the axis angle to influence specific hues to work with.
Use this tool to control the saturation or luminance. This should be according to the existing state of your image, such as the current saturation. Likewise, you can use color swatches to perform color adjustments based on different color modes. Such color modes include SXY, YUV, CMYK, and RGBW, among others.
Masking: This is another powerful tool capable of pulling an interesting color mixture. You can create masks based on various aspects of the settings, like hue and warmth.
To download the app, visit the official website of 3D LUT Creator at:
Concluding Remarks
● Working with the 3D LUT Creator is quite interesting. It gives a different approach to several common photo editors on the market. You get the 3D LUT mobile app version and the desktop version. It also brings you tons of tools to pull through any piece of colorwork on your images and videos. However, working with this program is complex and may suit only professional photographers and editors.
You need to be creative to compose a lookup table (LUT) for color grading. And working with LUT Creator is what you need for a successful outcome. Even though it suits advanced users, it comes with various tools to perform several things that concern color grading.
After a successful 3D LUT app download, you are good to work with it on your computer. Easily display its working and reference images side by side, toggle them back and forth, or top and bottom as you show your creativity. You can bring your source photo into the 3D LUT Creator in several ways. Interacting with other programs, pasting from the clipboard, or simply swapping work as you reference your images lets you come up with perfect color grading.
In this article
01 What Is a 3D LUT Creator, Exactly?
02 The 3D LUT Creator’s Features
03 Does 3D LUT have a mobile app?
What Is a 3D LUT Creator, Exactly?
A 3D LUT Creator is a program that harbors unique colors meant for grading your video or images. It creates 3DLUTS imported to other programs such as Adobe Premiere Pro, Final Cut Pro, and others. Creators opt for this top-notch program for several reasons. The speed is pretty fast, it harbors unique tools, and it easily integrates with other programs such as Adobe Photoshop. More so, 3D LUT Creator gives you a polished end product that upscales your creativity level.
The Cost of a 3D LUT Creator
The 3D LUT Creator comes on both Windows and Mac OS devices for desktop versions. These operating systems use different licenses but can combine for a price of $299. The Grading Edition is $99, the Standard Version is $199, and the PRO version is $249.
The 3D LUT Creator’s Features
This app is rich in features, enabling you to handle several color mixes and grading easily. The features supported by the 3D LUT Creator include:
1. Color match and correction with the reference image
With a color match, you’ll be able to copy the color scheme from one image to another. The color correction is made from the grid-tied to the color plan with saturation and hue. You can then easily change the color scheme and work with any desired color range of your choice.
 SwifDoo PDF Perpetual (1 PC) Free upgrade. No monthly fees ever.
2. Find the built-in LUT collection
You can find a collection of LUTs up to 48 in number. These are both cinematic-look LUTs and technical LUTs for grayscale conversion. To achieve this, turn on the adjustment. You will then see a pop-up menu and an “Intensify” slider. Next, choose from the 48 collections of LUTs the color that suits you.
 WinUtilities Pro
3. Control color settings
You can save the color settings in files with the extensions “.3dl,” “.csv,” and “.cube” as these are cross-platform formats. Likewise, you can open them in other video editors like Adobe Premiere Pro, Adobe After Effects, and Final Cut Pro apps. To use it, take a frame of the video, then process it within the program and save the settings before finally applying a color profile to your video.
 WonderFox DVD Ripper Pro
To correct your colors, first, the camera receives light and color. Then light passes through the lens and gets into the filter. Once the filter cuts off the infrared light, the rest of the light incident on the Bayer filter
Parental Control Software
### 4\. Adjust the imageYou can adjust the image in the 3D LUT Creator using the A/B Grid. You first need to ensure that your settings are well set as per your mission. These include contrast, temperature, pivot, saturation, and dynamic range. Use the “Compare” button to compare the changes with the original file. The “before” and the “after” image should give you a deeper insight into what your video is like after adjustment.
 vMix Pro - Software based live production. vMix Pro includes everything in vMix 4K plus 8 channels of Replay and 8 vMix Call
5. Find the custom LUT adjustment
You can also find a custom LUT adjustment with this creator. To do so, go to the Color Adjustment tool and turn on the Custom LUT adjustment. Furthermore, this applies to both individual and group layers.
6. Adjust the colors
For this feature, use the spider’s web in the A/B Grid and use the “color wheel.” Several points on the web represent the colors in your image. To adjust color, click and drag a point in any direction of choice. You will have changed the original color within the image to another color.
7. Generate a LUT File
You can choose to save the adjustments as a LUT file. To create such a file, go to the “File” menu and select the “File” tab, then click on the “Export” option. Next, name your file and choose the LUT format that you want to use. The most popular LUT format is “cube”. More so, it is quite compatible with several photo editors. Likewise, you can export your content to other platforms.
 Glarysoft File Recovery Pro - Helps to recover your lost file/data, even permanently deleted data.
Does 3D LUT have a mobile app?
Yes. 3D LUT has a mobile app version. You can use it to adjust your videos and photos from the comfort of your palms. It comprises these features.
Basic color adjustment: This feature allows you to change your video or image color to your satisfaction. You can make it brighter or dull by moving the brightness bar to either the left or the right. Other adjustments are the contrast, saturation, and white balance.
Choose your photos from the gallery: you don’t have to search for your data from other platforms. Simply choose photos or videos to use from the gallery. This applies to the earlier saved photos. However, you can also use your camera to shoot instant photos.
Color correction: your image color could be too bright or dull. This feature enables you to correct the color to a perfect tone. Besides, you get to choose from a wide range of colors, or better still, do a quick mix even as you correct the needed sections.
You don’t intend to compose your video and miss an open platform to share your content. Use the export tab to instantly share your video or images once ed to perfection. You can use it for marketing or tutorials.
The 3D LUT desktop version
The desktop version is the most widely used. It is powerful, with enough tools to carry out a couple of color grading effects.
How it works
The 3D LUT Creator has a working image and a reference image. These are displayed side by side or top and bottom to show the “Before” and “After” effects. The best part is that you can comfortably interact with other programs such as After Effect and many more. The simplest way to add your content is to drag a photo from the Finder into the PS. Additionally, pasting your image from the clipboard also works well. This favors you when watching a video on a separate social media site like YouTube or Vimeo as long as you like the grading pattern. Use your desktop screenshot as a clipboard shortcut, then go to the 3D LUT Creator and hit “Command+V” to paste it.
Note that after you paste your content into the program, you should begin to work with your color. Here are some useful tools for the desktop version.
The A/B Grid: This tool enables you to change the hue and saturation of your image without affecting other colors. It is either square or circular, both with layered colors. You will notice the color wheel shows the control points with more saturation in the outer area, while less saturation is geared towards the center region. Nonetheless, it is quite easy to limit the colors on your screen, as you can choose to work with only a few at a time.
C/L Grid: This tool is for controlling the contrast of a specific color. Make use of it by rotating the axis angle to influence specific hues to work with.
Use this tool to control the saturation or luminance. This should be according to the existing state of your image, such as the current saturation. Likewise, you can use color swatches to perform color adjustments based on different color modes. Such color modes include SXY, YUV, CMYK, and RGBW, among others.
Masking: This is another powerful tool capable of pulling an interesting color mixture. You can create masks based on various aspects of the settings, like hue and warmth.
To download the app, visit the official website of 3D LUT Creator at:
Concluding Remarks
● Working with the 3D LUT Creator is quite interesting. It gives a different approach to several common photo editors on the market. You get the 3D LUT mobile app version and the desktop version. It also brings you tons of tools to pull through any piece of colorwork on your images and videos. However, working with this program is complex and may suit only professional photographers and editors.
You need to be creative to compose a lookup table (LUT) for color grading. And working with LUT Creator is what you need for a successful outcome. Even though it suits advanced users, it comes with various tools to perform several things that concern color grading.
After a successful 3D LUT app download, you are good to work with it on your computer. Easily display its working and reference images side by side, toggle them back and forth, or top and bottom as you show your creativity. You can bring your source photo into the 3D LUT Creator in several ways. Interacting with other programs, pasting from the clipboard, or simply swapping work as you reference your images lets you come up with perfect color grading.
In this article
01 What Is a 3D LUT Creator, Exactly?
02 The 3D LUT Creator’s Features
03 Does 3D LUT have a mobile app?
What Is a 3D LUT Creator, Exactly?
A 3D LUT Creator is a program that harbors unique colors meant for grading your video or images. It creates 3DLUTS imported to other programs such as Adobe Premiere Pro, Final Cut Pro, and others. Creators opt for this top-notch program for several reasons. The speed is pretty fast, it harbors unique tools, and it easily integrates with other programs such as Adobe Photoshop. More so, 3D LUT Creator gives you a polished end product that upscales your creativity level.
The Cost of a 3D LUT Creator
The 3D LUT Creator comes on both Windows and Mac OS devices for desktop versions. These operating systems use different licenses but can combine for a price of $299. The Grading Edition is $99, the Standard Version is $199, and the PRO version is $249.
The 3D LUT Creator’s Features
This app is rich in features, enabling you to handle several color mixes and grading easily. The features supported by the 3D LUT Creator include:
1. Color match and correction with the reference image
With a color match, you’ll be able to copy the color scheme from one image to another. The color correction is made from the grid-tied to the color plan with saturation and hue. You can then easily change the color scheme and work with any desired color range of your choice.


2. Find the built-in LUT collection
You can find a collection of LUTs up to 48 in number. These are both cinematic-look LUTs and technical LUTs for grayscale conversion. To achieve this, turn on the adjustment. You will then see a pop-up menu and an “Intensify” slider. Next, choose from the 48 collections of LUTs the color that suits you.
3. Control color settings
You can save the color settings in files with the extensions “.3dl,” “.csv,” and “.cube” as these are cross-platform formats. Likewise, you can open them in other video editors like Adobe Premiere Pro, Adobe After Effects, and Final Cut Pro apps. To use it, take a frame of the video, then process it within the program and save the settings before finally applying a color profile to your video.
To correct your colors, first, the camera receives light and color. Then light passes through the lens and gets into the filter. Once the filter cuts off the infrared light, the rest of the light incident on the Bayer filter
 TubeDigger - online video downloader from mostly any site
4. Adjust the image
You can adjust the image in the 3D LUT Creator using the A/B Grid. You first need to ensure that your settings are well set as per your mission. These include contrast, temperature, pivot, saturation, and dynamic range. Use the “Compare” button to compare the changes with the original file. The “before” and the “after” image should give you a deeper insight into what your video is like after adjustment.

5. Find the custom LUT adjustment
You can also find a custom LUT adjustment with this creator. To do so, go to the Color Adjustment tool and turn on the Custom LUT adjustment. Furthermore, this applies to both individual and group layers.
6. Adjust the colors
For this feature, use the spider’s web in the A/B Grid and use the “color wheel.” Several points on the web represent the colors in your image. To adjust color, click and drag a point in any direction of choice. You will have changed the original color within the image to another color.

WPS Office Premium ( File Recovery, Photo Scanning, Convert PDF)–Yearly
7. Generate a LUT File
You can choose to save the adjustments as a LUT file. To create such a file, go to the “File” menu and select the “File” tab, then click on the “Export” option. Next, name your file and choose the LUT format that you want to use. The most popular LUT format is “cube”. More so, it is quite compatible with several photo editors. Likewise, you can export your content to other platforms.
Does 3D LUT have a mobile app?
Yes. 3D LUT has a mobile app version. You can use it to adjust your videos and photos from the comfort of your palms. It comprises these features.
Basic color adjustment: This feature allows you to change your video or image color to your satisfaction. You can make it brighter or dull by moving the brightness bar to either the left or the right. Other adjustments are the contrast, saturation, and white balance.
Choose your photos from the gallery: you don’t have to search for your data from other platforms. Simply choose photos or videos to use from the gallery. This applies to the earlier saved photos. However, you can also use your camera to shoot instant photos.
Color correction: your image color could be too bright or dull. This feature enables you to correct the color to a perfect tone. Besides, you get to choose from a wide range of colors, or better still, do a quick mix even as you correct the needed sections.
You don’t intend to compose your video and miss an open platform to share your content. Use the export tab to instantly share your video or images once ed to perfection. You can use it for marketing or tutorials.
The 3D LUT desktop version
The desktop version is the most widely used. It is powerful, with enough tools to carry out a couple of color grading effects.
How it works
The 3D LUT Creator has a working image and a reference image. These are displayed side by side or top and bottom to show the “Before” and “After” effects. The best part is that you can comfortably interact with other programs such as After Effect and many more. The simplest way to add your content is to drag a photo from the Finder into the PS. Additionally, pasting your image from the clipboard also works well. This favors you when watching a video on a separate social media site like YouTube or Vimeo as long as you like the grading pattern. Use your desktop screenshot as a clipboard shortcut, then go to the 3D LUT Creator and hit “Command+V” to paste it.
Note that after you paste your content into the program, you should begin to work with your color. Here are some useful tools for the desktop version.
The A/B Grid: This tool enables you to change the hue and saturation of your image without affecting other colors. It is either square or circular, both with layered colors. You will notice the color wheel shows the control points with more saturation in the outer area, while less saturation is geared towards the center region. Nonetheless, it is quite easy to limit the colors on your screen, as you can choose to work with only a few at a time.
C/L Grid: This tool is for controlling the contrast of a specific color. Make use of it by rotating the axis angle to influence specific hues to work with.
Use this tool to control the saturation or luminance. This should be according to the existing state of your image, such as the current saturation. Likewise, you can use color swatches to perform color adjustments based on different color modes. Such color modes include SXY, YUV, CMYK, and RGBW, among others.
Masking: This is another powerful tool capable of pulling an interesting color mixture. You can create masks based on various aspects of the settings, like hue and warmth.
To download the app, visit the official website of 3D LUT Creator at:
 Forex Robotron Gold Package
Concluding Remarks
● Working with the 3D LUT Creator is quite interesting. It gives a different approach to several common photo editors on the market. You get the 3D LUT mobile app version and the desktop version. It also brings you tons of tools to pull through any piece of colorwork on your images and videos. However, working with this program is complex and may suit only professional photographers and editors.
- Title: Leading Edge of Color Grading with LUTs
- Author: Christopher
- Created at : 2024-07-22 11:05:11
- Updated at : 2024-07-23 11:05:11
- Link: https://extra-hints.techidaily.com/leading-edge-of-color-grading-with-luts/
- License: This work is licensed under CC BY-NC-SA 4.0.