:max_bytes(150000):strip_icc()/GettyImages-1182646353-592e5ea20e2846d7b84b9d60e2b5a92c.jpg)
"Dimensions and Edits The iMovie Crop Enigma"
Dimensions and Edits: The iMovie Crop Enigma
Have you experienced importing your files, and suddenly iMovie automatically crops your videos? Whenever you add footage from various sources to a project, not all of the content may fit inside the aspect ratio you’ve set for the project. Fit in Frame: Fits the entire video into the aspect ratio of the output, even if it results in letterboxing or pillar boxing.

Why Does iMovie Crop Your Video Automatically?
Suppose you choose to maintain the aspect ratio of your project. In that case, iMovie automatically expands in and crops your clip to fill the screen without letterboxing or pillar boxing (putting black bars to the top and bottom of the film). Thus, it is preferable to utilize a four-dimensional and three-dimensional film standard (4:3).
 PCDJ DEX 3 for Windows & MAC is the total entertainment DJ software solution, offering audio, video, and karaoke mixing ability. Automatic beat-sync, smart looping, 4 decks, DJ MIDI controller support, Karaoke Streaming and much more.
Top 3 Best Alternative Software to Edit Videos
I know that you always get irritated with this automatic crop feature. Well, you won’t need to worry because, in this article, I will show you the best alternatives where you can edit your videos quickly, easily, and without an automatic crop feature. Keep reading as I offer you these below:

Video Editor #1: Wondershare Filmora – Overall Best
Are you seeking for a video editor that won’t automatically crop your clips? Then, you are in the right place. Wondershare Filmora instantly imports your files without restricting any resolution. You can load and start editing your clips with any of your desired aspect ratios.
Follow the steps below to begin making your video with Filmora:
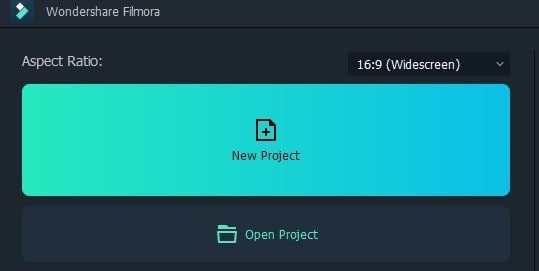
Step #1: Begin by Going to Filmora and Selecting Your Desired Aspect Ratio.
Double-click Filmora’s desktop icon once you’re ready to start working on a new video. The welcome screen of the application will encourage you to create a new project or open an existing one. You can also choose the aspect ratio here to save time when editing.
Step #2: Create a New Project
After choosing New Project on the software’s welcome screen, wait for the editor to load. After gaining access to Fillmora’s video editor, click the Register button to activate it.
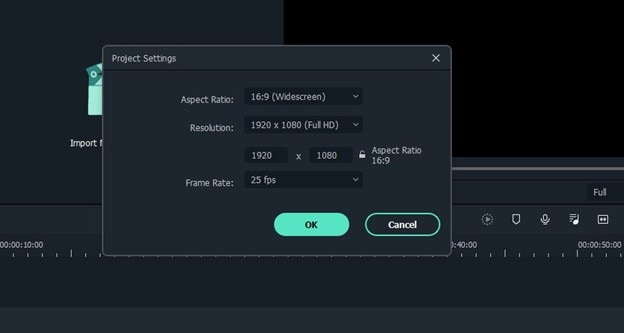
Go to the File menu and click Project Settings to choose the aspect ratio for your final film output. You’ll be able to select from various aspect ratios, including the standard 16:9 or 4:3, the less common 9:16 aspect ratio for vertically oriented flicks, and the 1:1 aspect ratio for square-shaped films. You can also adjust the aspect ratio to fit your needs.
Step #3: Import Your Files
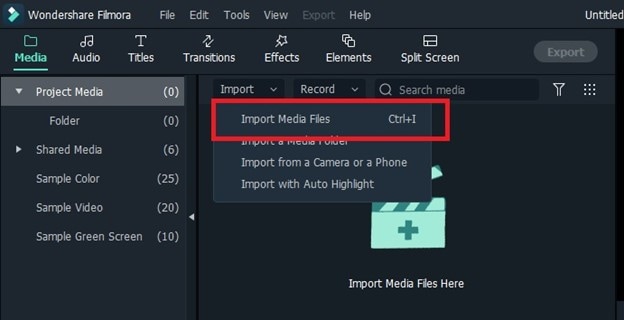
You can find the Import button in the upper left corner of the film editor; click it and select Import Media Files. Next, go to the hard drive folder containing the item you want to modify. After choosing the video, audio, or photo files, you want to use in your project, click the Import option.

The Import menu now includes Import with Instant Cutter Tool. The Instant Cutter Tool made trimming 4K and other large video files quick and easy. Filmora can also edit footage shot with action cameras swiftly. You can simply improve your films with the lens correction tools and the Fish Eye Distortion function.
Step #4: Arrange Your Clips
The documents you import into Filmora will be stored under the Media tab, which you can find beneath the Load button. Working with multiple files in a single project becomes significantly more difficult when searching for the films and photographs you want to add to the timeline. To eliminate clutter and annoyance, use the My Album tool to create folders and organize your files.
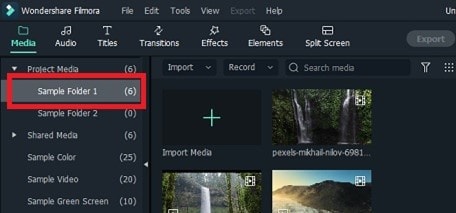
In the window’s top right corner, click the Add a New Folder icon at the bottom of the “My Project” section. You can organize the footage numerically or in another method to increase your productivity and save time looking through files.
Step #5: Organize the Files on The Timeline
Because raw footage frequently has incorrect orbits that you don’t need in your video, simply drag them from the Media tab and set them on the timeline if you want to delete or edit your videos. You can load as much clips as you want, but you can only add them one at a time, and you’ll have to drag the files to the right place on the timeline to reorder them.
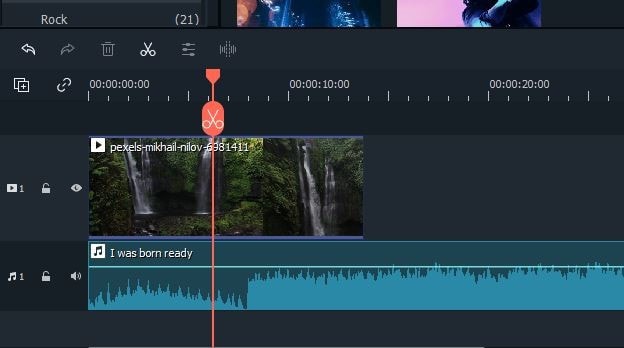
Press Play or use the Spacebar to examine the video clips you’ve added to the timeline. You may use the playhead to jump to a certain point in the movie. Place the playhead at the exact beginning of the video segment you wish to trim, then repeat the operation on the other end.
Parental Control Software
### **Step #6: Insert Effects**After eliminating all the unwanted bits from your video clips, you may now separate the audio and video files, add music, make transitions between the segments, or apply one of Filmora’s many graphic effects.
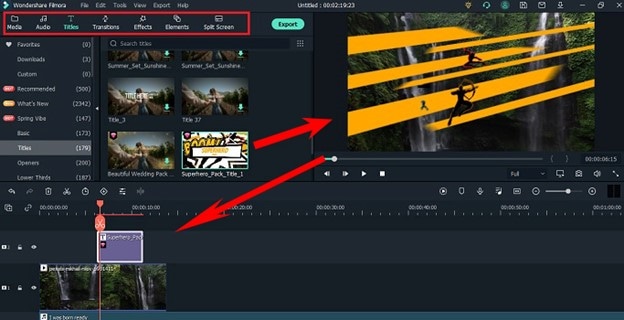
Click the Text /Credit icon to add opening titles, end credits, or subtitles to your video. The software comes with several text templates that you can use for various purposes. Drag and drop the theme you want to use to the appropriate location on the timeline, then add the relevant text using the software’s preview box.
BBD0E0 »
Step #2: Create a New Project
After choosing New Project on the software’s welcome screen, wait for the editor to load. After gaining access to Fillmora’s video editor, click the Register button to activate it.
Go to the File menu and click Project Settings to choose the aspect ratio for your final film output. You’ll be able to select from various aspect ratios, including the standard 16:9 or 4:3, the less common 9:16 aspect ratio for vertically oriented flicks, and the 1:1 aspect ratio for square-shaped films. You can also adjust the aspect ratio to fit your needs.
Step #3: Import Your Files
You can find the Import button in the upper left corner of the film editor; click it and select Import Media Files. Next, go to the hard drive folder containing the item you want to modify. After choosing the video, audio, or photo files, you want to use in your project, click the Import option.
 SwifDoo PDF 2-Year Plan
The Import menu now includes Import with Instant Cutter Tool. The Instant Cutter Tool made trimming 4K and other large video files quick and easy. Filmora can also edit footage shot with action cameras swiftly. You can simply improve your films with the lens correction tools and the Fish Eye Distortion function.
 Video Converter Factory Pro
Step #4: Arrange Your Clips
The documents you import into Filmora will be stored under the Media tab, which you can find beneath the Load button. Working with multiple files in a single project becomes significantly more difficult when searching for the films and photographs you want to add to the timeline. To eliminate clutter and annoyance, use the My Album tool to create folders and organize your files.
In the window’s top right corner, click the Add a New Folder icon at the bottom of the “My Project” section. You can organize the footage numerically or in another method to increase your productivity and save time looking through files.
Step #5: Organize the Files on The Timeline
Because raw footage frequently has incorrect orbits that you don’t need in your video, simply drag them from the Media tab and set them on the timeline if you want to delete or edit your videos. You can load as much clips as you want, but you can only add them one at a time, and you’ll have to drag the files to the right place on the timeline to reorder them.
Press Play or use the Spacebar to examine the video clips you’ve added to the timeline. You may use the playhead to jump to a certain point in the movie. Place the playhead at the exact beginning of the video segment you wish to trim, then repeat the operation on the other end.
Step #6: Insert Effects
After eliminating all the unwanted bits from your video clips, you may now separate the audio and video files, add music, make transitions between the segments, or apply one of Filmora’s many graphic effects.
Click the Text /Credit icon to add opening titles, end credits, or subtitles to your video. The software comes with several text templates that you can use for various purposes. Drag and drop the theme you want to use to the appropriate location on the timeline, then add the relevant text using the software’s preview box.
BBD0E0 »
Step #2: Create a New Project
After choosing New Project on the software’s welcome screen, wait for the editor to load. After gaining access to Fillmora’s video editor, click the Register button to activate it.
Go to the File menu and click Project Settings to choose the aspect ratio for your final film output. You’ll be able to select from various aspect ratios, including the standard 16:9 or 4:3, the less common 9:16 aspect ratio for vertically oriented flicks, and the 1:1 aspect ratio for square-shaped films. You can also adjust the aspect ratio to fit your needs.
Step #3: Import Your Files
You can find the Import button in the upper left corner of the film editor; click it and select Import Media Files. Next, go to the hard drive folder containing the item you want to modify. After choosing the video, audio, or photo files, you want to use in your project, click the Import option.
The Import menu now includes Import with Instant Cutter Tool. The Instant Cutter Tool made trimming 4K and other large video files quick and easy. Filmora can also edit footage shot with action cameras swiftly. You can simply improve your films with the lens correction tools and the Fish Eye Distortion function.
 vMix 4K - Software based live production. vMix 4K includes everything in vMix HD plus 4K support, PTZ control, External/Fullscreen output, 4 Virtual Outputs, 1 Replay, 4 vMix Call, and 2 Recorders.
Step #4: Arrange Your Clips
The documents you import into Filmora will be stored under the Media tab, which you can find beneath the Load button. Working with multiple files in a single project becomes significantly more difficult when searching for the films and photographs you want to add to the timeline. To eliminate clutter and annoyance, use the My Album tool to create folders and organize your files.
In the window’s top right corner, click the Add a New Folder icon at the bottom of the “My Project” section. You can organize the footage numerically or in another method to increase your productivity and save time looking through files.

Step #5: Organize the Files on The Timeline
Because raw footage frequently has incorrect orbits that you don’t need in your video, simply drag them from the Media tab and set them on the timeline if you want to delete or edit your videos. You can load as much clips as you want, but you can only add them one at a time, and you’ll have to drag the files to the right place on the timeline to reorder them.

Press Play or use the Spacebar to examine the video clips you’ve added to the timeline. You may use the playhead to jump to a certain point in the movie. Place the playhead at the exact beginning of the video segment you wish to trim, then repeat the operation on the other end.
Step #6: Insert Effects
After eliminating all the unwanted bits from your video clips, you may now separate the audio and video files, add music, make transitions between the segments, or apply one of Filmora’s many graphic effects.
Click the Text /Credit icon to add opening titles, end credits, or subtitles to your video. The software comes with several text templates that you can use for various purposes. Drag and drop the theme you want to use to the appropriate location on the timeline, then add the relevant text using the software’s preview box.
BBD0E0 »
Step #2: Create a New Project
After choosing New Project on the software’s welcome screen, wait for the editor to load. After gaining access to Fillmora’s video editor, click the Register button to activate it.
Go to the File menu and click Project Settings to choose the aspect ratio for your final film output. You’ll be able to select from various aspect ratios, including the standard 16:9 or 4:3, the less common 9:16 aspect ratio for vertically oriented flicks, and the 1:1 aspect ratio for square-shaped films. You can also adjust the aspect ratio to fit your needs.
Step #3: Import Your Files
You can find the Import button in the upper left corner of the film editor; click it and select Import Media Files. Next, go to the hard drive folder containing the item you want to modify. After choosing the video, audio, or photo files, you want to use in your project, click the Import option.
 Power Tools add-on for Google Sheets, 12-month subscription
The Import menu now includes Import with Instant Cutter Tool. The Instant Cutter Tool made trimming 4K and other large video files quick and easy. Filmora can also edit footage shot with action cameras swiftly. You can simply improve your films with the lens correction tools and the Fish Eye Distortion function.
Step #4: Arrange Your Clips
The documents you import into Filmora will be stored under the Media tab, which you can find beneath the Load button. Working with multiple files in a single project becomes significantly more difficult when searching for the films and photographs you want to add to the timeline. To eliminate clutter and annoyance, use the My Album tool to create folders and organize your files.
In the window’s top right corner, click the Add a New Folder icon at the bottom of the “My Project” section. You can organize the footage numerically or in another method to increase your productivity and save time looking through files.
Step #5: Organize the Files on The Timeline
Because raw footage frequently has incorrect orbits that you don’t need in your video, simply drag them from the Media tab and set them on the timeline if you want to delete or edit your videos. You can load as much clips as you want, but you can only add them one at a time, and you’ll have to drag the files to the right place on the timeline to reorder them.
Press Play or use the Spacebar to examine the video clips you’ve added to the timeline. You may use the playhead to jump to a certain point in the movie. Place the playhead at the exact beginning of the video segment you wish to trim, then repeat the operation on the other end.
Step #6: Insert Effects
After eliminating all the unwanted bits from your video clips, you may now separate the audio and video files, add music, make transitions between the segments, or apply one of Filmora’s many graphic effects.
Click the Text /Credit icon to add opening titles, end credits, or subtitles to your video. The software comes with several text templates that you can use for various purposes. Drag and drop the theme you want to use to the appropriate location on the timeline, then add the relevant text using the software’s preview box.
BBD0E0 »
- Title: Dimensions and Edits The iMovie Crop Enigma
- Author: Christopher
- Created at : 2024-07-22 10:05:24
- Updated at : 2024-07-23 10:05:24
- Link: https://extra-hints.techidaily.com/dimensions-and-edits-the-imovie-crop-enigma/
- License: This work is licensed under CC BY-NC-SA 4.0.