
"Color Grading Made Simple Photoshop Guide"
Color Grading Made Simple: Photoshop Guide
Create High-Quality Video - Wondershare Filmora
An easy and powerful YouTube video editor
Numerous video and audio effects to choose from
Detailed tutorials provided by the official channel
What is your social media follower count? Content creation is now a viable career, and you can make huge sums if you play your cards right. To do this, you need to create quality content that involves having the correct color grades for your photos. However, where do you start? And, how do you achieve these?
Below is information on Photoshop, a tool that some creators use for color grading and color correction. Additionally, you will discover three simple ways of photoshop color grading that you can use, regardless of your skill level. As such, you will also start releasing quality content and make some money out of it too, ready?
In this article
01 What is the difference between color grading and color correction?
02 3 Simple Ways to Color Grading in Photoshop
What is the difference between color grading and color correction?
Did you even know there was a difference? Well, the answer is yes, and here is how they differ.
 Nero Burning ROM:
The ultimate burning program for all your needs!
Color Grading
Color grading photoshop refers to the final process of content creation. It involves subtle tweaks to your photos to make them more stylish. Some of your reasons may include:
- Adjusting contrast so that you do not hurt your viewers’ eyes.
- Color balancing
- White balancing
- Black leveling
- Luminance adjustments
- Color saturation.
- Saturation
- Hue
- Effects and so on
For example, tweaking your Instagram photo with a retro color scheme is color grading. You can achieve this by using photoshop cinematic color grading.
 With Screensaver Wonder you can easily make a screensaver from your own pictures and video files. Create screensavers for your own computer or create standalone, self-installing screensavers for easy sharing with your friends. Together with its sister product Screensaver Factory, Screensaver Wonder is one of the most popular screensaver software products in the world, helping thousands of users decorate their computer screens quickly and easily.
Color Correction
Color correction refers to the fixes you make when creating your content. It focuses on making changes relevant to your target audience. You can do this during production from the device. For example, you can adjust your camera’s exposure when shooting your stills. As such, they appear more natural and unprocessed.
Additionally, you can do this in post-production, as the first step of your color grading photoshop process.
Some of the fixes you can do for color correction include:
- Eliminating dark spots and red eyes.
- Changing the resolution to fit specific content. For example, you can adjust your photo to a 600 X 300 resolution to put it in a blog post.
- Alternatively, you can color correct photos from different cameras to maintain consistency. Typically, you do this is for related content.
- Finally, the vacation photos you want to share also include your ex. You can color correct them by cropping the section that has you and them.
Now that you know the difference, why should you do them for your photos?
Both processes are essential to creating quality content and vary among creators. Some of the reasons include:
- You want to create a unique style that will make your content instantly recognizable. For example, you will immediately recognize a Quentin Tarantino movie thanks to the emphasis on red in his action scenes. Another example is Tyler Perry. He prefers brighter than usual color schemes.
- Alternatively, you use color grading and color correction to create variation in scenes. For example, you can indicate a throwback photo by making it black and white.
- Additionally, color grading photoshop is an excellent way to elicit different moods. For example, a color scheme that features bright yellows, greens, or blues can indicate different excitement levels.
- Furthermore, you use color correction and color grading to indicate the importance of some scene sections. For example, news briefs are usually brighter than the rest of the shot, especially when displaying important messages, such as breaking news.
- Finally, you do photoshop cinematic color grading to ensure consistency in your photos. Weather is unpredictable and can cause your scenes to vary dramatically. For example, some sections of your location may not receive similar lighting. As such, you can make those sections brighter through color grading in photoshop.

3 Simple Ways to Color Grading in Photoshop
Below are 3 simple ways to color grade in Photoshop.

1. Using Photo Filter
Photo filters allow you to quickly make changes to your content by using Photoshop’s presets. Some of the reasons for using it include:
- You want to remove color bounces on your image.
- Brighten the image.
- Add tints to your photo.
Here is how you do it:
1. Open the image
You can do this by using your Photoshop device or selecting it from the program’s library.
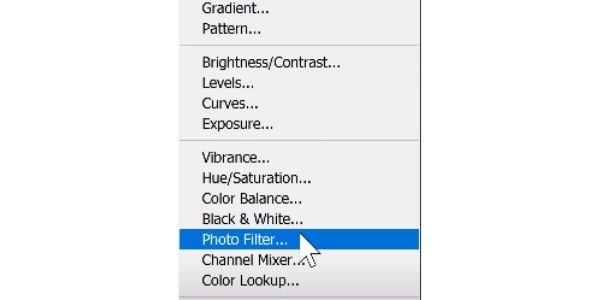
2. Open the Photo Filter tool
You will find this in the Adjustments layer of your Photoshop program. Kindly open the menu and select the Photo Filter option. Usually, it is located on the bottom right section of your screen.

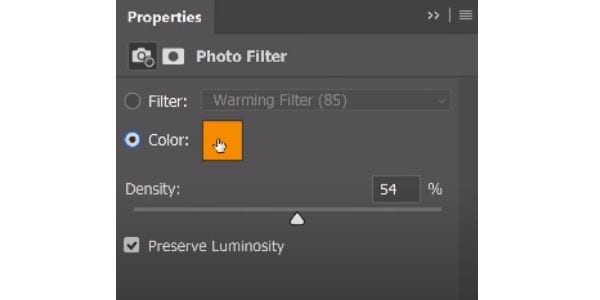
3. Increase the color density of different colors
Click the active color to open the color wheel. Additionally, you can preserve the brightness by leaving the maintain luminosity option checked. Please note some details will disappear depending on the density level.
4. Cycle between filters
Cycle between different filters by checking the filters option from the same menu. You will find all filter presents from the dropdown menu as per the photo.
 WinUtilities Pro
4. Add Layers
You can add different layers to the image by clicking the New Adjustment Layer icon at the bottom of the Layers palette. You can make different adjustments by repeating the above process.
 Glarysoft File Recovery Pro Annually - Helps to recover your lost file/data, even permanently deleted data.
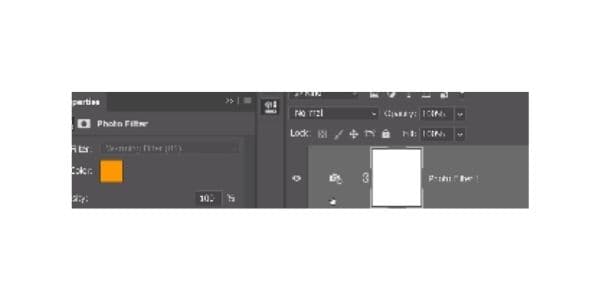
2. Using Hue and Saturation
You can also perform color grading in photoshop by making changes using the Hue and Saturation sliders. Here is how you can access them.
- Open the photo you want to make edits on using your Photoshop program.
- On the bottom right corner of the program, you will see Adjustments.
- Then, click on the option to create a new Hue/Saturation adjustment layer.
- A menu will open, where you select Hue/Saturation.
- Use the sliders to color grade and color correct your photo.
 vMix 4K - Software based live production. vMix 4K includes everything in vMix HD plus 4K support, PTZ control, External/Fullscreen output, 4 Virtual Outputs, 1 Replay, 4 vMix Call, and 2 Recorders.
Here is how each adjustment affects your photo:
- Hue: Making changes to this slider affects the color of your picture. For example, sliding it right gives you a brighter color scheme, with purple being the maximum.
- Saturation: Changes here affect the density of the color you choose. For example, sliding it left makes the color less dense, giving you the most transparent shade.
- Lightness: The slider affects how bright the color you choose will appear. Sliding it extremely left will make it very dark.
3. Using Paint
Paint is another simple way to color correct and color grade in Photoshop. Additionally, it leaves feeling like an artist if you do it correctly. You can opt for this method if you want to:
• Remove color distortions
Sometimes your photo may contain color bounces. Paint allows you to even out things without the need to estimate the correct color values.
• Add fancy effects to your photos
How cool is it to have a blue sun in your landscape photo? You can do that with paint and get stunning results.
• Remove awkward features
You must have a profile picture where some of your facial features look alien. Instead of deleting it, try some color corrections with paint. The results may stun you, to the point you start looking for lost photo albums. Paint allows you to get rid of weird chins color combinations that leave your audiences questioning your health.
Here is how you can use paint to make your photos stunning:
I. Locate the brush tool from your version of photoshop.
Usually, it is under the Tools menu of the layer screen. Alternatively, you can open it by pressing B on your keyboard.
II. Then, drag it to your photo to start painting.
A menu box will appear where you can set your brush. You can customize the following items:
- Color
- Brush size
- Layer
- Blend Mode
III. You can switch the colors by clicking the main color box to activate the color wheel.
IV. The paint tool offers you different brushes depending on the function. For example, you have a healing brush that repairs pixels and blends them seamlessly with the rest.
Conclusion
● As you can see photoshop color grading is a simple process that results in stunning pictures when you use it correctly. Additionally, you have tons of presets available to simplify your work. An important point to consider is to keep things minimal. Keep checking with us regularly for more insights on how to create quality content with different color correction software.
What is your social media follower count? Content creation is now a viable career, and you can make huge sums if you play your cards right. To do this, you need to create quality content that involves having the correct color grades for your photos. However, where do you start? And, how do you achieve these?
Below is information on Photoshop, a tool that some creators use for color grading and color correction. Additionally, you will discover three simple ways of photoshop color grading that you can use, regardless of your skill level. As such, you will also start releasing quality content and make some money out of it too, ready?
In this article
01 What is the difference between color grading and color correction?
02 3 Simple Ways to Color Grading in Photoshop
What is the difference between color grading and color correction?
Did you even know there was a difference? Well, the answer is yes, and here is how they differ.
Color Grading
Color grading photoshop refers to the final process of content creation. It involves subtle tweaks to your photos to make them more stylish. Some of your reasons may include:
- Adjusting contrast so that you do not hurt your viewers’ eyes.
- Color balancing
- White balancing
- Black leveling
- Luminance adjustments
- Color saturation.
- Saturation
- Hue
- Effects and so on
For example, tweaking your Instagram photo with a retro color scheme is color grading. You can achieve this by using photoshop cinematic color grading.

Color Correction
Color correction refers to the fixes you make when creating your content. It focuses on making changes relevant to your target audience. You can do this during production from the device. For example, you can adjust your camera’s exposure when shooting your stills. As such, they appear more natural and unprocessed.
Additionally, you can do this in post-production, as the first step of your color grading photoshop process.
Some of the fixes you can do for color correction include:
- Eliminating dark spots and red eyes.
- Changing the resolution to fit specific content. For example, you can adjust your photo to a 600 X 300 resolution to put it in a blog post.
- Alternatively, you can color correct photos from different cameras to maintain consistency. Typically, you do this is for related content.
- Finally, the vacation photos you want to share also include your ex. You can color correct them by cropping the section that has you and them.
Now that you know the difference, why should you do them for your photos?
Both processes are essential to creating quality content and vary among creators. Some of the reasons include:
- You want to create a unique style that will make your content instantly recognizable. For example, you will immediately recognize a Quentin Tarantino movie thanks to the emphasis on red in his action scenes. Another example is Tyler Perry. He prefers brighter than usual color schemes.
- Alternatively, you use color grading and color correction to create variation in scenes. For example, you can indicate a throwback photo by making it black and white.
- Additionally, color grading photoshop is an excellent way to elicit different moods. For example, a color scheme that features bright yellows, greens, or blues can indicate different excitement levels.
- Furthermore, you use color correction and color grading to indicate the importance of some scene sections. For example, news briefs are usually brighter than the rest of the shot, especially when displaying important messages, such as breaking news.
- Finally, you do photoshop cinematic color grading to ensure consistency in your photos. Weather is unpredictable and can cause your scenes to vary dramatically. For example, some sections of your location may not receive similar lighting. As such, you can make those sections brighter through color grading in photoshop.

3 Simple Ways to Color Grading in Photoshop
Below are 3 simple ways to color grade in Photoshop.
1. Using Photo Filter
Photo filters allow you to quickly make changes to your content by using Photoshop’s presets. Some of the reasons for using it include:
- You want to remove color bounces on your image.
- Brighten the image.
- Add tints to your photo.
Here is how you do it:
 Project Manager - Asset Browser for 3Ds Max
1. Open the image
You can do this by using your Photoshop device or selecting it from the program’s library.
2. Open the Photo Filter tool
You will find this in the Adjustments layer of your Photoshop program. Kindly open the menu and select the Photo Filter option. Usually, it is located on the bottom right section of your screen.
3. Increase the color density of different colors
Click the active color to open the color wheel. Additionally, you can preserve the brightness by leaving the maintain luminosity option checked. Please note some details will disappear depending on the density level.
4. Cycle between filters
Cycle between different filters by checking the filters option from the same menu. You will find all filter presents from the dropdown menu as per the photo.
 Allavsoft Batch Download Online Videos, Music Offline to MP4, MP3, MOV, etc format
4. Add Layers
You can add different layers to the image by clicking the New Adjustment Layer icon at the bottom of the Layers palette. You can make different adjustments by repeating the above process.
2. Using Hue and Saturation
You can also perform color grading in photoshop by making changes using the Hue and Saturation sliders. Here is how you can access them.
- Open the photo you want to make edits on using your Photoshop program.
- On the bottom right corner of the program, you will see Adjustments.
- Then, click on the option to create a new Hue/Saturation adjustment layer.
- A menu will open, where you select Hue/Saturation.
- Use the sliders to color grade and color correct your photo.
 The BootIt Collection covers multi-booting, partitioning, and disk imaging on traditional PC’s using the standard BIOS and newer PC’s using UEFI. The collection includes BootIt Bare Metal (BIBM) for standard BIOS systems and BootIt UEFI (BIU) for UEFI system.
Here is how each adjustment affects your photo:
- Hue: Making changes to this slider affects the color of your picture. For example, sliding it right gives you a brighter color scheme, with purple being the maximum.
- Saturation: Changes here affect the density of the color you choose. For example, sliding it left makes the color less dense, giving you the most transparent shade.
- Lightness: The slider affects how bright the color you choose will appear. Sliding it extremely left will make it very dark.
3. Using Paint
Paint is another simple way to color correct and color grade in Photoshop. Additionally, it leaves feeling like an artist if you do it correctly. You can opt for this method if you want to:
• Remove color distortions
Sometimes your photo may contain color bounces. Paint allows you to even out things without the need to estimate the correct color values.
• Add fancy effects to your photos
How cool is it to have a blue sun in your landscape photo? You can do that with paint and get stunning results.
• Remove awkward features
You must have a profile picture where some of your facial features look alien. Instead of deleting it, try some color corrections with paint. The results may stun you, to the point you start looking for lost photo albums. Paint allows you to get rid of weird chins color combinations that leave your audiences questioning your health.
Here is how you can use paint to make your photos stunning:
I. Locate the brush tool from your version of photoshop.
Usually, it is under the Tools menu of the layer screen. Alternatively, you can open it by pressing B on your keyboard.
II. Then, drag it to your photo to start painting.
A menu box will appear where you can set your brush. You can customize the following items:
- Color
- Brush size
- Layer
- Blend Mode
III. You can switch the colors by clicking the main color box to activate the color wheel.
IV. The paint tool offers you different brushes depending on the function. For example, you have a healing brush that repairs pixels and blends them seamlessly with the rest.
Conclusion
● As you can see photoshop color grading is a simple process that results in stunning pictures when you use it correctly. Additionally, you have tons of presets available to simplify your work. An important point to consider is to keep things minimal. Keep checking with us regularly for more insights on how to create quality content with different color correction software.
What is your social media follower count? Content creation is now a viable career, and you can make huge sums if you play your cards right. To do this, you need to create quality content that involves having the correct color grades for your photos. However, where do you start? And, how do you achieve these?
Below is information on Photoshop, a tool that some creators use for color grading and color correction. Additionally, you will discover three simple ways of photoshop color grading that you can use, regardless of your skill level. As such, you will also start releasing quality content and make some money out of it too, ready?
In this article
01 What is the difference between color grading and color correction?
02 3 Simple Ways to Color Grading in Photoshop

What is the difference between color grading and color correction?
Did you even know there was a difference? Well, the answer is yes, and here is how they differ.
Color Grading
Color grading photoshop refers to the final process of content creation. It involves subtle tweaks to your photos to make them more stylish. Some of your reasons may include:
- Adjusting contrast so that you do not hurt your viewers’ eyes.
- Color balancing
- White balancing
- Black leveling
- Luminance adjustments
- Color saturation.
- Saturation
- Hue
- Effects and so on
For example, tweaking your Instagram photo with a retro color scheme is color grading. You can achieve this by using photoshop cinematic color grading.
Color Correction
Color correction refers to the fixes you make when creating your content. It focuses on making changes relevant to your target audience. You can do this during production from the device. For example, you can adjust your camera’s exposure when shooting your stills. As such, they appear more natural and unprocessed.
Additionally, you can do this in post-production, as the first step of your color grading photoshop process.
Some of the fixes you can do for color correction include:
- Eliminating dark spots and red eyes.
- Changing the resolution to fit specific content. For example, you can adjust your photo to a 600 X 300 resolution to put it in a blog post.
- Alternatively, you can color correct photos from different cameras to maintain consistency. Typically, you do this is for related content.
- Finally, the vacation photos you want to share also include your ex. You can color correct them by cropping the section that has you and them.
Now that you know the difference, why should you do them for your photos?
Both processes are essential to creating quality content and vary among creators. Some of the reasons include:
- You want to create a unique style that will make your content instantly recognizable. For example, you will immediately recognize a Quentin Tarantino movie thanks to the emphasis on red in his action scenes. Another example is Tyler Perry. He prefers brighter than usual color schemes.
- Alternatively, you use color grading and color correction to create variation in scenes. For example, you can indicate a throwback photo by making it black and white.
- Additionally, color grading photoshop is an excellent way to elicit different moods. For example, a color scheme that features bright yellows, greens, or blues can indicate different excitement levels.
- Furthermore, you use color correction and color grading to indicate the importance of some scene sections. For example, news briefs are usually brighter than the rest of the shot, especially when displaying important messages, such as breaking news.
- Finally, you do photoshop cinematic color grading to ensure consistency in your photos. Weather is unpredictable and can cause your scenes to vary dramatically. For example, some sections of your location may not receive similar lighting. As such, you can make those sections brighter through color grading in photoshop.
3 Simple Ways to Color Grading in Photoshop
Below are 3 simple ways to color grade in Photoshop.
### 1\. Using Photo FilterPhoto filters allow you to quickly make changes to your content by using Photoshop’s presets. Some of the reasons for using it include:
- You want to remove color bounces on your image.
- Brighten the image.
- Add tints to your photo.
Here is how you do it:
 ZoneAlarm Extreme Security NextGen
1. Open the image
You can do this by using your Photoshop device or selecting it from the program’s library.
2. Open the Photo Filter tool
You will find this in the Adjustments layer of your Photoshop program. Kindly open the menu and select the Photo Filter option. Usually, it is located on the bottom right section of your screen.
 Forex Robotron Basic Package
3. Increase the color density of different colors
Click the active color to open the color wheel. Additionally, you can preserve the brightness by leaving the maintain luminosity option checked. Please note some details will disappear depending on the density level.
4. Cycle between filters
Cycle between different filters by checking the filters option from the same menu. You will find all filter presents from the dropdown menu as per the photo.
4. Add Layers
You can add different layers to the image by clicking the New Adjustment Layer icon at the bottom of the Layers palette. You can make different adjustments by repeating the above process.
2. Using Hue and Saturation
You can also perform color grading in photoshop by making changes using the Hue and Saturation sliders. Here is how you can access them.
- Open the photo you want to make edits on using your Photoshop program.
- On the bottom right corner of the program, you will see Adjustments.
- Then, click on the option to create a new Hue/Saturation adjustment layer.
- A menu will open, where you select Hue/Saturation.
- Use the sliders to color grade and color correct your photo.

Here is how each adjustment affects your photo:
- Hue: Making changes to this slider affects the color of your picture. For example, sliding it right gives you a brighter color scheme, with purple being the maximum.
- Saturation: Changes here affect the density of the color you choose. For example, sliding it left makes the color less dense, giving you the most transparent shade.
- Lightness: The slider affects how bright the color you choose will appear. Sliding it extremely left will make it very dark.
3. Using Paint
Paint is another simple way to color correct and color grade in Photoshop. Additionally, it leaves feeling like an artist if you do it correctly. You can opt for this method if you want to:
• Remove color distortions
Sometimes your photo may contain color bounces. Paint allows you to even out things without the need to estimate the correct color values.
• Add fancy effects to your photos
How cool is it to have a blue sun in your landscape photo? You can do that with paint and get stunning results.
• Remove awkward features
You must have a profile picture where some of your facial features look alien. Instead of deleting it, try some color corrections with paint. The results may stun you, to the point you start looking for lost photo albums. Paint allows you to get rid of weird chins color combinations that leave your audiences questioning your health.
Here is how you can use paint to make your photos stunning:
I. Locate the brush tool from your version of photoshop.
Usually, it is under the Tools menu of the layer screen. Alternatively, you can open it by pressing B on your keyboard.
II. Then, drag it to your photo to start painting.
A menu box will appear where you can set your brush. You can customize the following items:
- Color
- Brush size
- Layer
- Blend Mode
III. You can switch the colors by clicking the main color box to activate the color wheel.
IV. The paint tool offers you different brushes depending on the function. For example, you have a healing brush that repairs pixels and blends them seamlessly with the rest.
Conclusion
● As you can see photoshop color grading is a simple process that results in stunning pictures when you use it correctly. Additionally, you have tons of presets available to simplify your work. An important point to consider is to keep things minimal. Keep checking with us regularly for more insights on how to create quality content with different color correction software.
What is your social media follower count? Content creation is now a viable career, and you can make huge sums if you play your cards right. To do this, you need to create quality content that involves having the correct color grades for your photos. However, where do you start? And, how do you achieve these?
Below is information on Photoshop, a tool that some creators use for color grading and color correction. Additionally, you will discover three simple ways of photoshop color grading that you can use, regardless of your skill level. As such, you will also start releasing quality content and make some money out of it too, ready?
In this article
01 What is the difference between color grading and color correction?
02 3 Simple Ways to Color Grading in Photoshop
What is the difference between color grading and color correction?
Did you even know there was a difference? Well, the answer is yes, and here is how they differ.
Color Grading
Color grading photoshop refers to the final process of content creation. It involves subtle tweaks to your photos to make them more stylish. Some of your reasons may include:
- Adjusting contrast so that you do not hurt your viewers’ eyes.
- Color balancing
- White balancing
- Black leveling
- Luminance adjustments
- Color saturation.
- Saturation
- Hue
- Effects and so on
For example, tweaking your Instagram photo with a retro color scheme is color grading. You can achieve this by using photoshop cinematic color grading.
Color Correction
Color correction refers to the fixes you make when creating your content. It focuses on making changes relevant to your target audience. You can do this during production from the device. For example, you can adjust your camera’s exposure when shooting your stills. As such, they appear more natural and unprocessed.
Additionally, you can do this in post-production, as the first step of your color grading photoshop process.
Some of the fixes you can do for color correction include:
- Eliminating dark spots and red eyes.
- Changing the resolution to fit specific content. For example, you can adjust your photo to a 600 X 300 resolution to put it in a blog post.
- Alternatively, you can color correct photos from different cameras to maintain consistency. Typically, you do this is for related content.
- Finally, the vacation photos you want to share also include your ex. You can color correct them by cropping the section that has you and them.
Now that you know the difference, why should you do them for your photos?
Both processes are essential to creating quality content and vary among creators. Some of the reasons include:
- You want to create a unique style that will make your content instantly recognizable. For example, you will immediately recognize a Quentin Tarantino movie thanks to the emphasis on red in his action scenes. Another example is Tyler Perry. He prefers brighter than usual color schemes.
- Alternatively, you use color grading and color correction to create variation in scenes. For example, you can indicate a throwback photo by making it black and white.
- Additionally, color grading photoshop is an excellent way to elicit different moods. For example, a color scheme that features bright yellows, greens, or blues can indicate different excitement levels.
- Furthermore, you use color correction and color grading to indicate the importance of some scene sections. For example, news briefs are usually brighter than the rest of the shot, especially when displaying important messages, such as breaking news.
- Finally, you do photoshop cinematic color grading to ensure consistency in your photos. Weather is unpredictable and can cause your scenes to vary dramatically. For example, some sections of your location may not receive similar lighting. As such, you can make those sections brighter through color grading in photoshop.
3 Simple Ways to Color Grading in Photoshop
Below are 3 simple ways to color grade in Photoshop.
1. Using Photo Filter
Photo filters allow you to quickly make changes to your content by using Photoshop’s presets. Some of the reasons for using it include:
- You want to remove color bounces on your image.
- Brighten the image.
- Add tints to your photo.
Here is how you do it:
1. Open the image
You can do this by using your Photoshop device or selecting it from the program’s library.

2. Open the Photo Filter tool
You will find this in the Adjustments layer of your Photoshop program. Kindly open the menu and select the Photo Filter option. Usually, it is located on the bottom right section of your screen.
3. Increase the color density of different colors
Click the active color to open the color wheel. Additionally, you can preserve the brightness by leaving the maintain luminosity option checked. Please note some details will disappear depending on the density level.

4. Cycle between filters
Cycle between different filters by checking the filters option from the same menu. You will find all filter presents from the dropdown menu as per the photo.
4. Add Layers
You can add different layers to the image by clicking the New Adjustment Layer icon at the bottom of the Layers palette. You can make different adjustments by repeating the above process.
2. Using Hue and Saturation
You can also perform color grading in photoshop by making changes using the Hue and Saturation sliders. Here is how you can access them.
- Open the photo you want to make edits on using your Photoshop program.
- On the bottom right corner of the program, you will see Adjustments.
- Then, click on the option to create a new Hue/Saturation adjustment layer.
- A menu will open, where you select Hue/Saturation.
- Use the sliders to color grade and color correct your photo.

Here is how each adjustment affects your photo:
- Hue: Making changes to this slider affects the color of your picture. For example, sliding it right gives you a brighter color scheme, with purple being the maximum.
- Saturation: Changes here affect the density of the color you choose. For example, sliding it left makes the color less dense, giving you the most transparent shade.
- Lightness: The slider affects how bright the color you choose will appear. Sliding it extremely left will make it very dark.
 SwifDoo PDF Perpetual (2-PC) Free upgrade. No monthly fees ever.
3. Using Paint
Paint is another simple way to color correct and color grade in Photoshop. Additionally, it leaves feeling like an artist if you do it correctly. You can opt for this method if you want to:
• Remove color distortions
Sometimes your photo may contain color bounces. Paint allows you to even out things without the need to estimate the correct color values.
• Add fancy effects to your photos
How cool is it to have a blue sun in your landscape photo? You can do that with paint and get stunning results.
• Remove awkward features
You must have a profile picture where some of your facial features look alien. Instead of deleting it, try some color corrections with paint. The results may stun you, to the point you start looking for lost photo albums. Paint allows you to get rid of weird chins color combinations that leave your audiences questioning your health.
Here is how you can use paint to make your photos stunning:
I. Locate the brush tool from your version of photoshop.
Usually, it is under the Tools menu of the layer screen. Alternatively, you can open it by pressing B on your keyboard.
II. Then, drag it to your photo to start painting.
A menu box will appear where you can set your brush. You can customize the following items:
- Color
- Brush size
- Layer
- Blend Mode
III. You can switch the colors by clicking the main color box to activate the color wheel.
IV. The paint tool offers you different brushes depending on the function. For example, you have a healing brush that repairs pixels and blends them seamlessly with the rest.
Conclusion
● As you can see photoshop color grading is a simple process that results in stunning pictures when you use it correctly. Additionally, you have tons of presets available to simplify your work. An important point to consider is to keep things minimal. Keep checking with us regularly for more insights on how to create quality content with different color correction software.
- Title: Color Grading Made Simple Photoshop Guide
- Author: Christopher
- Created at : 2024-07-22 13:35:56
- Updated at : 2024-07-23 13:35:56
- Link: https://extra-hints.techidaily.com/color-grading-made-simple-photoshop-guide/
- License: This work is licensed under CC BY-NC-SA 4.0.