
"2024 Approved Clear and Bright Optimizing Visuals in Zoom Calls"
Clear and Bright: Optimizing Visuals in Zoom Calls
Our lives became internet-dependent, especially during Pandemic times. You must have tried things that you have never done before. Pandemic time was the toughest time of all. This is because no one knew what was required to tackle the situation. The schools, offices, universities, everything was shifted to online from the regular physical mode.
During this unpredicted situation, we came across various things and platforms that were nearly non-existent before this. Zoom Meetings are among one of those. This article will discuss in detail Zoom Meetings and Zoom video resolution.
In this article
01 Step by Step Guide to Help You Improve Zoom Video Quality
02 Advanced Tips to Use Zoom Like a Pro
Part 1. Step by Step Guide to Help You Improve Zoom Video Quality
Zoom Meetings is a top-rated tool widely used for video conferencing. As mentioned earlier, the Pandemic era was the hardest time; many changes took place. One great change was that schools, offices, and universities were being managed from home. Zoom Meetings were the most popular medium to communicate and work during this tough time.
Although the tool is very famous for its services, it has never been known for its video quality. If you want to improve the video quality and Zoom recording resolution, keep reading; this section will share various methods.

1. Low Light Adjustment
As we said earlier that Zoom is known for its video conferencing but not its video quality. People don’t know that the video quality could be improved from within Zoom Meetings. The number 1 way is to enable its Low Light Adjustments.
With this setting feature, your video quality remains balanced even if you don’t have enough light. By using this software optimization technique, Zoom Meetings automatically brightens your videos. Follow the steps shared below to enable this setting feature.
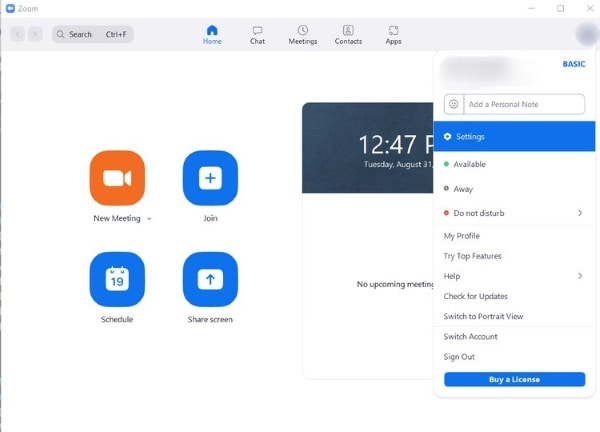
Step 1: Open Video Settings Tab
To enable Low Light Adjustment, first of all, click on your Zoom profile picture and then select the ‘Settings’ option. From the Settings menu list, go for the option of ‘Video.’

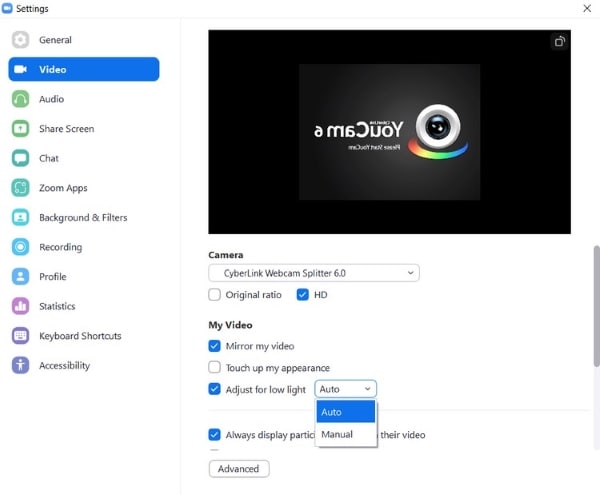
Step 2: Enable the Low Light Setting
First, from the Video section, look for the ‘Adjust for Low Light’ option. Toggle on this option, and then Zoom Meetings will spontaneously adjust the low light settings.
Step 3: Manual Settings
You can also set the Low Light settings manually. For this, you have to select the ‘Manual’ option from the toggle button. A manual slider will show up on the screen to set the brightness.
2. Enable HD
The first thing that should be enabled on Zoom Meetings is high-quality video. Who doesn’t like their video to be clear with the high definition? You can achieve this with Zoom Meetings HD video. With its HD video quality, you can stream in 720p or 1080p.
Surprisingly you can achieve HD quality videos on Zoom Meetings from its settings by activating it. Many of you have no idea about this, so let us guide you on how this could be done.
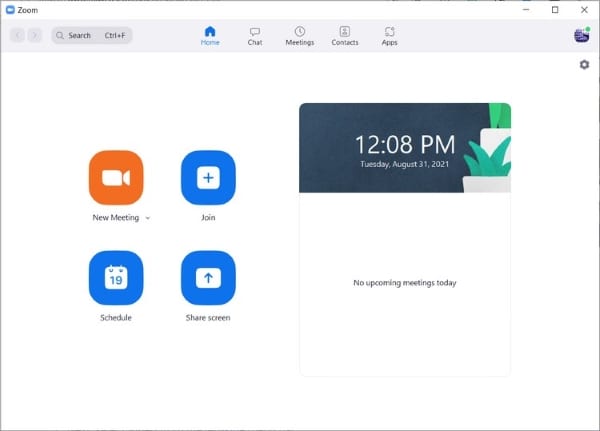
Step 1: Open Settings Section
To open the Settings. Firstly, click on your profile picture, available at the top right corner. A list will open up with this; select the ‘Settings’ option from that list. You can also open ‘Settings’ by clicking on the gear icon in the top right corner.

Step 2: Enable HD Quality
On the ‘Settings’ screen, a menu is displayed on the left side. From that menu, select the ‘Video’ option. Then, from the Video screen, look for the option of HD. After location, click on it to enable it.
 SwifDoo PDF 2-Year Plan
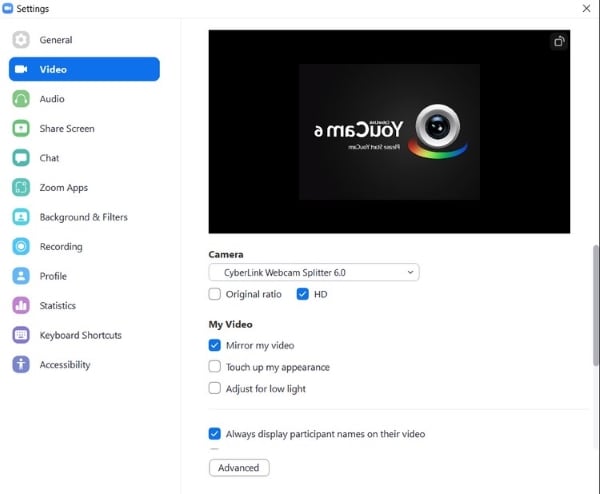
3. Studio Effects
You could do any possible thing to improve your Zoom video resolution. You can also add Studio Effects to your video if it increases and improves the video quality. This is not the best solution, but if it works, you can try it. With Zoom Meetings, you can apply different effects to your appearance. Stay with us to learn this step by step.
Step 1: Head to Settings
The process will start when you launch Zoom Meetings. After that, click on your profile picture and head to the ‘Settings’ section.

Step 2: Select Background and Filters
On the ‘Settings screen,’ a menu list appears on the left side. Locate and select the ‘Background and Filters’ option from that list.
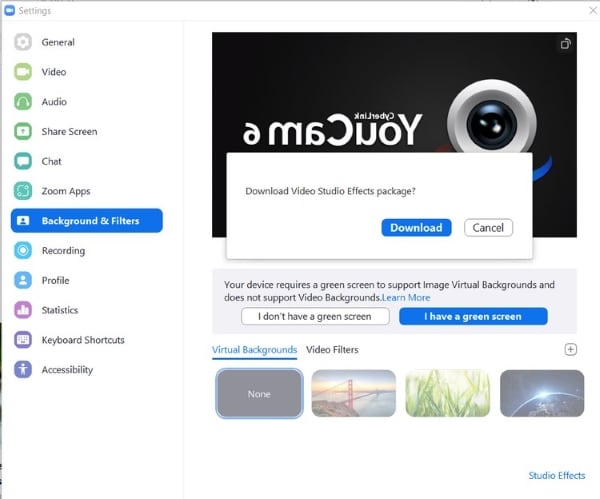
Step 3: Download Studio Effects
Then, move to the bottom of the screen. You will see an option of ‘Studio Effects’; select that. At this point, Zoom will ask you to Download the Studio Effects. You can hit the ‘Download’ button to do that.
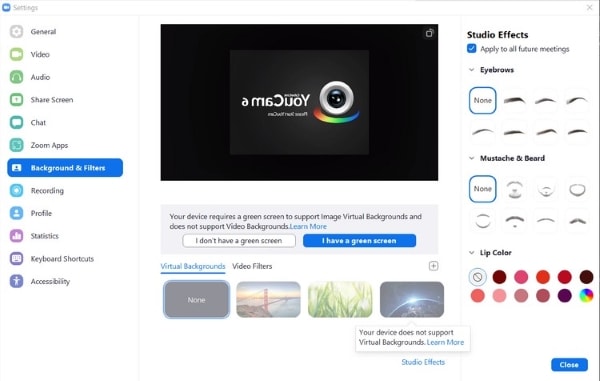
Step 4: Apply your favorite Studio Effects
The Studio Effects are ready to be used as soon as the download is completed. Click on Studio Effects and select the effects you want to add. You can apply the same effects to all your meetings by selecting the ‘Apply to all Future Meetings’ option.
4. Touch Up Appearance
Another way to improve your appearance and Zoom video resolution is by using this built-in feature of Zoom Meetings. This is the ‘Touch Up my Appearance’ feature to enhance your appearance with just a few clicks. The steps to get this done are added below.
Step 1: Open Video Settings
Firstly, launch Zoom Meetings and directly head to Settings by clicking on your profile picture. Then from the ‘Settings’ screen, select the ‘Video’ option from the left side.

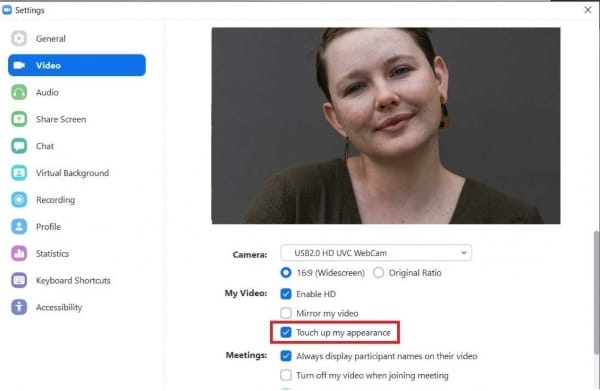
Step 2: Enable ‘Touch up Appearance’
Toggle on the ‘Touch up Appearance’ feature from the Video setting screen. If you are an iOS user, then from the Settings section, select the ‘Meetings’ option. This will guide your way to the ‘Touch up Appearance’ toggle.
.png) Kanto Player Professional
Kanto Player ProfessionalPart 2. Advanced Tips to Use Zoom Like a Pro
Since Zoom Meetings is being used widely, it is essential to know everything about the tool. It has been mentioned earlier that the tool is not known for its video quality, so previously we shared the ways that could be used to improve Zoom video resolution. Here, we will highlight advanced tips to use Zoom Meetings in this section.
· Add Cool Backgrounds
Neither we nor our environment is in the form to instantly join any video conference. What could be done in such a scenario, where you have to join any video conference urgently? If you are using Zoom Meetings, you are lucky enough because you can add customized backgrounds to your video and work like a pro with Zoom.
· Enhance Personal Space
For professional video conferences, you need to be more presentable and active. You don’t have to do much to achieve what you want with Zoom Meetings. Turn on the ‘Touch up Appearance.’ Focus on the lighting where you are going to sit. Lastly, make sure you raise the computer to your eye level. This makes you look active and confident.
· React with Emoji
Another tip for using Zoom Meetings like a pro is its emoji feature. With Zoom Meetings, a video conferencing tool, you can react with emojis on your screen. Even if you are muted, the emojis will speak for you on the screen.
Bottom Line
This article is all about Zoom Meetings. The tool can be used like professionals only if you take notes from this article. We started the discussion by sharing various ways to improve the Zoom video resolution. Later we also talked about a few tips that could be adopted to get comfortable with the tool.
02 Advanced Tips to Use Zoom Like a Pro
 Forex Robotron Gold Package
Part 1. Step by Step Guide to Help You Improve Zoom Video Quality
Zoom Meetings is a top-rated tool widely used for video conferencing. As mentioned earlier, the Pandemic era was the hardest time; many changes took place. One great change was that schools, offices, and universities were being managed from home. Zoom Meetings were the most popular medium to communicate and work during this tough time.
Although the tool is very famous for its services, it has never been known for its video quality. If you want to improve the video quality and Zoom recording resolution, keep reading; this section will share various methods.
1. Low Light Adjustment
As we said earlier that Zoom is known for its video conferencing but not its video quality. People don’t know that the video quality could be improved from within Zoom Meetings. The number 1 way is to enable its Low Light Adjustments.
With this setting feature, your video quality remains balanced even if you don’t have enough light. By using this software optimization technique, Zoom Meetings automatically brightens your videos. Follow the steps shared below to enable this setting feature.
Step 1: Open Video Settings Tab
To enable Low Light Adjustment, first of all, click on your Zoom profile picture and then select the ‘Settings’ option. From the Settings menu list, go for the option of ‘Video.’


Step 2: Enable the Low Light Setting
First, from the Video section, look for the ‘Adjust for Low Light’ option. Toggle on this option, and then Zoom Meetings will spontaneously adjust the low light settings.

Step 3: Manual Settings
You can also set the Low Light settings manually. For this, you have to select the ‘Manual’ option from the toggle button. A manual slider will show up on the screen to set the brightness.
2. Enable HD
The first thing that should be enabled on Zoom Meetings is high-quality video. Who doesn’t like their video to be clear with the high definition? You can achieve this with Zoom Meetings HD video. With its HD video quality, you can stream in 720p or 1080p.
Surprisingly you can achieve HD quality videos on Zoom Meetings from its settings by activating it. Many of you have no idea about this, so let us guide you on how this could be done.
Step 1: Open Settings Section
To open the Settings. Firstly, click on your profile picture, available at the top right corner. A list will open up with this; select the ‘Settings’ option from that list. You can also open ‘Settings’ by clicking on the gear icon in the top right corner.
Step 2: Enable HD Quality
On the ‘Settings’ screen, a menu is displayed on the left side. From that menu, select the ‘Video’ option. Then, from the Video screen, look for the option of HD. After location, click on it to enable it.
3. Studio Effects
You could do any possible thing to improve your Zoom video resolution. You can also add Studio Effects to your video if it increases and improves the video quality. This is not the best solution, but if it works, you can try it. With Zoom Meetings, you can apply different effects to your appearance. Stay with us to learn this step by step.
Step 1: Head to Settings
The process will start when you launch Zoom Meetings. After that, click on your profile picture and head to the ‘Settings’ section.

Step 2: Select Background and Filters
On the ‘Settings screen,’ a menu list appears on the left side. Locate and select the ‘Background and Filters’ option from that list.
Step 3: Download Studio Effects
Then, move to the bottom of the screen. You will see an option of ‘Studio Effects’; select that. At this point, Zoom will ask you to Download the Studio Effects. You can hit the ‘Download’ button to do that.
Step 4: Apply your favorite Studio Effects
The Studio Effects are ready to be used as soon as the download is completed. Click on Studio Effects and select the effects you want to add. You can apply the same effects to all your meetings by selecting the ‘Apply to all Future Meetings’ option.
 Glarysoft File Recovery Pro - Helps to recover your lost file/data, even permanently deleted data.
4. Touch Up Appearance
Another way to improve your appearance and Zoom video resolution is by using this built-in feature of Zoom Meetings. This is the ‘Touch Up my Appearance’ feature to enhance your appearance with just a few clicks. The steps to get this done are added below.
Step 1: Open Video Settings
Firstly, launch Zoom Meetings and directly head to Settings by clicking on your profile picture. Then from the ‘Settings’ screen, select the ‘Video’ option from the left side.
 PaperScan Professional: PaperScan Scanner Software is a powerful TWAIN & WIA scanning application centered on one idea: making document acquisition an unparalleled easy task for anyone.
Parental Control Software
### Step 2: Enable 'Touch up Appearance'Toggle on the ‘Touch up Appearance’ feature from the Video setting screen. If you are an iOS user, then from the Settings section, select the ‘Meetings’ option. This will guide your way to the ‘Touch up Appearance’ toggle.
Part 2. Advanced Tips to Use Zoom Like a Pro
Since Zoom Meetings is being used widely, it is essential to know everything about the tool. It has been mentioned earlier that the tool is not known for its video quality, so previously we shared the ways that could be used to improve Zoom video resolution. Here, we will highlight advanced tips to use Zoom Meetings in this section.
· Add Cool Backgrounds
Neither we nor our environment is in the form to instantly join any video conference. What could be done in such a scenario, where you have to join any video conference urgently? If you are using Zoom Meetings, you are lucky enough because you can add customized backgrounds to your video and work like a pro with Zoom.

· Enhance Personal Space
For professional video conferences, you need to be more presentable and active. You don’t have to do much to achieve what you want with Zoom Meetings. Turn on the ‘Touch up Appearance.’ Focus on the lighting where you are going to sit. Lastly, make sure you raise the computer to your eye level. This makes you look active and confident.
 Power Tools add-on for Google Sheets, 12-month subscription
· React with Emoji
Another tip for using Zoom Meetings like a pro is its emoji feature. With Zoom Meetings, a video conferencing tool, you can react with emojis on your screen. Even if you are muted, the emojis will speak for you on the screen.
Bottom Line
This article is all about Zoom Meetings. The tool can be used like professionals only if you take notes from this article. We started the discussion by sharing various ways to improve the Zoom video resolution. Later we also talked about a few tips that could be adopted to get comfortable with the tool.
02 Advanced Tips to Use Zoom Like a Pro
Part 1. Step by Step Guide to Help You Improve Zoom Video Quality
Zoom Meetings is a top-rated tool widely used for video conferencing. As mentioned earlier, the Pandemic era was the hardest time; many changes took place. One great change was that schools, offices, and universities were being managed from home. Zoom Meetings were the most popular medium to communicate and work during this tough time.
Although the tool is very famous for its services, it has never been known for its video quality. If you want to improve the video quality and Zoom recording resolution, keep reading; this section will share various methods.
1. Low Light Adjustment
As we said earlier that Zoom is known for its video conferencing but not its video quality. People don’t know that the video quality could be improved from within Zoom Meetings. The number 1 way is to enable its Low Light Adjustments.
With this setting feature, your video quality remains balanced even if you don’t have enough light. By using this software optimization technique, Zoom Meetings automatically brightens your videos. Follow the steps shared below to enable this setting feature.
Step 1: Open Video Settings Tab
To enable Low Light Adjustment, first of all, click on your Zoom profile picture and then select the ‘Settings’ option. From the Settings menu list, go for the option of ‘Video.’

Step 2: Enable the Low Light Setting
First, from the Video section, look for the ‘Adjust for Low Light’ option. Toggle on this option, and then Zoom Meetings will spontaneously adjust the low light settings.
Step 3: Manual Settings
You can also set the Low Light settings manually. For this, you have to select the ‘Manual’ option from the toggle button. A manual slider will show up on the screen to set the brightness.

2. Enable HD
The first thing that should be enabled on Zoom Meetings is high-quality video. Who doesn’t like their video to be clear with the high definition? You can achieve this with Zoom Meetings HD video. With its HD video quality, you can stream in 720p or 1080p.
Surprisingly you can achieve HD quality videos on Zoom Meetings from its settings by activating it. Many of you have no idea about this, so let us guide you on how this could be done.
Step 1: Open Settings Section
To open the Settings. Firstly, click on your profile picture, available at the top right corner. A list will open up with this; select the ‘Settings’ option from that list. You can also open ‘Settings’ by clicking on the gear icon in the top right corner.
 Forex Robotron Basic Package
Step 2: Enable HD Quality
On the ‘Settings’ screen, a menu is displayed on the left side. From that menu, select the ‘Video’ option. Then, from the Video screen, look for the option of HD. After location, click on it to enable it.
3. Studio Effects
You could do any possible thing to improve your Zoom video resolution. You can also add Studio Effects to your video if it increases and improves the video quality. This is not the best solution, but if it works, you can try it. With Zoom Meetings, you can apply different effects to your appearance. Stay with us to learn this step by step.
Step 1: Head to Settings
The process will start when you launch Zoom Meetings. After that, click on your profile picture and head to the ‘Settings’ section.

Step 2: Select Background and Filters
On the ‘Settings screen,’ a menu list appears on the left side. Locate and select the ‘Background and Filters’ option from that list.
 SwifDoo PDF Perpetual (2-PC) Free upgrade. No monthly fees ever.
Step 3: Download Studio Effects
Then, move to the bottom of the screen. You will see an option of ‘Studio Effects’; select that. At this point, Zoom will ask you to Download the Studio Effects. You can hit the ‘Download’ button to do that.
Step 4: Apply your favorite Studio Effects
The Studio Effects are ready to be used as soon as the download is completed. Click on Studio Effects and select the effects you want to add. You can apply the same effects to all your meetings by selecting the ‘Apply to all Future Meetings’ option.
4. Touch Up Appearance
Another way to improve your appearance and Zoom video resolution is by using this built-in feature of Zoom Meetings. This is the ‘Touch Up my Appearance’ feature to enhance your appearance with just a few clicks. The steps to get this done are added below.
 CalendarBudget - Monthly subscription membership to CalendarBudget via web browser or mobile app. Support included.
 Step 1: Open Video Settings
Firstly, launch Zoom Meetings and directly head to Settings by clicking on your profile picture. Then from the ‘Settings’ screen, select the ‘Video’ option from the left side.

WPS Office Premium ( File Recovery, Photo Scanning, Convert PDF)–Yearly
Step 2: Enable ‘Touch up Appearance’
Toggle on the ‘Touch up Appearance’ feature from the Video setting screen. If you are an iOS user, then from the Settings section, select the ‘Meetings’ option. This will guide your way to the ‘Touch up Appearance’ toggle.
Part 2. Advanced Tips to Use Zoom Like a Pro
Since Zoom Meetings is being used widely, it is essential to know everything about the tool. It has been mentioned earlier that the tool is not known for its video quality, so previously we shared the ways that could be used to improve Zoom video resolution. Here, we will highlight advanced tips to use Zoom Meetings in this section.
· Add Cool Backgrounds
Neither we nor our environment is in the form to instantly join any video conference. What could be done in such a scenario, where you have to join any video conference urgently? If you are using Zoom Meetings, you are lucky enough because you can add customized backgrounds to your video and work like a pro with Zoom.
· Enhance Personal Space
For professional video conferences, you need to be more presentable and active. You don’t have to do much to achieve what you want with Zoom Meetings. Turn on the ‘Touch up Appearance.’ Focus on the lighting where you are going to sit. Lastly, make sure you raise the computer to your eye level. This makes you look active and confident.
· React with Emoji
Another tip for using Zoom Meetings like a pro is its emoji feature. With Zoom Meetings, a video conferencing tool, you can react with emojis on your screen. Even if you are muted, the emojis will speak for you on the screen.
 TubeDigger - online video downloader from mostly any site
Bottom Line
This article is all about Zoom Meetings. The tool can be used like professionals only if you take notes from this article. We started the discussion by sharing various ways to improve the Zoom video resolution. Later we also talked about a few tips that could be adopted to get comfortable with the tool.
02 Advanced Tips to Use Zoom Like a Pro
 Easy and Safe Partition Software & Hard Disk Manager
Part 1. Step by Step Guide to Help You Improve Zoom Video Quality
Zoom Meetings is a top-rated tool widely used for video conferencing. As mentioned earlier, the Pandemic era was the hardest time; many changes took place. One great change was that schools, offices, and universities were being managed from home. Zoom Meetings were the most popular medium to communicate and work during this tough time.
Although the tool is very famous for its services, it has never been known for its video quality. If you want to improve the video quality and Zoom recording resolution, keep reading; this section will share various methods.
1. Low Light Adjustment
As we said earlier that Zoom is known for its video conferencing but not its video quality. People don’t know that the video quality could be improved from within Zoom Meetings. The number 1 way is to enable its Low Light Adjustments.
With this setting feature, your video quality remains balanced even if you don’t have enough light. By using this software optimization technique, Zoom Meetings automatically brightens your videos. Follow the steps shared below to enable this setting feature.
Step 1: Open Video Settings Tab
To enable Low Light Adjustment, first of all, click on your Zoom profile picture and then select the ‘Settings’ option. From the Settings menu list, go for the option of ‘Video.’
Step 2: Enable the Low Light Setting
First, from the Video section, look for the ‘Adjust for Low Light’ option. Toggle on this option, and then Zoom Meetings will spontaneously adjust the low light settings.
Step 3: Manual Settings
You can also set the Low Light settings manually. For this, you have to select the ‘Manual’ option from the toggle button. A manual slider will show up on the screen to set the brightness.
2. Enable HD
The first thing that should be enabled on Zoom Meetings is high-quality video. Who doesn’t like their video to be clear with the high definition? You can achieve this with Zoom Meetings HD video. With its HD video quality, you can stream in 720p or 1080p.
Surprisingly you can achieve HD quality videos on Zoom Meetings from its settings by activating it. Many of you have no idea about this, so let us guide you on how this could be done.
Step 1: Open Settings Section
To open the Settings. Firstly, click on your profile picture, available at the top right corner. A list will open up with this; select the ‘Settings’ option from that list. You can also open ‘Settings’ by clicking on the gear icon in the top right corner.

Step 2: Enable HD Quality
On the ‘Settings’ screen, a menu is displayed on the left side. From that menu, select the ‘Video’ option. Then, from the Video screen, look for the option of HD. After location, click on it to enable it.
3. Studio Effects
You could do any possible thing to improve your Zoom video resolution. You can also add Studio Effects to your video if it increases and improves the video quality. This is not the best solution, but if it works, you can try it. With Zoom Meetings, you can apply different effects to your appearance. Stay with us to learn this step by step.

Step 1: Head to Settings
The process will start when you launch Zoom Meetings. After that, click on your profile picture and head to the ‘Settings’ section.

Step 2: Select Background and Filters
On the ‘Settings screen,’ a menu list appears on the left side. Locate and select the ‘Background and Filters’ option from that list.
Step 3: Download Studio Effects
Then, move to the bottom of the screen. You will see an option of ‘Studio Effects’; select that. At this point, Zoom will ask you to Download the Studio Effects. You can hit the ‘Download’ button to do that.
Step 4: Apply your favorite Studio Effects
The Studio Effects are ready to be used as soon as the download is completed. Click on Studio Effects and select the effects you want to add. You can apply the same effects to all your meetings by selecting the ‘Apply to all Future Meetings’ option.
4. Touch Up Appearance
Another way to improve your appearance and Zoom video resolution is by using this built-in feature of Zoom Meetings. This is the ‘Touch Up my Appearance’ feature to enhance your appearance with just a few clicks. The steps to get this done are added below.
### Step 1: Open Video SettingsFirstly, launch Zoom Meetings and directly head to Settings by clicking on your profile picture. Then from the ‘Settings’ screen, select the ‘Video’ option from the left side.
Step 2: Enable ‘Touch up Appearance’
Toggle on the ‘Touch up Appearance’ feature from the Video setting screen. If you are an iOS user, then from the Settings section, select the ‘Meetings’ option. This will guide your way to the ‘Touch up Appearance’ toggle.
Part 2. Advanced Tips to Use Zoom Like a Pro
Since Zoom Meetings is being used widely, it is essential to know everything about the tool. It has been mentioned earlier that the tool is not known for its video quality, so previously we shared the ways that could be used to improve Zoom video resolution. Here, we will highlight advanced tips to use Zoom Meetings in this section.
 ZoneAlarm Pro Antivirus + Firewall NextGen
· Add Cool Backgrounds
Neither we nor our environment is in the form to instantly join any video conference. What could be done in such a scenario, where you have to join any video conference urgently? If you are using Zoom Meetings, you are lucky enough because you can add customized backgrounds to your video and work like a pro with Zoom.

· Enhance Personal Space
For professional video conferences, you need to be more presentable and active. You don’t have to do much to achieve what you want with Zoom Meetings. Turn on the ‘Touch up Appearance.’ Focus on the lighting where you are going to sit. Lastly, make sure you raise the computer to your eye level. This makes you look active and confident.

Key features:
• Import from any devices and cams, including GoPro and drones. All formats supported. Сurrently the only free video editor that allows users to export in a new H265/HEVC codec, something essential for those working with 4K and HD.
• Everything for hassle-free basic editing: cut, crop and merge files, add titles and favorite music
• Visual effects, advanced color correction and trendy Instagram-like filters
• All multimedia processing done from one app: video editing capabilities reinforced by a video converter, a screen capture, a video capture, a disc burner and a YouTube uploader
• Non-linear editing: edit several files with simultaneously
• Easy export to social networks: special profiles for YouTube, Facebook, Vimeo, Twitter and Instagram
• High quality export – no conversion quality loss, double export speed even of HD files due to hardware acceleration
• Stabilization tool will turn shaky or jittery footage into a more stable video automatically.
• Essential toolset for professional video editing: blending modes, Mask tool, advanced multiple-color Chroma Key
· React with Emoji
Another tip for using Zoom Meetings like a pro is its emoji feature. With Zoom Meetings, a video conferencing tool, you can react with emojis on your screen. Even if you are muted, the emojis will speak for you on the screen.
Bottom Line
This article is all about Zoom Meetings. The tool can be used like professionals only if you take notes from this article. We started the discussion by sharing various ways to improve the Zoom video resolution. Later we also talked about a few tips that could be adopted to get comfortable with the tool.
- Title: 2024 Approved Clear and Bright Optimizing Visuals in Zoom Calls
- Author: Christopher
- Created at : 2024-07-22 11:14:07
- Updated at : 2024-07-23 11:14:07
- Link: https://extra-hints.techidaily.com/2024-approved-clear-and-bright-optimizing-visuals-in-zoom-calls/
- License: This work is licensed under CC BY-NC-SA 4.0.